Public Kiosk Manual
The NOAA SOS Public Kiosk (“Public Kiosk”) software initially debuted with the SOS 5.0 release. It provides a touch screen controller intended for a general public audience to interact with a Science On a Sphere® (SOS) exhibit when there is no docent present. It has some similarities with other third party kiosks created in the past for SOS, such as the Bishop Museum’s kiosk. The motivation for building the Public Kiosk was to provide a flexible and easy-to-administer public controller that can be localized to native languages by using standard SOS playlists.
The Public Kiosk is fully supported by its NOAA software developers and is included as part of the normal SOS customer support. Suggestions for new features and submissions of bug reports is highly encouraged to keep improving the Public Kiosk into the future, so please email sos.support@noaa.gov.
System Requirements
Permalink to System RequirementsThe Public Kiosk software runs on a PC running Microsoft Windows. Details about the system can be found in the Equipment List.
Installation and Setup
Permalink to Installation and SetupThe Public Kiosk software is available to all current SOS customers at no cost upon request by emailing sos.support@noaa.gov. Instructions will be provided on how to download the software, which is provided as a standard Windows setup.exe program that unpacks and installs the software as well as the default configuration files on the PC. Most of the files reside under C:\shared\sos\kiosk, so the Windows user must have privileges to write to the C: drive. The kiosk software doesn’t use the Windows registry. Approximately 80MB of disk space is required for the software and data files.
Once installed, the hostname or IP address of the SOS machine must be changed in the kiosk_server property for the Kiosk to operate. See the Administration User Interface section for more information. To tell if the Public Kiosk is correctly connected to the SOS machine, look at the colored dot in the lower left corner of the Public User Interface. If it is green, the connection is working correctly, but if it is red, they are not connected and either the settings or the networking must be changed.
The Public Kiosk software may occasionally crash, leaving the Windows PC with the desktop showing. To remedy this situation, you can install an application that will automatically detect that the kiosk is no longer running and restart it automatically. One free application that does this is called Restart On Crash and it has been successfully used with the Public Kiosk. Instructions on how to download and install this utility are described in Appendix D. There are many other Windows restart applications available that may work with the Public Kiosk and NOAA is not specifically endorsing the use of Restart On Crash.
Quick Start
Permalink to Quick StartThe Public Kiosk has two main user interfaces (UIs), one for public interaction with SOS and another for administration of the kiosk. The public UI is normally the one displayed and is described in this section, while the latter is described in the Admin UI section.
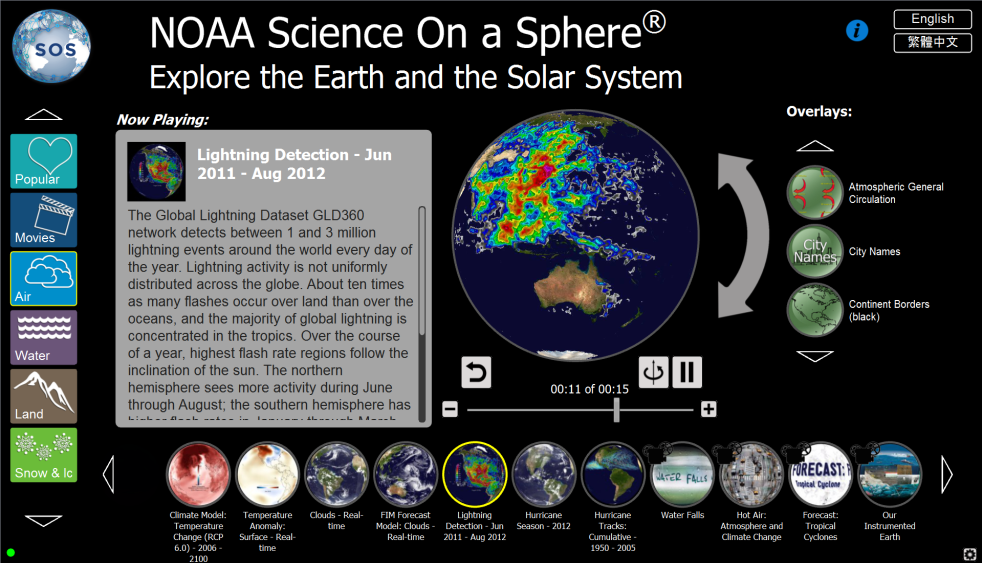
The default configuration of the Kiosk’s public user interface.
Major Components of the public UI
Permalink to Major Components of the public UI1. Title Area
Permalink to 1. Title AreaLocated at the top. This area includes a logo image at the left, title and subtitle text, an information button (“i” symbol), and a group of language buttons. The language buttons transform the language of the UI to the selected choice. The supported languages are preselected by each venue (see the Localization/Translations to Non-English Languages section for information on how to set up translations).
2. Groups Column
Permalink to 2. Groups ColumnLocated on the left side. This is a scrollable set of rectangular buttons, each of which defines a related set of datasets. By default, these are largely the same as the Major Categories in the SOS Data Catalog, but can be changed to fit each venue’s needs (see the Group and Dataset Configuration section).
3. Datasets Row
Permalink to 3. Datasets RowLocated on the bottom. This is a scrollable set of circular buttons, each of which defines a dataset for the currently selected group. By default, these are NOAA’s selection of the best and most popular datasets for each group, but can be changed to fit each venue’s needs (see the Group and Dataset Configuration section).
4. Overlays Column
Permalink to 4. Overlays ColumnLocated on the right side. This is a scrollable set of circular buttons, each of which defines an overlay dataset that may be shown on top of the current dataset. By default, these are all of NOAA’s set of overlay datasets, but fewer may be shown to can fit with the venue’s needs.
5. Information Box
Permalink to 5. Information BoxLocated left of center. This is a text area that usually displays a brief description of the currently selected dataset. When the information button is selected, this area displays an introduction to SOS and instructions on how to use the Public Kiosk.
6. Sphere Controls
Permalink to 6. Sphere ControlsLocated right of center. This is a collection of controls to manipulate the sphere. A spherical trackball controller is used to drag the sphere horizontally and vertically with curved arrow next to it used to tilt the sphere (by tapping or dragging it). Below the sphere are buttons to reset the sphere position, play or pause it, turn globe rotation on/off for animations, step one frame backward/forward, and a frame slider.
7. Administration UI Button
Permalink to 7. Administration UI ButtonLocated lower right corner. The “gear” button is used to access the user interface for kiosk administration controls. It includes the ability to lock the kiosk UI when a presenter is using the iPad controller.
Basic workflow
Permalink to Basic workflow- Select a Group (Component #2) and scroll through its Datasets (Component #3)
- Select a Dataset (Component #3) and watch it appear on SOS and on the trackball controller (Component #6)
- Read about the currently playing dataset in the Information Box (Component #5)
- Use the Sphere Controls (Component #6) to position the sphere and change which frames are displayed on SOS
- Select one or more Overlays (Component #4) to display an overlay on top of the Dataset currently playing on SOS
- Repeat these steps as long as desired
Other options
Permalink to Other options- Select the Information Button (Component #1) to display information about SOS or how to use the kiosk (Component #5)
- Select a language button (Component #1) to change the language text used in the kiosk
Configuring Public Kiosk Settings
Permalink to Configuring Public Kiosk SettingsThe Public Kiosk has default settings carefully selected by NOAA that will work well at many SOS sites. However, there are many ways to customize the kiosk to suit the needs of a particular venue:
- Administration User Interface
- Group and Dataset Configuration
- Localization/Translations to Non-English Languages
Each of these of configurations is described in their own sections in this manual. The underlying file structure used by the Public Kiosk is also fully described for reference in Appendix A.
Administration User Interface
Permalink to Administration User InterfaceThe Public Kiosk is highly configurable using the Administration User Interface (Admin UI), which is launched by pressing the gear icon in the lower right corner of the Public UI. A numeric keypad appears to enter a 4-digit administration passcode (the default is 1234, which should be changed!). The back-arrow key is used to delete a mistyped digit. Note that if the kiosk was previously locked, a 4-digit lock code must be entered (the default is 4321, which should also be changed).
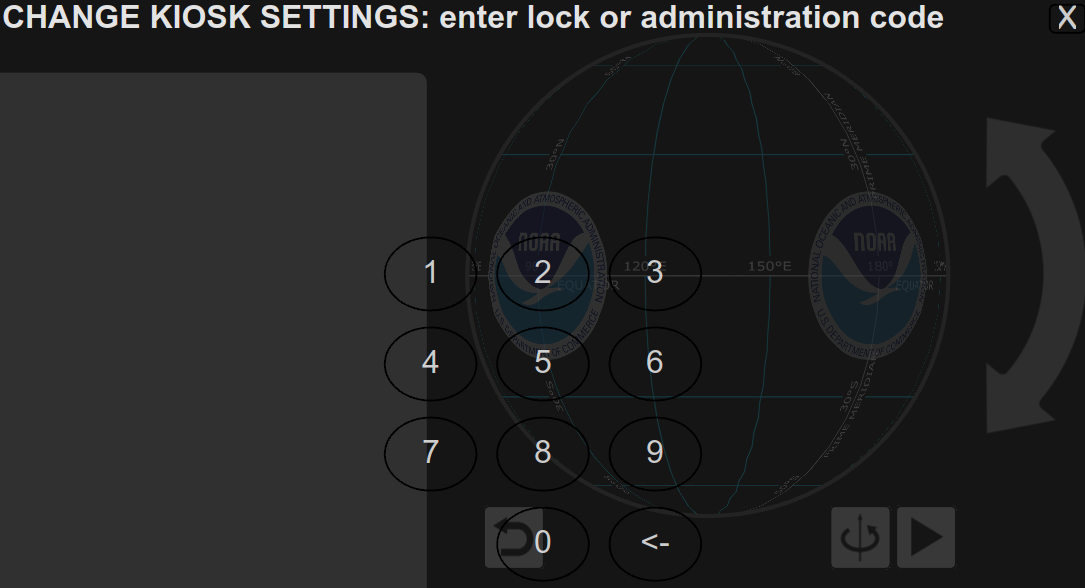
The Admin UI must be unlocked using a 4-digit passcode.
The Admin UI has five tabs (described below) and a set of common buttons, Apply and Close at the bottom right and X at the top right, that are used for all options. Apply must be pressed for changes to be saved. Pressing either Close or X simply dismisses the Admin UI without saving changes made.
Viewpoint Tab
Permalink to Viewpoint Tab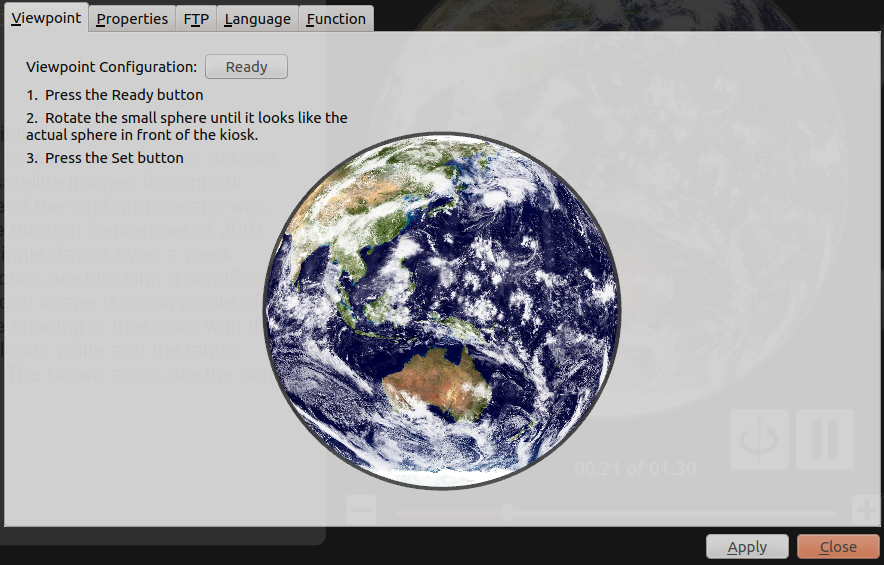
The Viewpoint tab
The Viewpoint tab controls are used to correctly set the position of the images in the trackball controller relative to the SOS origin.
Normally this operation is only required once when the Public Kiosk is first set up.
- Press the Ready button to begin
- Rotate the sphere image until it matches what is displayed on SOS directly in front of the kiosk
- Press the Set button to finish
Properties Tab
Permalink to Properties Tab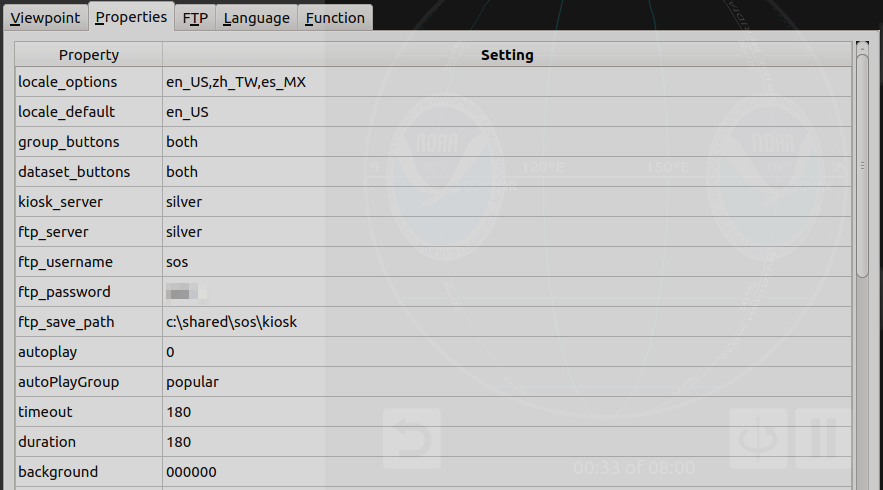
The Properties tab
The Properties tab presents a table of kiosk properties and controls to change their settings. Colors are represented with hexadecimal characters for red-green-blue that are set using a popup Color Chooser. Numbers are set using a graphical Numeric Keypad or a dropdown Number Chooser, and text is set using a Graphical Keyboard. Examples of each of these controls are given after the property list. Note that for more extensive editing, a regular keyboard may be attached to the kiosk machine and used instead of the graphical keyboard and numeric keypad.
Properties
Permalink to Propertieslocale_options
Permalink to locale_optionsDefault: en_US.
A comma separated list of localization strings for the languages supported in the kiosk. It must include the locale_default value in the list. These are used to specify the language buttons shown. If only one locale is specified, the language buttons are hidden. Set using the Graphical Keyboard.
For example, to use American English, Mexican Spanish, and Traditional Chinese in Taiwan, the value would be: en_US,es_MX,zh_TW. If new locale_options are added, it is necessary to restart the kiosk for them to take effect.
locale_default
Permalink to locale_defaultDefault: en_US (English in the United States).
The localization string for the language in which the kiosk starts. The localization string uses the ISO 639-1 two letter code for language an underscore (“_”) and then the ISO 3166 for the country or region. Set using the Graphical Keyboard.
group_buttons
Permalink to group_buttonsDefault: both.
Options for showing text and/or an image for Groups. In this version of the kiosk, both is always used.
dataset_buttons
Permalink to dataset_buttonsDefault: both.
Options for showing text and/or an image for datasets. In this version of the kiosk, both is always used.
kiosk_server
Permalink to kiosk_serverDefault: 127.0.0.1.
The name or IP address of the SOS machine (typically something like sos1). The default will not work and must be changed to a valid value. Set using the Graphical Keyboard.
ftp_server
Permalink to ftp_serverDefault: 127.0.0.1.
The name or IP address of the machine configured for FTP (typically the SOS machine, something like sos1). The default will not work and must be changed to a valid value. Set using the Graphical Keyboard.
ftp_username
Permalink to ftp_usernameDefault: test.
The username being used for FTP transfers on the SOS machine (typically something like sos). The default will not work and must be changed to a valid value. Set using the Graphical Keyboard.
ftp_password
Permalink to ftp_passwordDefault: test.
The password being used for FTP transfers on the SOS machine (typically the password used for the sos user). The default will not work and must be changed to a valid value. Set using the Graphical Keyboard.
ftp_save_path
Permalink to ftp_save_pathDefault = C:\shared\sos\kiosk.
The root directory on the Windows kiosk machine where the Public Kiosk data files are installed. Normally will not need to be changed. Set using the Graphical Keyboard.
autoplay
Permalink to autoplayDefault: 0.
Analogous to the SOS Autorun mode, this property controls the behavior for automatically playing datasets in the kiosk. Set using the Numeric Keypad.
- 0 (off)
- manual mode only
- 1 (on)
- cycles repeatedly through all the datasets in the Group specified by the value of the autoPlayGroup property
- 2 (on)
- cycles randomly through all the datasets in the kiosk
When autoplay is on, each dataset plays for the length of time specified by the duration property. If autoplay is interrupted by a person manually selecting a dataset, the autoplay will restart again after a length of time specified by the timeout property until interrupted.
autoPlayGroup
Permalink to autoPlayGroupDefault: popular.
Used when autoplay is set to 1 and specifies the group from which datasets will be automatically displayed. Set using the Graphical Keyboard.
timeout
Permalink to timeoutDefault: 180.
Length of time in seconds after autoplay is interrupted before the autoplay resumes (when autoplay's value is 1 or 2).
duration
Permalink to durationDefault: 180.
Length of time in seconds that a dataset will be displayed when autoplay is turned on (value = 1 or 2) before switching to the next dataset. Datasets that are narrated movies will play to the end even if they are longer than the duration time.
background
Permalink to backgroundDefault: 000000 (black).
The color used for the main area of the kiosk background. Set using the Color Chooser.
fontcolor
Permalink to fontcolorDefault: ffffff (white).
The color of the text in the main area of the kiosk. Set using the Color Chooser.
banner_background
Permalink to banner_backgroundDefault: 000000 (black).
The color of the Title Area of the kiosk background. Set using the Color Chooser.
banner_fontcolor
Permalink to banner_fontcolorDefault: ffffff (white).
The color of the text in the Title Area of the kiosk. Set using the Color Chooser.
circlecolor
Permalink to circlecolorDefault: 555555, gray.
The color of the border drawn around the Dataset and Overlay circular buttons. Set using the Color Chooser.
nowcolor
Permalink to nowcolorDefault: ffff00, yellow.
The color of the border drawn around the currently selected Group, Dataset, and Overlay buttons. Set using the Color Chooser.
content_fontsize
Permalink to content_fontsizeDefault: 18.
The font size of the text in the Information Box. Set using the Number Chooser.
title_fontsize
Permalink to title_fontsizeDefault: 48.
The font size of the text in the main title. Set using the Number Chooser.
subtitle_fontsize
Permalink to subtitle_fontsizeDefault: 36.
The font size of the text in the secondary title. Set using the Number Chooser.
langbtn_fontcolor
Permalink to langbtn_fontcolorDefault: 000000 (black).
The color of the text used for the language buttons. Set using the Color Chooser.
langbtn_bordercolor
Permalink to langbtn_bordercolorDefault: 000000 (black).
The color of the border around each language button. Set using the Color Chooser.
password
Permalink to passwordDefault: 1234.
The 4-digit passcode used to open the Administration UI. This should be changed to a different value that is less easily guessed. Set using the Numeric Keypad.
lockcode
Permalink to lockcodeDefault: 4321.
The 4-digit passcode to lock and unlock the kiosk. This should be changed to a different value that is less easily guessed. Set using the Numeric Keypad.
sphere_load_delay
Permalink to sphere_load_delayDefault: 5.
The length of time in seconds that the kiosk waits after a dataset has been selected before it will allow another dataset to be selected. This prevents a user from rapidly selecting datasets in succession, which causes SOS to cycle too quickly between datasets. Set using the Numeric Keypad.
sync_enable
Permalink to sync_enableDefault: 1.
Synchronize rotation of the trackball image with the SOS display. Use 0 to turn this off if the kiosk computer or networking equipment used is unable to handle the increased system load this feature may cause. Set using the Numeric Keypad.
Color Chooser Example
Permalink to Color Chooser Example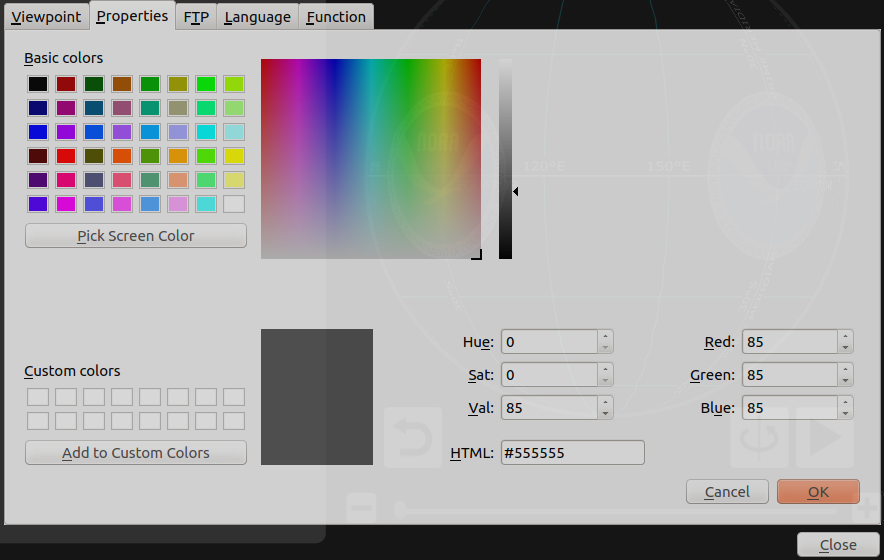
The Color Chooser
The Color Chooser interface is used to set a color, such as for backgrounds, text, and button borders. It provides a variety of options for picking a color, including selecting 1 of 64 basic colors, making your own custom color by clicking in a rectangular color grid, and entering numerical values into boxes for Hue/Saturation/Value (HSV), Red/Green/Blue (RGB), or as a 6-digit hexadecimal HTML number. The best way to learn how these controls work is to experiment with them and try out different ways to create the colors you want. The Color Chooser has the ability to remember particular colors you like with the Add to Custom Colors button. These Custom colors can then be picked and used for other kiosk color properties, but note that they won't be remembered the next time the kiosk is restarted (however, any colors saved as properties are definitely preserved).
When you are finished, press OK to accept the new color or Cancel to keep the previous color.
Numeric Keypad Example
Permalink to Numeric Keypad Example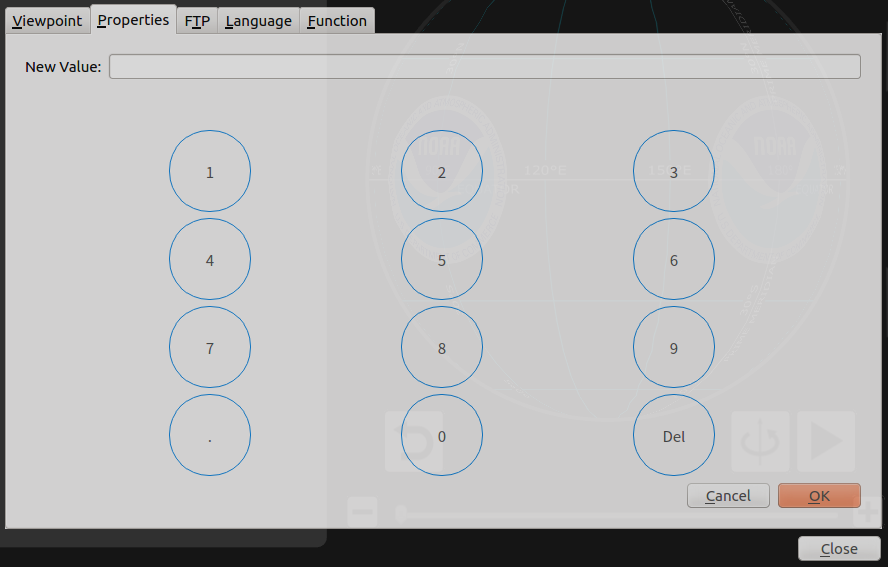
The Numeric Keypad
The Numeric Keypad interface is used to set a numeric value, such as passcodes. Use the Del button to delete that last typed digit. When you are finished, press OK to accept the new numbers or Cancel to keep the previous numbers.
Number Chooser Example
Permalink to Number Chooser Example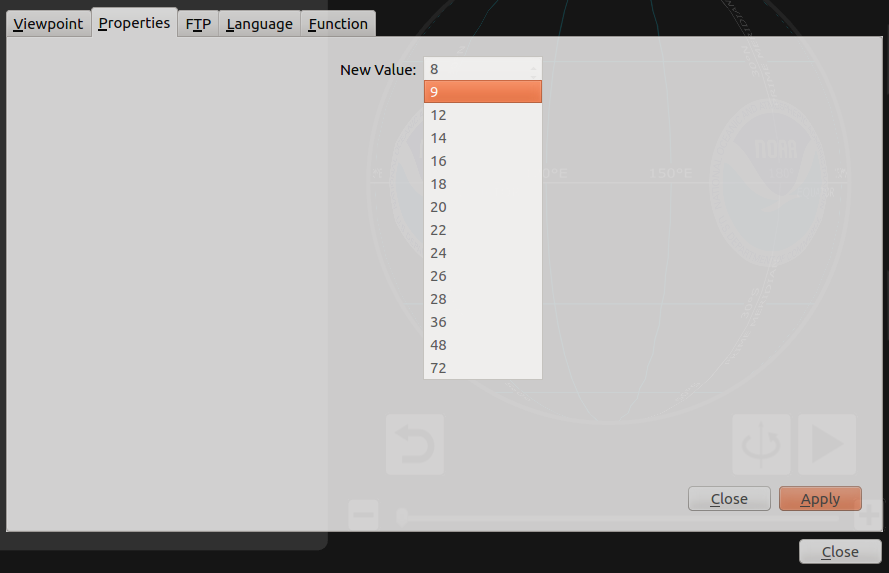
The Number Chooser
The Number Chooser interface is used to set a numeric value from a dropdown list of choices, such as font sizes. Select the desired value and use the Apply button to change the value or the Close button (next to Apply) to discard changes and keep the old value.
Graphical Keyboard Example
Permalink to Graphical Keyboard Example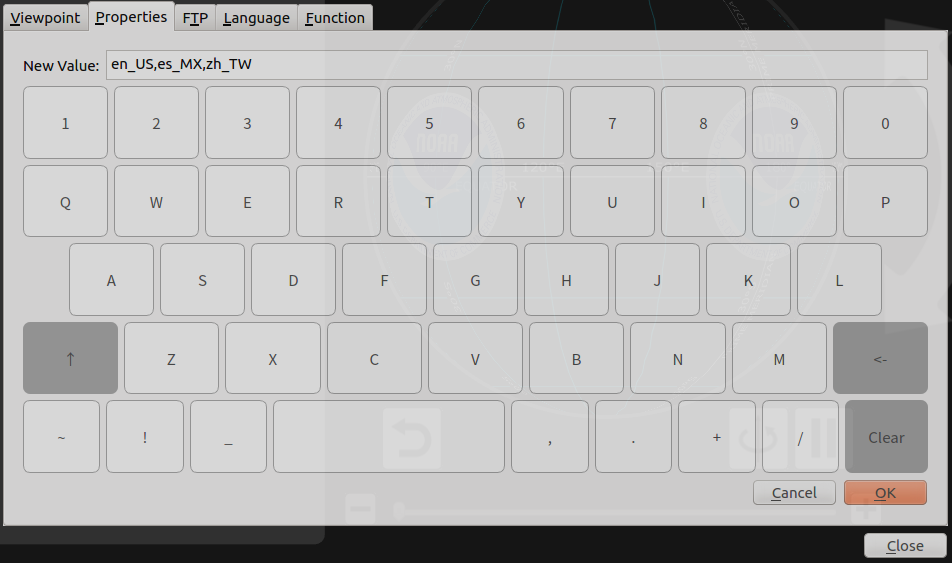
The Graphical Keyboard
The Graphical Keyboard interface is used to set text values and simulates a physical keyboard. Use Clear to delete all the text, the back arrow key to delete the last typed character, and the up arrow key to shift to type alternative characters. When you are finished, press OK to accept the new text or Cancel to keep the previous text.
FTP Tab
Permalink to FTP Tab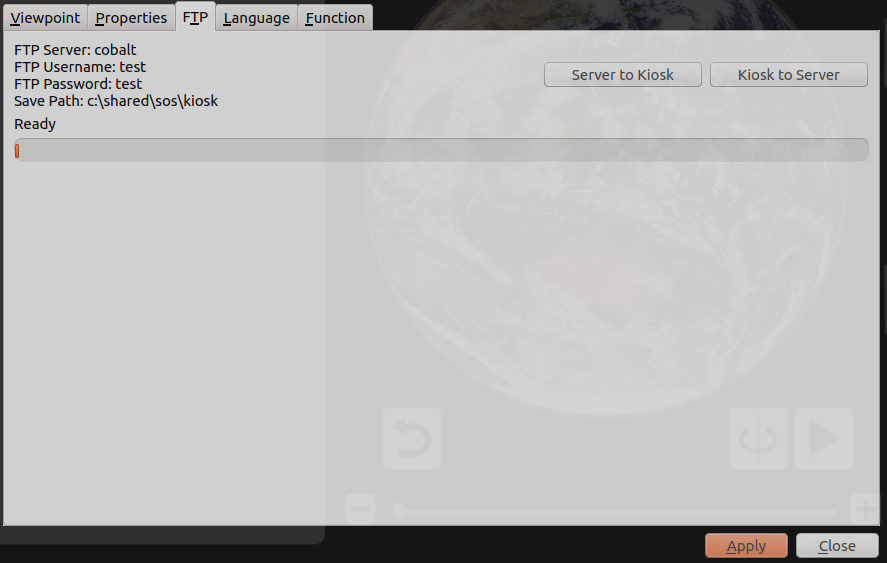
The FTP Tab
The FTP tab controls are used to transfer kiosk-related files between the Windows Kiosk machine and the Ubuntu SOS Server using the industry standard File Transfer Protocol (FTP). This functionality replaces the need to use external file transfer tools. The properties in the upper left of the pane are all defined in the Properties tab and are normally set only once when the kiosk is first set up. The buttons on the right side are used to initiate a transfer in the direction indicated. The progress bar shows the file transfer activity as it occurs.
Server to Kiosk
Permalink to Server to KioskThis option copies files from the SOS machine to the kiosk. This needs to be used whenever the media2kiosk command line utility has been run on the SOS machine to update which groups and datasets are shown on the kiosk, along with related text including translations.
Kiosk to Server
Permalink to Kiosk to ServerThis option copies file from the kiosk to the SOS machine. This generally needs to be done only once after the kiosk is installed and its purpose is to copy the default kiosk configuration to the SOS machine so it can be customized. If there are no files in the /shared/sos/kiosk directory on the SOS machine, this option will copy those files from the kiosk as the initial starting point.
The purposes of the files transferred are described below in the sections entitled Group and Dataset Configuration and Localization/Translations to Non-English Languages. For even more information, the file structure is documented in Appendix A. Also, an FTP server must be set up on the SOS machine in order for these options to work properly (see Appendix B for instructions).
Language Tab
Permalink to Language Tab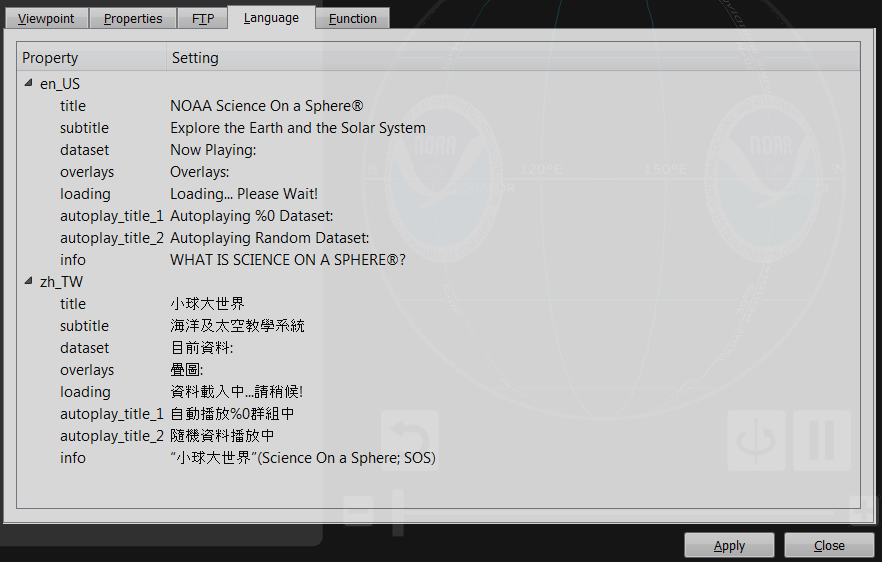
The Language Tab
The Language tab controls are used to set the text for the small amount of text in the Public user interface of the kiosk for each of the languages specified by the locale_options property (described above). Note that this tab is not used to translate groups, dataset names and descriptions, or text in the Admin UI, which are described in the SOS Translations Manual.
Properties
Permalink to Propertiestitle
Permalink to titleThe text for the upper part of the Title Area. This is the primary text for the Kiosk and normally has the largest font size.
subtitle
Permalink to subtitleThe text for the lower part of the Title Area. This is the secondary text for the Kiosk and normally has the second largest font size.
dataset
Permalink to datasetThe text appearing immediately above the Information Box. This text appears when a user has selected a dataset manually.
overlays
Permalink to overlaysThe text appearing at the top of the Overlays Column. This text indicates the purpose of the overlays dataset thumbnail buttons below it.
autoplay_title_1
Permalink to autoplay_title_1New in v5.2.
The text appearing immediately above the Information Box. This text appears when the autoplay property is set to 1 (cycles within a group). The %0 symbol is a placeholder for the group specified by the autoPlayGroup value and is automatically filled in by the software.
autoplay_title_2
Permalink to autoplay_title_2New in v5.2.
The text appearing immediately above the Information Box. This text appears when the autoplay property is set to 2 (randomly chosen from all the datasets).
info
Permalink to infoThe text that appears in the Information Box when the information button (i symbol) is pressed in the Title Area. Note that this is actually a multi-line block of text with only the first line showing in the Language tab. It contains an introduction to SOS and brief instructions on how to use the Public Kiosk controls.
To edit the value of any of any text property, just click in the Setting field space next to it and use the Graphical Keyboard to edit the text. If there are characters you need that are not available in the Graphical Keyboard, you will need to attach a physical keyboard and mouse, then copy and paste the text you want from another source, such as a website or text document. If you add a new language to the kiosk with the locale_options property, the Language tab will show its text properties with blank lines for the translations. If there are any blank values in the Language tab, the kiosk will use default American English text.
Function Tab
Permalink to Function Tab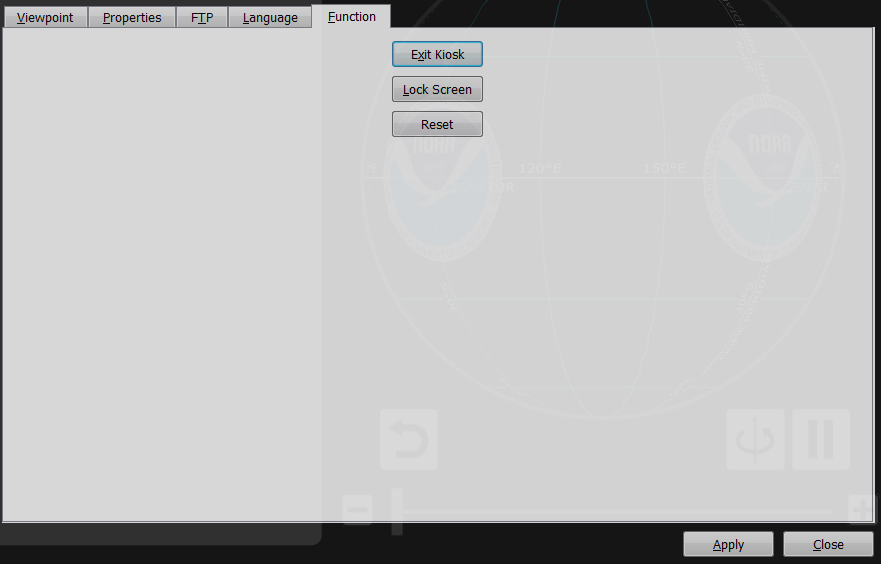
The Function Tab
The Function tab has buttons to close the kiosk application, to lock down its operations, and reset the properties.
- Exit Kiosk closes the kiosk interface and terminates the program. This is typically used only when administrative work is needed on the kiosk machine and normally the kiosk will always be up and running
- Lock Screen locks the kiosk user interface so that none of its controls can be operated and autoplay is suspended. This should be done whenever a presenter is using the iOS Remote App to control SOS. A separate 4-digit lockcode is entered to unlock the kiosk
- Reset resets all the properties to their default values
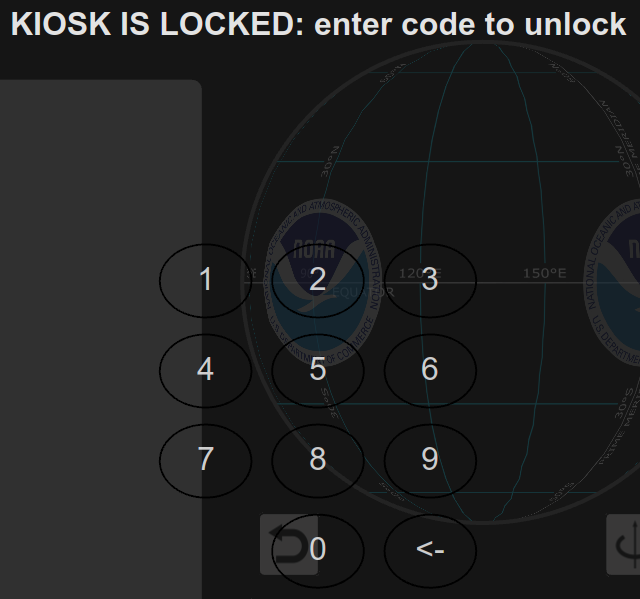
When the kiosk is locked no user input is accepted until someone enters a 4-digit lockcode to unlock it.
Groups and Dataset Configuration
Permalink to Groups and Dataset ConfigurationThe default groups and datasets provided with the Public Kiosk setup may work well for your venue, but are easily changed to better suit your intended SOS viewers. The Public Kiosk defines which groups and datasets are displayed by using standard SOS playlists that reside under /shared/sos/kiosk/playlists on the SOS machine. General information about SOS playlists is available in the Playlist Format Reference.
Organization of Groups and Datasets in Playlists
Permalink to Organization of Groups and Datasets in Playlistskiosk.sos
Permalink to kiosk.sosThe kiosk.sos playlist has include lines for all the playlists that define each group. The order they appear in the kiosk.sos playlist is how they are displayed in the kiosk UI.
# Public Kiosk

# Kiosk logo
icons = /shared/sos/kiosk/images/n.png

# Kiosk ordered group playlists

# popular group
include = /shared/sos/kiosk/playlists/groups/popular.sos

# movies group
include = /shared/sos/kiosk/playlists/groups/movies.sos

# air group
include = /shared/sos/kiosk/playlists/groups/air.sos

# water group
include = /shared/sos/kiosk/playlists/groups/water.sos

# land group
include = /shared/sos/kiosk/playlists/groups/land.sos

# snow_and_ice group
include = /shared/sos/kiosk/playlists/groups/snow_and_ice.sos

# space group
include = /shared/sos/kiosk/playlists/groups/space.sos

# people group
include = /shared/sos/kiosk/playlists/groups/people.sos
The default kiosk.sos playlist file
groups Directory
Permalink to groups DirectoryThe groups/ directory contains all the group playlists included in kiosk.sos. Each group playlist has include lines for each of the datasets that appear in the kiosk when that group’s button is selected.
# Public Kiosk
# Ordered Datasets for Display on the Sphere

# Group: land
icons = /shared/sos/kiosk/images/groups/land-kiosk.jpg

# ID_82: Blue Marble
include = /shared/sos/media/land/blue_marble/blue_marble/playlist.sos

# ID_88: ETOPO1: Topography and Bathymetry
include = /shared/sos/media/land/etopo1/playlist.sos

# ID_118: Age of the Seafloor (topography)
include = /shared/sos/media/land/sea_floor_age/topo/playlist.sos

# ID_127: Earthquakes - Real-time
include = /shared/sos/rt/noaa/quake/hires/playlist/playlist.sos

# ID_472: Dams and Reservoirs - 1800 - 2100
include = /shared/sos/media/land/dams/global/playlist.sos
An excerpt from the land.sos group playlist.
Customizing Groups, Datasets, and Graphics
Permalink to Customizing Groups, Datasets, and GraphicsIf this is the first time you are customizing your Public Kiosk groups or datasets, it is necessary to transfer the default kiosk playlist files to your SOS machine from the kiosk machine using the controls in the FTP tab of the Admin UI. It is important to note that this step should only be done the first time as a starting point for you to make your changes and will not be needed again.
Decide how you will be editing the kiosk text files. Currently the recommended approach is to use a standard text editor such as vim or gedit. In the future you may be able to use other tools such as the Visual Playlist Editor to do your edits.
Edit the kiosk.sos File
Permalink to Edit the kiosk.sos FileYou can change the value of the icons property if you’d like to replace the
NOAA logo with one of your own. For best results, use a size similar to the NOAA
logo’s dimensions, which is 260x260 pixels. Copy your logo image file into the
/shared/sos/kiosk/images/ directory and change the icons value to
match its path.
Edit, remove, or add include lines to the dataset groups you plan to use in
the kiosk. Each include line refers to a group playlist that will appear in the
public UI represented with a rectangular group button. The groups will appear in
the kiosk in the same order (top-to-bottom) as they are listed in the
kiosk.sos file.
Create New or Edit Existing Groups
Permalink to Create New or Edit Existing GroupsTo create a new group, start by copying an existing group playlist file to a new name. The filename stem (e.g., “air” for air.sos) will be used as the group name in the kiosk.
For each group playlist, edit the value of the icons property if you wish to
change the image for that group’s button in the public UI. There are a number of
image files you may choose to use located in
/shared/sos/kiosk/images/groups/. You may also create your own, but
any images you use should have pixel dimensions about 500x417 and have empty
space at the bottom for where the group name will be displayed. We also suggest
that you copy your image files into the
/shared/sos/kiosk/images/groups/ directory.
For each group playlist, add, remove, or modify include lines for each dataset
you plan to use in the kiosk. Each include line refers to a dataset that will
appear in the public UI represented with a circular thumbnail button. The
datasets will appear in the kiosk in the same order (left-to-right) as they are
listed in the group files.
The sphere frame image that is displayed on the trackball control for each dataset listed by an include line is usually derived directly from the dataset’s image data itself, but there are a number of different ways that this image may be generated for use in the kiosk. Here are the available options in priority order of precedence:
- If the
iconskeyword is set immediately following the dataset’s include line in the group playlist, the trackball image will be set to the file path for any existing image file anywhere on the SOS machine. This option overrides any other source for the trackball image. Note that this is not the standard use of the icons keyword in an SOS dataset playlist - For a movie file or directory of images, if the
stopframekeyword is set immediately following the dataset’sincludeline in the group playlist, the trackball image is extracted using the frame index specified. This keyword is ignored for a single frame image dataset. Note that this is not the standard use of thestopframekeyword in an SOS dataset playlist - If there is a sphere_frame.jpg or sphere_frame.png or sphere_frame.tiff file located in the dataset’s media sub-directory (where the thumbnails are located), that will be used as the trackball image. NOAA supplies these as part of some datasets and any site may specify these files for their own datasets installed under the /shared/sos/media/site-custom directory
- The default option is to use the image itself as the trackball for single frame datasets or by extracting the middle frame number as the index into the dataset’s movie file or directory of images. In the latter case, for example, if a dataset has 200 frames, then frame 100 would be used to generate the trackball image
include = /shared/sos/media/land/blue_marble/blue_marble/playlist.sos
icons = /home/sos/my_images/my_sphere_frame.jpg
In this example, the icons keyword is used immediately following the include
statement to set the image displayed on the trackball for this dataset.
include = /shared/sos/media/extras/frozen/playlist.sos
stopframe = 50
In this example, frame 50 of the movie from the “frozen” dataset is used as the trackball image.
Test Your Playlists
Permalink to Test Your PlaylistsTest your kiosk playlists on SOS with the FileOpen Playlist menu item in the SOS Stream GUI, by loading the file /shared/sos/kiosk/playlist/kiosk.sos. Check for any dataset loading errors that indicate invalid include paths to the datasets you selected and correct them in the group playlists.
Transfer Playlists to the Kiosk
Permalink to Transfer Playlists to the KioskVerify that the directory /shared/sos/kiosk exists on your SOS system. If it doesn’t, you can use the FTP tab of the Admin UI to transfer the default kiosk-related files from the kiosk to the SOS machine. You may also need to install and configure a simple FTP server on the SOS machine to handle the FTP file transfers between the two systems. See Appendix B for instructions on how to set up your FTP server.
Run the media2kiosk command line utility in a terminal window (it is located in the /shared/sos/bin directory of your SOS installation). This program automatically generates the file hierarchy used by the kiosk for groups and datasets. It automatically names the groups after the playlist filenames used to define them, such as air for the group playlist /shared/sos/kiosk/playlists/groups/air.sos. It also generates files the kiosk uses to show each dataset in the public UI (Appendix A has a full description of the kiosk file hierarchy). By default, the dataset names and descriptions are obtained from the SOS Data Catalog. The descriptions tend to be longer than desirable for a kiosk user, so there is a way to replace those with your own text. This is done with the same approach as for translating English to other languages, which is covered in the next section.
Transfer the kiosk dataset and group file hierarchy using the controls in the FTP tab of the Admin UI.
Restart the kiosk software (using the desktop or from the Start menu) and verify that you are satisfied with how your changes appear in the public UI, including group names and button images and dataset names, descriptions, and button images. Test the kiosk with SOS to make sure all the datasets load and display properly.
Repeat these steps until the kiosk is configured the way you want it.
Localization/Translation
Permalink to Localization/TranslationThe term localization refers to translating text into another language, with possible variations for a particular country or region. A locale is defined as xx_YY, where xx is the ISO 639-1 language code and YY is the ISO 3166 country or region code. The default locale is en_US, which is English in the United States.
In the Public Kiosk, translations are created and edited in several different ways depending on which part of the kiosk is being localized.
Translations Made on the Kiosk Machine
Permalink to Translations Made on the Kiosk MachinePublic UI
Permalink to Public UIPublic UI text translations are created and edited using the Language tab in the Admin UI on the Windows kiosk machine.
Admin UI
Permalink to Admin UIAdministration UI text translations are made using a set of utilities run on the Windows kiosk machine. This is a more advanced localization activity that may require assistance from the SOS team. Steps to perform a translation of the Admin UI are described in the Admin UI Translations section of the SOS Translation Manual.
Translations made on the SOS machine
Permalink to Translations made on the SOS machineDataset Translations
Permalink to Dataset TranslationsDataset names and descriptions are translated using the SOS Data Catalog and playlists as described in the section Kiosk Dataset Translations of the SOS Translation Manual.
Groups
Permalink to GroupsGroup names are translated using playlists as described in the Group Name Translations section SOS Translation Manual.
Update Kiosk Translations
Permalink to Update Kiosk TranslationsAfter finishing your dataset and group translation changes, run media2kiosk, then transfer the resulting files to the kiosk machine using the FTP tab in the Admin UI.
Appendix A: File Structure
Permalink to Appendix A: File StructureThis appendix is a reference that describes the underlying file hierarchy used in the Public Kiosk and its user interface. The Public Kiosk’s appearance and operations are driven entirely by a local file structure in combination with SOS Automation Control Protocol made from the kiosk to the SOS machine. All media used in the kiosk software is locally resident and set up in advance.
Most of the kiosk files are autogenerated on the SOS machine using the media2kiosk utility found in the bin directory of the SOS software installation. This utility must be run from the command line. There are also some files that must be configured directly on the kiosk.
The files structure described below is relative to the kiosk root directory, which is /shared/sos/kiosk on the SOS machine and C:\shared\sos\kiosk on the kiosk machine.
Directories and Files Required Only on the Kiosk Machine
Permalink to Directories and Files Required Only on the Kiosk MachineThese files are edited on the Kiosk and are not used on the SOS machine.
- config\: UI settings directory
- settings.txt: UI properties
- logo.png: Image in Kiosk title area (upper left corner)
- en_US.txt: Title and label text in English/United States
- xx_YY.txt: Title and label text in “xx” language/“YY” country
- admin\: Admin UI translations directory
- en_US.ts: Admin UI interface elements for US English in text (editable)
- en_US.qm: Admin UI interface elements for US English in binary (used by kiosk software)
- xx_YY.ts: Admin UI interface elements for “xx” language/“YY” country in text (editable)
- xx_YY.qm: Admin UI interface elements for “xx” language/“YY” country in binary (used by kiosk software)
- info\: Info text directory
- en_US.txt: SOS info and kiosk instructions in US English
- xx_YY.txt: SOS info and kiosk instructions in “xx”/“YY” locale
- resource\: Control button image directory
- buttonA.png: Control button image (png)
- buttonB.jpg: Control Button image (jpeg)
Directories and Files Required Only on the SOS Machine
Permalink to Directories and Files Required Only on the SOS MachineThese files are used as input to the media2kiosk utility and are not used directly on the kiosk.
- images/: Images directory
- groups/: Group images directory
- GroupA.jpg: GroupA button image (jpeg)
- GroupB.png: GroupB button image (png)
- groups/: Group images directory
- playlists/: Kiosk playlists directory
- kiosk.sos: A playlist defining the groups in the kiosk
- groups/: Group playlists directory
- overlays.sos: Playlist of the overlays in the Overlays group
- GroupA.sos: Playlist of the datasets in GroupA
- GroupB.sos: Playlist of the datasets in GroupB
- locale/: Media translation playlists directory
- datasets/: Dataset translation playlists directory
- en_US.sos: Dataset names/descriptions playlist in US English
- xx_YY.sos: Dataset names/descriptions playlist in “xx” language/“YY” country
- groups/: Group translation playlists directory
- en_US.sos: Group names playlist in US English
- xx_YY.sos: Group names playlist in “xx” language/“YY” country
- datasets/: Dataset translation playlists directory
Directories and Files Generated on the SOS Machine by the media2kiosk Utility
Permalink to Directories and Files Generated on the SOS Machine by the media2kiosk UtilityThese files must be transferred to the kiosk machine.
- groups/: Derived directory for groups
- groups.txt: Listing of all the groups in the kiosk
- GroupA/: Derived directory for GroupA
- datasets.txt: listing of the datasets in GroupA
- group.png: Image on the group button (can also be a jpeg)
- en_US.txt: Group name in English/United States
- xx_YY.txt: Group name in “xx” language/“YY” country
- GroupB/: Derived directory for GroupB
- datasets.txt
- group.png
- en_US.txt
- xx_YY.txt
- overlays/: Derived directory for overlays
- datasets.txt
- group.png
- en_US.txt
- xx_YY.txt
- datasets/: Derived directory for datasets
- ID_#####/playlist/: Derived directory for dataset with ID “#####”
- thumbnail.jpg: image on the dataset button
- properties.txt: dataset properties used by the kiosk
- sphere.png: dataset image shown in the trackball sphere (can also be a jpeg)
- en_US.txt: dataset name/description in English/United States
- xx_YY.txt: dataset name/description in “xx” language/“YY” country
- ID_#####/playlist_xyz/: Derived directory for dataset variation “xyz” with ID “#####”
- thumbnail.jpg
- properties.txt
- sphere.png
- en_US.txt
- xx_YY.txt
- ID_#####/playlist/: Derived directory for dataset with ID “#####”
Appendix B: File Transfers
Permalink to Appendix B: File TransfersFile transfer between the SOS machine and the kiosk is not trivial since these two machines use very different operating systems, Ubuntu Linux and Microsoft Windows, respectively. Beginning with version 5.1, the kiosk software supports a direct transfer between the two systems from the FTP tab in the Administration UI. This functionality uses the industry standard File Transfer Protocol (FTP) software. On the SOS machine, the very secure FTP daemon (vsftpd) server can be installed using the normal Ubuntu apt-get commands and by editing a few configuration files.
Install vsftpd
Permalink to Install vsftpdYou can install vsftpd from your Terminal application with these commands:
$ sudo apt-get update
$ sudo apt-get install vsftpd
Configure vsftpd
Permalink to Configure vsftpdThen you’ll need to edit the FTP configuration using a text editor of your choice such as vim or gedit.
$ sudo gedit /etc/vsftpd.conf
Locate the following lines, uncomment them as needed by removing the leading #
character, and make sure the values are set exactly as follows:
anonymous_enable=NO
local_enable=YES
write_enable=YES
ascii_upload_enable=YES
ascii_download_enable=YES
chroot_local_user=YES
chroot_list_enable=YES
chroot_list_file=/etc/vsftpd.chroot_list
ls_recurse_enable=YES
Add the following line at the end of the file:
local_root=/shared/sos/kiosk
Save the file and exit the editor.
Authorize the sos User
Permalink to Authorize the sos UserCreate a file the FTP server will use to authorize the sos user to access the /shared/sos/kiosk directory:
$ sudo gedit /etc/vsftpd.chroot_list
Add the following line:
sos
Save the file and exit the editor.
Star the FTP Server
Permalink to Star the FTP Server$ sudo service vsftpd restart
If the FTP server is running, you should see output like this when you run the
ftp command:
$ ftp localhost
Connect to localhost.
220 (vsFTPD 3.0.3)
Name (localhost:sos)
Create the Kiosk Directory
Permalink to Create the Kiosk DirectoryCreate the kiosk root directory if it’s not already there:
$ mkdir /shared/sos/kiosk
You are now ready to transfer files between the kiosk and the SOS machine.
Appendix C: media2kiosk Utility
Permalink to Appendix C: media2kiosk UtilityThe media2kiosk command-line utility is used in a terminal window on the SOS machine to prepare files for use by the Public Kiosk. This utility resides in the bin directory of the standard SOS installation, typically /shared/sos/bin. It is normally used to generate the kiosk file hierarchy as shown in Appendix A. The generated files are then transferred from the SOS machine to the Windows kiosk machine using the FTP tab in the Administration User Interface.
$ media2kiosk --help
Usage:
    --verbose - write timestamps with logged messages (default is no timestamps)
    --logging level - set logging level for messages (default is INFO)
               Valid level values are:  FATAL, ERROR, WARN, INFO, DEBUG, TRACE
    --root directory - specify the kiosk root directory (default is /shared/sos/kiosk)
    --remove_all - remove all previously generated dataset/group files
    --tr_root directory - use a different translations root directory (default is /shared/sos/kiosk/config/admin)
    --skip_datasets - skip dataset conversions (use with ts_to_tsv or tsv_to_ts)
    --ts_to_tsv - convert Kiosk ts files to tab separated value (tsv) files. Can't combine with tsv_to_ts!
    --tsv_to_ts - convert tab separated value (tsv) files to Kiosk ts files. Can't combine with ts_to_tsv!
Options for media2kiosk can be displayed using the –help option
The most common use of media2kiosk is to generate the kiosk files that are transferred to the kiosk machine after changing the main group file (/shared/sos/kiosk/playlists/kiosk.sos, the group playlists under (/shared/sos/kiosk/playlists/groups), or translation playlists under (/shared/sos/kiosk/playlists/locale). Less commonly, media2kiosk may be run when changes made to the SOS Data Catalog need to be updated in the corresponding kiosk files.
The other options available in media2kiosk are not routinely used.
- –verbose and –logging are helpful when troubleshooting problems running media2kiosk
- –root and –tr_root are used for developer testing
- –ts_to_tsv, –tsv_to_ts, and –skip_datasets are experimental and will become regular features in a future release
Appendix D: Auto-restart Utility
Permalink to Appendix D: Auto-restart UtilityAs mentioned in the Installation and Setup section, you may wish to install a separate application that automatically restarts the Public Kiosk if it crashes or a clever kiosk user finds a way to close it intentionally. One free application that does this is called Restart On Crash. It has been successfully used with the Public Kiosk is described in this appendix.
Information about Restart On Crash is at the link Automatically Restart Crashed Or Hanged Applications.
Install Restart on Crash
Permalink to Install Restart on CrashIn a web browser, click on the link Download Restart on Crash, which puts the file RestartOnCrash-v1.4.1.zip in your Downloads folder (or a different download location, depending on your browser settings).
Run Restart on Crash
Permalink to Run Restart on CrashDouble-click on RestartOnCrash-v1.4.1.zip to unzip the utility. It does not have an installer and it’s easiest to just put the RestartOnCrash.exe on the Kiosk machine’s Windows Desktop.
Configure Restart on Crash
Permalink to Configure Restart on CrashSelect Settings and enter the full path to a log file where crashes will be recorded in the Settings window. We recommend that you set the following options for Restart on Crash:
- Start minimized
- Log events to a file: C:\shared\sos\restart_log.txt
- Grace period: 30 seconds
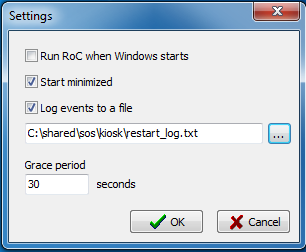
Recommended settings for Restart on Crash.
Select Add and enter the full path to the Kiosk application (C:\shared\bin\Kiosk.exe) in the Add New Application window. We recommend the following application settings for the kiosk:
- Monitor this application: C:\shared\bin\Kiosk.exe
- Assume it has crashed or hanged when…: It isn’t running
- After a crash
- Execute a command: “C:\shared\bin\Kiosk.exe”
- Working directory: C:\shared/bin
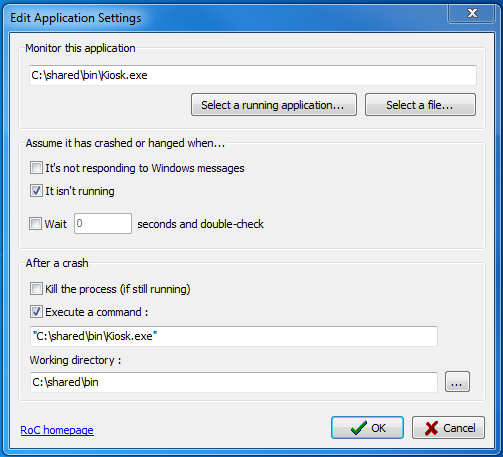
Recommended application settings for Restart on Crash to monitor the kiosk.
Turning Off Restart on Crash
Permalink to Turning Off Restart on CrashTo turn off Restart On Crash, first open it by right-clicking on its icon in the icon tray (the lower right side of the Windows taskbar), then choosing Show/Hide. In the window that opens, just uncheck the box next to the Application name (C:\shared\bin\Kiosk.exe) in the utility’s main window. The Status indicated by Disabled means that the kiosk won’t be automatically restarted when it’s not running. If you check the box again, then Restart On Crash will start monitoring and restarting it when needed.
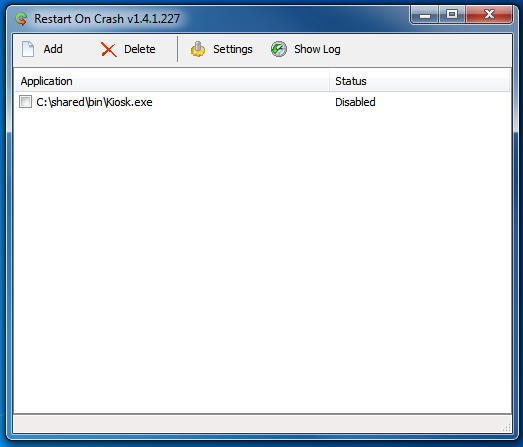
Disable the Kiosk application to prevent Restart on Crash from starting it when it isn’t running.