Connecting Points of Data With Lines
Sometimes it’s useful to be able to connect the dots of a dataset, such as in the case of animal locations. QGIS doesn’t provide this functionality on its own; we have to download a plugin to do it for us. For this example, we are going to use the leatherback turtle track information provided by www.topp.org, the Tagging of Pelagic Predators project’s website. You can download the file or find it in the project files for this tutorial. The file name is leatherback 41708.txt.
Installing PointsToPaths Plugin
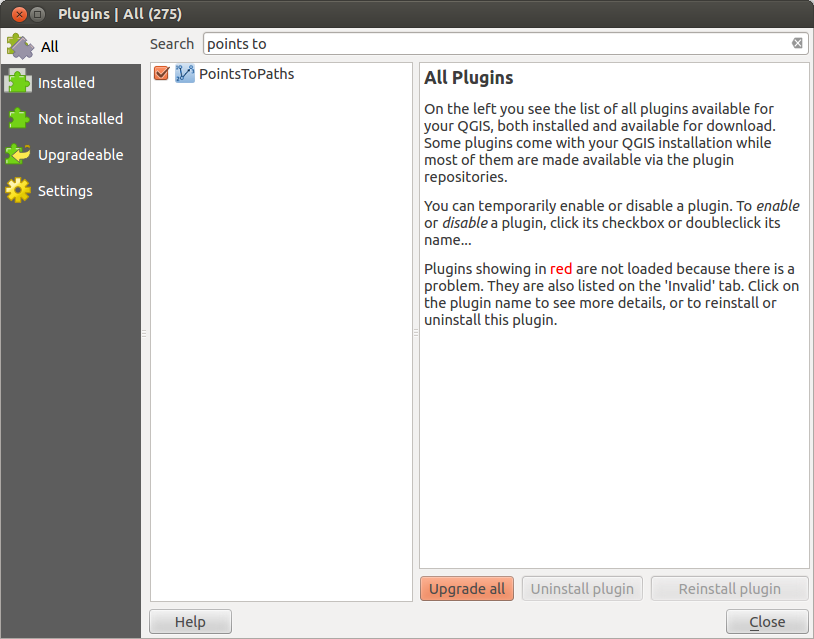
Permalink to Installing PointsToPaths PluginOpen QGIS. At the top of the window, go to PluginsManage and Install Plugins, then search for Points to Path and click Install. Please note that if you search for Point to instead of Points to the plugin will not appear in the menu.

Install PointsToPaths from the QGIS Plugins dialog.
You can now run the plugin from PluginsPoints to PathsPoints to Paths.

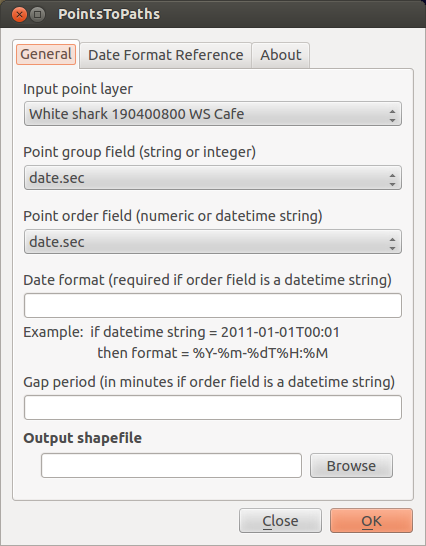
After running Points to Paths you will see a window like this.
Currently, it’s on the General tab. There are also a Date Format Reference tab, which will be useful later, and an About tab.
Using PointsToPaths
Permalink to Using PointsToPathsOn the General tab, there are six fields:
- Input point layer
- Point group field
- Point order field
- Date format
- Gap period
- Output shapefile
Input point layer
Permalink to Input point layerThe layer of points that you want to connect. In our case, this is the turtle tracking layer.
Point group field
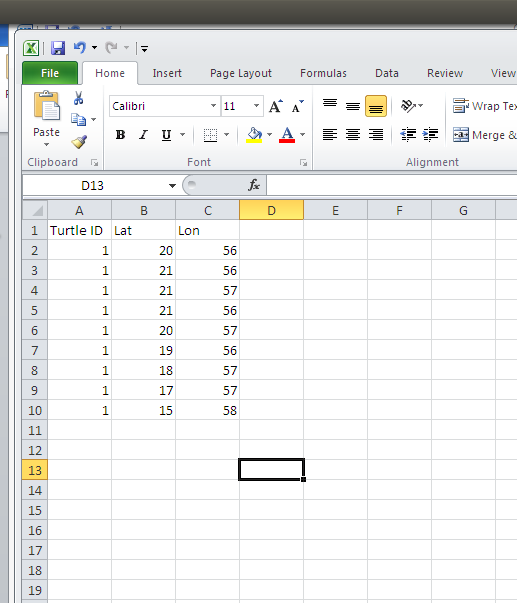
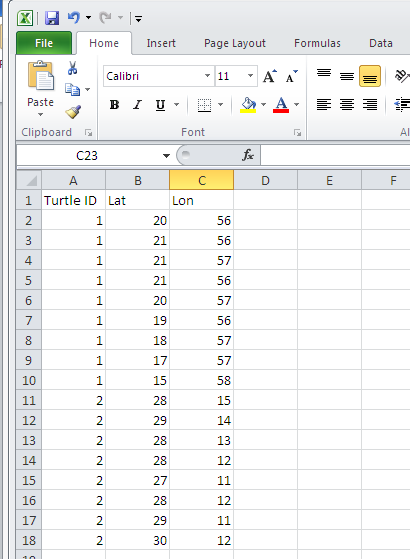
Permalink to Point group fieldThe plugin is looking for a column that has the same character(s) for all the points that will be part of one path. The software just needs to know which points it should add to the line, so it asks for a column with a com- mon identifier. For example, if I have a spreadsheet that contains location infor- mation for one leatherback turtle, I would need an identifying column that has the number 1(or any other character) in it for every row of data. If I had a spreadsheet with information for two turtles, turtle 1 would have the number 1 in the identification column, and turtle 2 would have the number 2, so that Points to Paths knows to make two paths for the data.

Example for one leatherback turtle.

Example for two leatherback turtles.
Point Order Field
Permalink to Point Order FieldThe point order field is the field that tells the plugin which order to connect the points in. What the plugin wants you to do is specify a column that has the date the location measurements were taken. For our data, and possibly in other spread- sheets, you may run across a column called “date.sec” that doesn’t look like a recognizable date format. A computer will be able to use that information without being told what format it’s in, so if you pick the date.sec column for the point or- der field, leave the date format field blank. However, most of the time, you’ll have a more traditional date column. In this case, you’ll need to tell the plugin what format it’s in in the following column.
Date Format Field
Permalink to Date Format FieldThe date format field’s purpose is to tell the plugins which format your date in- formation is in. For example, say you have a date column in the format MM/DD/YYYY. (To determine the format of your spreadsheet’s date column, right-click on the layer name and select Open attribute table. You’ll be able to see the column that has your date info.) The plugin needs to know that the first number it reads is the month, the second is the day, and the third is the year. It also needs to know that a number ends when it is followed by a “/” symbol. So we type in the symbols %m/%d/%Y, which basically translates our date into a format the plugin can read. %m means month, %d means day, etc. See the Date Format Reference tab at the top of the plugin’s window, it will give you the codes needed to identify each type of date information.
Gap Period
Permalink to Gap PeriodYou don’t need to worry about this field for this dataset.
Output Shapefile
Permalink to Output ShapefileUnder the Output shapefile field, select a name for the animal track you’re creating. You can use Browse to pick a folder to save it in. The animal track will be saved as a shapefile at this path.
Creating Your Shapefile
Permalink to Creating Your ShapefileAfter you’ve filled in all of the above fields in the PointsToPaths dialog, click OK on the plugin window, a window will pop up asking you if you want to import the new shapefile. If you click Yes and the shapefile doesn’t appear, simply import it as a vector layer manually. (See the Using Vector Data section of Making a Base Map in this tutorial.) It will be saved in your top directory, unless you specified a file path while naming your output shapefile. A line that goes through your points will appear on your map.