Visual Playlist Editor Manual
The SOS Visual Playlist Editor is a tool that allows users to create, modify, and extend presentation playlists, as well as visually lay out, modify, and preview SOS datasets.
In this document, we refer to the SOS Visual Playlist Editor as VPLE and the User Interface as UI for short.
You may wish to read through the Appendix A: SOS Definitions section at the end of this document before proceeding. Note that Appendix B: Attribute Descriptions contains links to detailed descriptions of all of the attributes. As always, once you have created or made changes to a dataset using the VPLE, please preview the dataset on SOS to confirm you get the expected results.
You can also watch the training videos available in our video tutorials section.
System Requirements
Permalink to System RequirementsThe SOS Visual Playlist Editor requires Ubuntu 22.04 and SOS software version 6.0.1.
Support
Permalink to SupportPlease contact sos.support@noaa.gov if you have any questions or feedback about the SOS Visual Playlist Editor.
User Interface Definitions
Permalink to User Interface DefinitionsThe VPLE user interface is divided into two modes: Presentation Mode and Dataset Mode. The following two annotated screenshots identify the components that make up each mode. The rest of this document will refer to these components.
Functions Available from Both Modes
Permalink to Functions Available from Both ModesMenu Bar
Permalink to Menu Bar- Start new presentations and datasets
- Open existing presentations and datasets
- Save / Save As presentations and datasets
- Export presentations
- Export presenter notes
- Generate a summary of presentation
- Change language
- View VPLE version information
- Quit the VPLE application
Mode Selector
Permalink to Mode SelectorToggle button located in the Tool Bar for switching between Presentation Mode and Dataset Mode. The highlighted toggle button signifies the currently selected Mode. From Presentation Mode, double-clicking a dataset from the Presentation Playlist View will open that dataset in Dataset Mode.
Status Bar
Permalink to Status BarInformation bar located at the bottom of the VPLE. This bar shows the name of the currently open presentation playlist or dataset, depending on the current mode.
Tool Bar
Permalink to Tool BarShortcuts to New, Open, and Save for the currently selected mode. This bar also includes the Mode Selector.
Presentation Mode
Permalink to Presentation Mode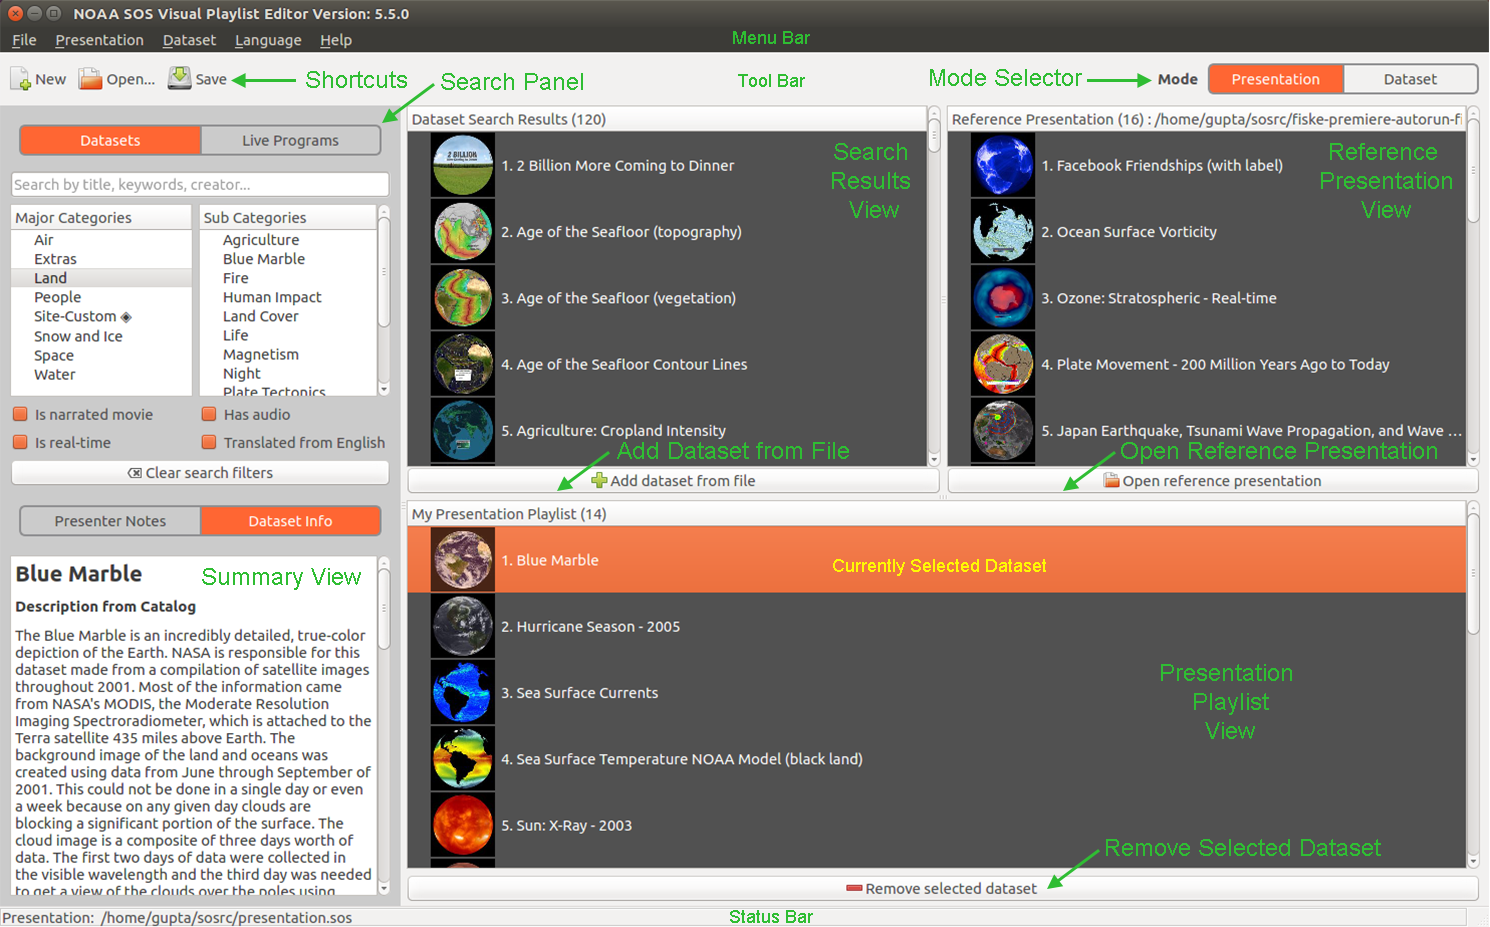
Presentation Mode in the VPLE
Add Dataset from File Button
Permalink to Add Dataset from File ButtonAdd Dataset from File opens a file browser into the media directory and gives users the option to navigate to and add a dataset to the Presentation Playlist View that is not available in the SOS Data Catalog database (and is therefore not showing up in the Search Results View).
Open Reference Presentation Button
Permalink to Open Reference Presentation ButtonOpen Reference Presentation opens a file browser into the sosrc directory and gives users the option to open an existing presentation playlist into the Reference Presentation View.
Presentation Playlist View
Permalink to Presentation Playlist ViewA list of all the datasets that have been added to the presentation playlist you are currently creating. Double-clicking on a dataset will open the dataset in Dataset Mode so it can be previewed or modified. The number in parentheses is the number of datasets in the presentation playlist.
Summary View
Permalink to Summary ViewAdd or view presenter notes to/for the currently open presentation playlist, or, view the dataset info for the currently selected dataset. The toggle button at the top allows users to indicate whether they want to view Presenter Notes or Dataset Info.
Reference Presentation View
Permalink to Reference Presentation ViewView an existing presentation playlist. Click and drag a dataset from this view to add it to the Presentation Playlist View. The number in parentheses is the number of datasets in the reference presentation playlist.
Remove Selected Dataset Button
Permalink to Remove Selected Dataset ButtonRemove Selected Dataset removes the currently selected dataset from the Presentation Playlist View.
Search Panel
Permalink to Search PanelThe Search Panel allows you to quickly search and browse for datasets in the entire SOS Data Catalog (all of the NOAA-managed datasets) and the Site-Custom datasets on your SOS computer. (Site-Custom datasets have a diamond icon at the end of their name so that they are easy to identify at a glance.) Simply click on any combination of filters (Major/Sub Categories, Movies/Realtime, etc.) to narrow down search results. The dataset search results will appear in the Search Results View. The toggle button at the top allows users to indicate whether they would like to search within Datasets or Live Programs.
You can also search for datasets by typing a search term in the search text field. By default, the search field searches through dataset titles, keywords, and dataset contact name/organization.
Pressing the Clear Search Filters button clears all filters and search terms and shows all datasets available on your SOS computer in the Search Results View.
If the Live Programs toggle has been selected, the search filters are disabled and only browsing by Major Category and Live Program name is supported. Also, for Live Programs, a small i button appears next to the Add Dataset from File button. This button is a toggle between:
- Live Program Presenter Notes and My Presentation Playlist Presenter Notes when the Presenter Notes toggle is selected in the Search Panel
- Live Program information and information for the currently selected dataset when the Dataset Info toggle is selected in the Search Panel
The Search Panel checkboxes are tri-state filters. This means that each checkbox supports three modes: Unchecked, Checked, and Intermediate. For example, for the Has Audio checkbox:
- Unchecked and filled is the default state, and the search will return datasets with or without audio
- Checked and filled will return datasets that do have audio
- Unchecked and not filled will return datasets that do not have audio
Search Results View
Permalink to Search Results ViewA list of all the datasets that match the filters selected in the Search Panel. Click and drag a dataset from this view to add it to the Presentation Playlist View. The number in parentheses is the number of datasets found.
Dataset Mode
Permalink to Dataset Mode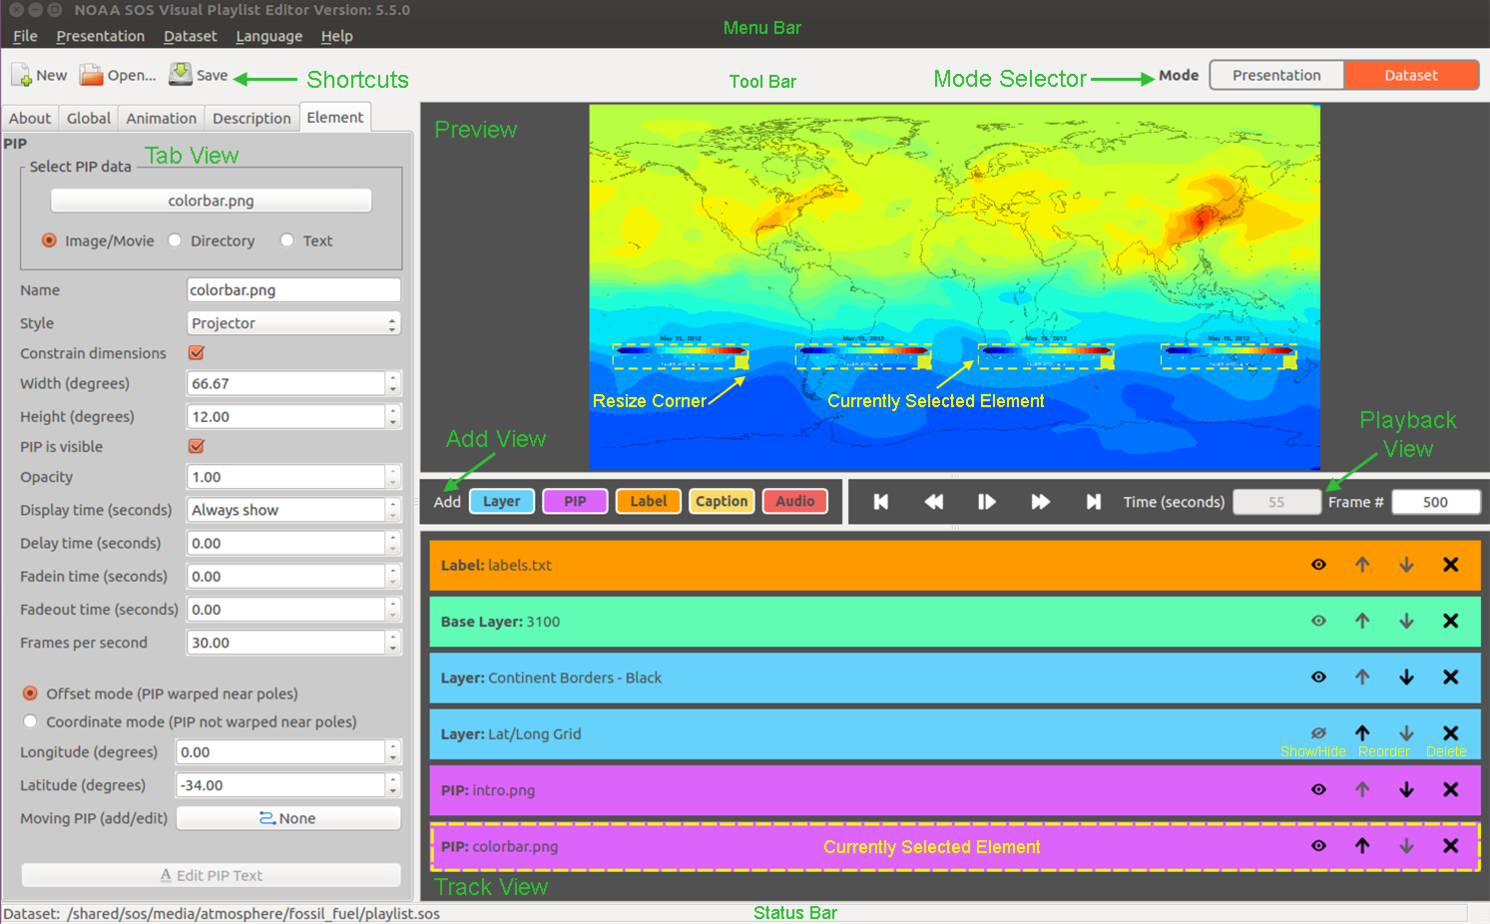
Dataset Mode in the VPLE
Add View
Permalink to Add ViewAdd a new Element to the dataset.
Element
Permalink to ElementA component of a dataset. For Base Layer, Layer, and PIP, the underlying data can be an image file, a movie, or a directory of images. An SOS dataset can have multiple Layers and PIPs. There are 6 main element types in SOS:
Base Layer
Permalink to Base LayerThe first (or only) global layer in a dataset. (Corresponds to the data or
datadir attributes in SOS.) A dataset may or may not have this Element. If
not, the dataset must have at least one Layer.
Layer
Permalink to LayerA global layer in a dataset. (This Element may be resized.)
PIP (Picture-in-a-Picture)
Permalink to PIP (Picture-in-a-Picture)Supplementary data that is displayed on top of all of the Layers, like icons or legends or small movies. A PIP can also display text (see the Creating Text PIP Elements section for more info).
Label
Permalink to LabelA text file (.txt) that contains a sequential list of text that runs in sync with global data that is either a movie or a directory of images.
Caption
Permalink to CaptionAn industry standard SubRip Subtitle file (.srt) that contains a sequential set of closed captions/subtitles with their start and end timecodes and that runs in sync with global data that is either a movie or a directory of images.
Audio
Permalink to AudioAn audio track that complements the dataset.
Playback View
Permalink to Playback ViewControl playback of a dataset, and view the current playback time and frame number of the dataset. A frame number can also be typed into the Frame # text field.
Preview
Permalink to PreviewVisual composite of all the Elements (Layers, PIPs, Labels, etc.) that make up a dataset. Allows moving and rescaling of certain Elements using the mouse.
Tab View
Permalink to Tab ViewView and modify the global attributes of a dataset (ex. name, sphere tilt, frames per second, etc.) and the attributes of Elements of a dataset such as a PIP’s width, height, and location. Every attribute in each of the tabs corresponds to an attribute/value pair that gets written to a dataset’s playlist.sos file. Please see the Playlist Reference Guide detailed information about each attribute.
The Tab View also includes a Description tab for the dataset. For NOAA-managed datasets, the description comes from the SOS Data Catalog. For Site-Custom datasets, the description comes from the description that your site entered for that dataset.
Track View
Permalink to Track ViewA list of all the Elements in the dataset shown as a set of track lanes. Clicking on a track lane will highlight the corresponding Element in the Preview and will show the Element’s attributes in the Element Tab View. Each track lane contains 4 buttons:
Eye Button
Permalink to Eye ButtonShow/Hide an Element in the Preview. This control may be disabled for some Layers if the Layer is visible attribute (layervisible attribute in SOS) is unchecked in the Layer’s Element tab.
Up / Down Buttons
Permalink to Up / Down ButtonsReorder an Element. Note that re-ordering is only relative to an Element type (for example, a Layer Element will only get re-ordered relative to other Layers). If the Element has a Lock icon, it cannot be re-ordered.
X / Lock Button
Permalink to X / Lock ButtonIf an X icon is present, the Element can be deleted. If a Lock icon is present, the Element cannot be deleted.
Presentation Mode Tutorial
Permalink to Presentation Mode TutorialGet the Latest SOS Database
Permalink to Get the Latest SOS DatabaseThe search and browse filters located in the Search Panel of Presentation Mode use an SOS database that is located on your SOS computer. The database contains meta-data for NOAA-managed datasets and Site-Custom datasets. Most sites have automatic updates to their SOS database once per week on Mondays. However, if you have added a new Site-Custom dataset or NOAA added a new dataset during the middle of the week that you would like to access immediately from the database, you must refresh your SOS database.
To do this, simply run the DatasetUpdate Catalog menu option. This may take a few minutes. Once the update is complete, your SOS database is now up-to-date and any new datasets should show up in the Search Results View when filtering. If you have translated Site-Custom datasets, you need to run the DatasetUpdate Translations menu option after running the Update Catalog menu option to make sure your translated datasets get into the SOS database.
Create a Presentation Playlist
Permalink to Create a Presentation PlaylistFrom the Menu Bar, click PresentationNew (or you can click the New Shortcut if in Presentation Mode). Use the Search Panel to narrow the list of datasets in the Search Results View to find datasets of interest. Click and drag a dataset from the Search Results View to the Presentation Playlist View. Datasets can also be added from a reference presentation playlist in the Reference Presentation View or by navigating to a desired dataset by clicking the Add Dataset from File button. Use the Remove Selected Dataset button to remove datasets from your presentation.
Modify a Presentation Playlist
Permalink to Modify a Presentation PlaylistTo modify (add, delete, or reorder) the datasets in an existing presentation playlist, first open the presentation into the Presentation Playlist View by clicking on PresentationOpen (or you can click the Open Shortcut if in Presentation mode). Add datasets from the Search Results View, Reference Presentation View, or Add Dataset from File button. Use the Remove Selected Dataset button to remove datasets from your presentation. Click and drag a dataset to re-order it within the list.
Override or Extend Datasets in a Presentation Playlist
Permalink to Override or Extend Datasets in a Presentation PlaylistDatasets in a presentation playlist can be overridden or extended so that you do not have to create a new copy of the dataset, and thus, you can have alternative versions of the same dataset (i.e. only one folder for the dataset with its playlist.sos file, with any overrides or extensions only specified in the presentation playlist file and not in the dataset playlist.sos file). There are 3 use cases:
- Extend the dataset. For example, add your site’s logo to a dataset, or add a new audio track to a dataset
- Override global attributes. For example, change the frames per second to a different value
- Override the files specified for the Audio, Label, or Caption Elements to use different files
To perform overrides or extensions, double-click on a dataset in the Presentation Playlist View, which will open the dataset in Dataset Mode. Then, modify attributes to make an override and/or add Elements to extend the dataset, as described in the Dataset Mode Tutorial section. When you are done modifying the dataset, click Presentation in the Mode Selector to get back to the presentation playlist.
Save a Presentation Playlist
Permalink to Save a Presentation PlaylistOnce you are done editing a presentation playlist, click PresentationSave (or you can click the Save Shortcut if in Presentation Mode). If you want to save the presentation under a different name, click PresentationSave As and then give the presentation a name with no spaces or special characters. The .sos file extension will automatically be added to the end of the file.
Export a Presentation Playlist
Permalink to Export a Presentation PlaylistExporting allows you to package everything in your presentation playlist (including datasets) into a single folder in /shared/sos/media/site-custom/. Once packaged, the presentation can be easily shared with other SOS sites and NOAA.
To export, simply click on PresentationExport. A file browser will appear and you will need to either create a new folder for the presentation or choose an existing folder. Choosing an existing folder will delete the contents of that folder before exporting, but you will be prompted if that folder is not empty. Once saved, a sub-folder for each dataset in the presentation playlist is created that contains any Elements that have been modified or added. NOAA-managed data will not be copied, but will be referenced with an absolute path.
A presentation.sos presentation playlist file is also created in the main folder that references each of the sub-folders that contain the datasets.
Export Presenter Notes
Permalink to Export Presenter NotesClick PresentationExport Presenter Notes to create a PDF file that contains the Presenter Notes for the presentation playlist that is open in the Presentation Playlist View.
Generate a Summary of a Presentation Playlist
Permalink to Generate a Summary of a Presentation PlaylistClick PresentationGenerate Summary to create a PDF file that is a list of every dataset name currently in the Presentation Playlist View, along with their thumbnails. Presenter Notes, if available, are appended to the bottom of the list.
Dataset Mode Tutorial
Permalink to Dataset Mode TutorialView an Existing Dataset
Permalink to View an Existing DatasetIn the Menu Bar, click DatasetOpen (or you can click the Open Shortcut if in Dataset Mode). Browse to a dataset folder of interest. Select the dataset’s playlist.sos file and click Open. The path to the dataset you just opened is displayed in the Status Bar on the bottom left corner of the UI. The dataset imagery will open in the Preview, and the Tabs and Track View will get populated with the dataset’s attributes. Use the Playback View controls to animate through the dataset.
Modify a Dataset
Permalink to Modify a DatasetFor global modifications to a dataset such as frames per second, dwell time, etc., select the Animation Tab, modify the desired attributes, and re-run the animation. When attributes are modified in the other global tabs (About, Global, and Description), the Preview and Track View in the VPLE are not affected, even when you re-run the animation, as they are not applicable in the flat-screen preview. However, when the dataset is saved, changes made to attributes in these tabs will show up appropriately in SOS and on the iPad SOS Remote app.
To modify an Element, click on an Element in the Preview or Track View. For Layers and PIPs, a yellow corner appears in the bottom right corner of the Element in the Preview to indicate that the Element can be rescaled by clicking and dragging on the corner (note that the Element’s aspect ratio is maintained when using the mouse to resize). You can also use the mouse to reposition an Element in the Preview. Base Layers cannot be resized and cannot be repositioned. Labels and Captions can only be resized in their height dimension — their width is automatically computed.
When you select an Element, the Element tab is brought to the forefront and shows all the attributes that can be modified for that Element. Changing attributes such as the data file, size, position, opacity, etc. will update it in the Preview either immediately or during playback.
Add New Elements to a Dataset
Permalink to Add New Elements to a DatasetIn the Add View, click the desired Element type to add it to your dataset. For Layers, a message prompt will first ask you if the media you want to add is a File (ex. a single image or a movie) or a Directory (eg. a directory of image frames). For PIPs, a message prompt will first ask you if the media you want to add is a File, Directory, or Text (see the Creating Text PIP Elements section for more info). For all Elements, a file browser will pop up where you can navigate to your data of interest.
Filters have been added to the file browser depending on the type of data you are trying to open. So, for example, when adding Audio, you will only see audio files (.mp4, .mp3, etc.) in the file browser; for Labels, you will only see .txt files; and for Captions, you will only see .srt files. Once you select Open, a new Element will be added to the Track View and the Preview, and the Element tab will open up with the new Element’s default attributes populated.
Create a New Dataset
Permalink to Create a New DatasetIn the Menu Bar, click DatasetNew (or you can click the New Shortcut if in Dataset Mode). Add Elements to your dataset as described in the Add New Elements to a Dataset section. Edit the About, Global, Animation, and Description tabs as necessary to describe your dataset.
When creating a new dataset, at a minimum, a Name must be specified in the About Tab and at least one Layer must exist.
Save a Dataset
Permalink to Save a DatasetClick the DatasetSave button in the Menu Bar (or you can click the Save Shortcut if in Dataset Mode). If you have modified a NOAA-managed dataset, a message prompt will pop-up explaining that this is a NOAA-managed dataset and it cannot be modified, but it can be copied to another folder. Follow the prompts to proceed. If you click the Save button and you have modified an existing dataset that is not NOAA-managed, the dataset will save all your changes to your dataset’s playlist.sos file that you originally opened.
If you click DatasetSave As, select a folder in which to save your dataset. By default, the file browser opens up into the /shared/sos/media/site-custom/ folder, which is the folder where all custom datasets should be saved. Custom datasets should only be saved here so that the SOS database can be updated with your site’s custom datasets.
If you want to save a new dataset to a folder that does not exist, click DatasetSave As, and then, in the file browser that pops up, click the Create New Folder button in the top-right hand side. Enter a folder name, press Enter, and then press Save.
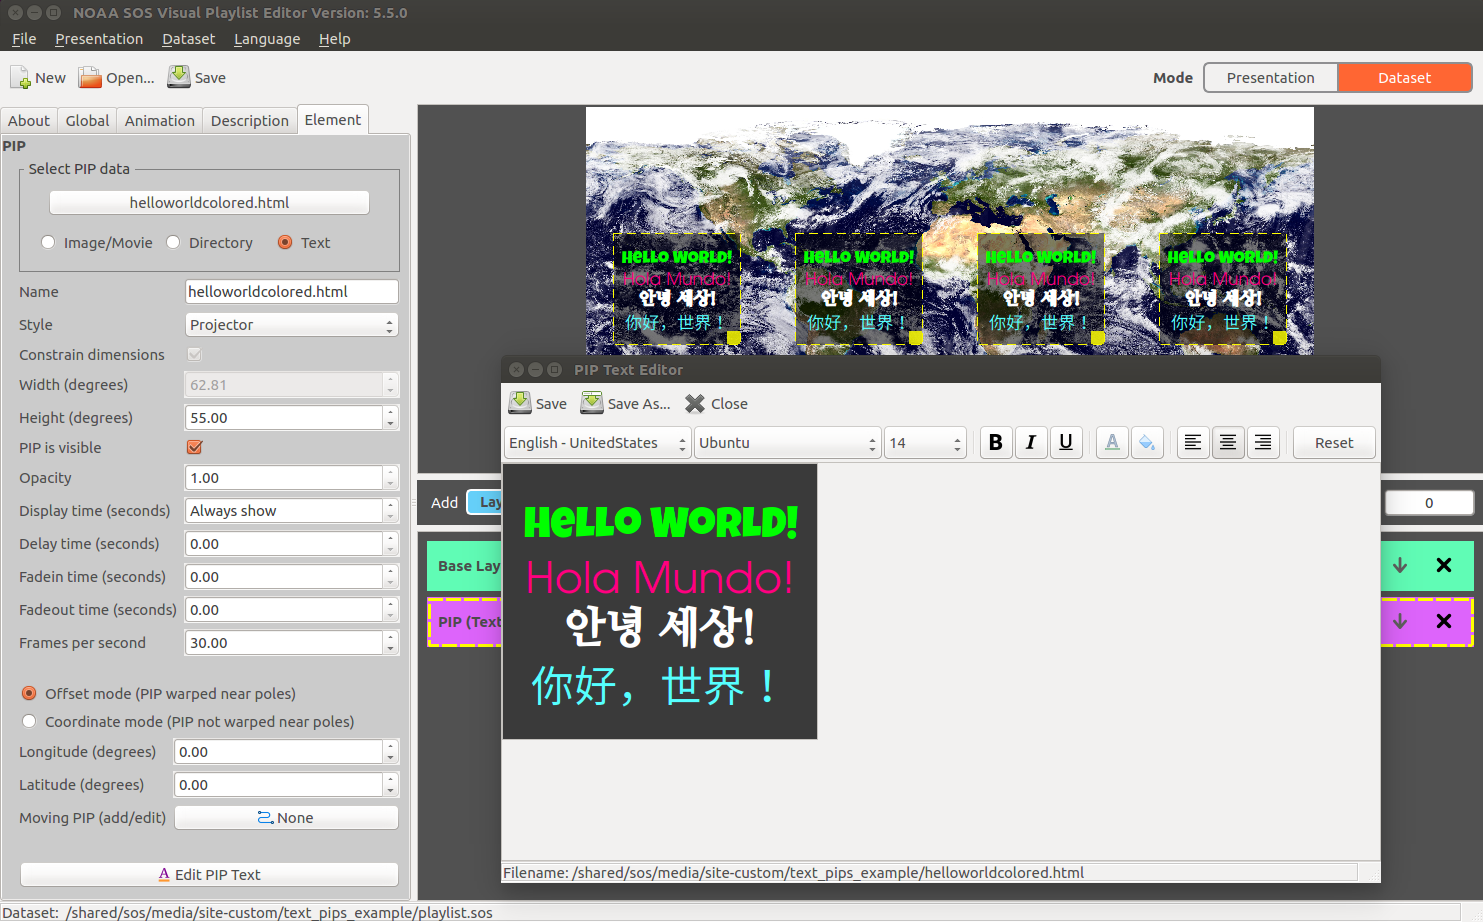
Creating Text PIP Elements
Permalink to Creating Text PIP ElementsA Text PIP is a special kind of PIP that displays text only. A Text PIP has all the same attribute specifications as a normal PIP, such as height, opacity, and fadein time.
Rather than using an image editing program to create text and save it as an image file for a PIP, you can enter text directly into the PIP Text Editor and save the Text PIP to your SOS dataset. A Text PIP gets written to an html file. You should only use the Text PIP Editor to create and edit Text PIP files, and you should not create or edit it by hand.
Pip Text Editor dialog window

An example Text PIP
SOS Configuration for Optimal Text PIP Resolution
Permalink to SOS Configuration for Optimal Text PIP ResolutionBy default, Text PIPs are optimized for SOS displays with 4 projectors where each projector has a resolution of 1920x1200. If your SOS display has a different configuration (i.e. fewer projectors or a different resolution), please configure all fields in the Projectors section of the SOS Configuration Manager to obtain the ideal text resolution for your SOS display.
Add a Text PIP
Permalink to Add a Text PIPTo add a Text PIP to your dataset, click the PIP button in the Add View, and select the Text option when prompted. At the next message prompt, select the File option if you are adding an existing Text PIP, or select the Create option if you are creating a new one.
When a Text PIP is added, a new track lane called PIP (Text) is added to the Track View, a placeholder image that says PIP Text (if creating a new one) or the actual text (if adding an existing one) is added to the Preview, and the PIP Text Editor pops up. You cannot set the width of a Text PIP as it is automatically computed at the time of rendering onto SOS, but you can set the height as you would any other PIP.
Edit a Text PIP
Permalink to Edit a Text PIPTo edit a Text PIP, click the Text PIP in the Track View or in the Preview to bring up the Element tab. Click on the Edit PIP Text button on the bottom of the tab to bring up the PIP Text Editor.
First, select the language you are going to write your text in from the Language drop down menu. (By default, each time the Text PIP Editor first pops up automatically, it will auto-select the language currently set in the Language menu of the VPLE’s Menu Bar.) Selecting a language filters the Font drop down menu to show only those fonts on your system that will support characters in that language.
The Font Size is used to indicate how big characters in the text are relative to each other, and do not represent the actual size of the text that will be shown on SOS. The final dimensions of a Text PIP, regardless if it is a single line or contains multiple lines, and regardless of the font sizes in the text, will have a height (in degrees latitude) equal to what you have specified in the Height (degrees) field of the PIP Element tab. In other words, the VPLE/SOS will proportionally scale all of your text to fit the height of the Text PIP, and it will dynamically compute the width of the Text PIP. As an example, if you are trying to create single line Text PIPs to label all the continents on the sphere, and you want the size of the text to look consistent across all the Text PIPs, do not change the Font Size for any of the Text PIPs (just leave at the default), and make the Height (degrees) of each of the Text PIPs the same.
You can set other attributes on the text like bold, italics, underline, alignment, text color, and background color. By default, the alpha channel (transparency) for the background color is set to 0 (fully transparent). The Reset button will reset the Text PIP Editor to all its default values.
If you want to write text in multiple languages in a single Text PIP, you must first select a Language, then select a supported Font, and then type or paste the characters into the Text PIP Editor. Alternatively, you can directly type or paste text of different languages into the Text Editor first. After that, for each set of text from a given language, you must select the language from the Language drop down menu, highlight the text that corresponds to that language, and then select the available font from the Font drop down menu so the text will change to that font.
To change the color in a Color Dialog that pops up for the Text and Background Color buttons, you can:
- Select a predefined color from the Basic colors section
- Type in a Red/Green/Blue/Alpha value (range for each channel is 0-255)
- Type in an HTML value
- Use the gradient box on the right-hand side to select a color. Note that this gradient box works in conjunction with the vertical slider to the right of the box
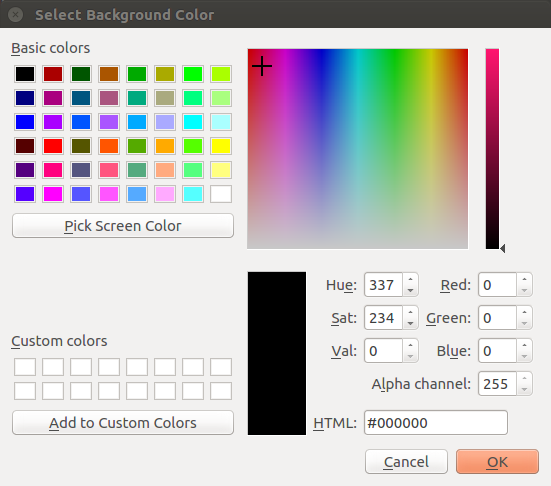
In this example, notice how the cursor in the gradient box is placed in a red area, but the Red/Green/Blue channels are showing values of 0, and the currently selected color is showing black. This is because the vertical slider is set all the way to the bottom, at black. Adjust this slider to change the color.
Save a Text PIP
Permalink to Save a Text PIPClick the Save button to save the Text PIP. If an html file does not yet exist for this Text PIP, you will be prompted to enter a name for your file. Once you save, the full path of your Text PIP is indicated in the Status Bar at the the bottom of the Text PIP Editor. If you close the editor without saving the the text to a file, the Track Lane for the Text PIP will show the title unsaved_empty_text_file.html, which means no file exists for this Text PIP.
Add Custom Fonts to the PIP Text Editor
Permalink to Add Custom Fonts to the PIP Text EditorIf you want to use a font that is not shown in the Text PIP Editor, you can add a font file to the following folder on your SOS computer: /usr/local/share/fonts/. Only FreeType font formats are supported, such as .ttf, .ttc, .otf ( complete list of supported font format). Once you add a font, restart the main SOS GUI application.
Creating Moving PIPs
Permalink to Creating Moving PIPsEach type of PIP can be given a simple path file that contains coordinate locations that indicate how to automatically move the PIP on the sphere as the dataset is animating. The path file is a simple comma separated value file (.csv file format) that contains a list of increasing frame numbers, each with a latitude and longitude value. As the dataset is animating, the PIP will be moved to the location specified in the file that corresponds to the current frame being displayed on SOS. Option to render a line path that follows the moving PIP is provided and is turned ON by default. Use the Moving PIP (add/edit) button to open the PIP Path Editor to add/change/remove the path file as well as specify attributes for path line drawing.
For a full example on how to create a Moving PIP, including detailed documentation for creating the csv path file, please see Creating a Moving PIP.
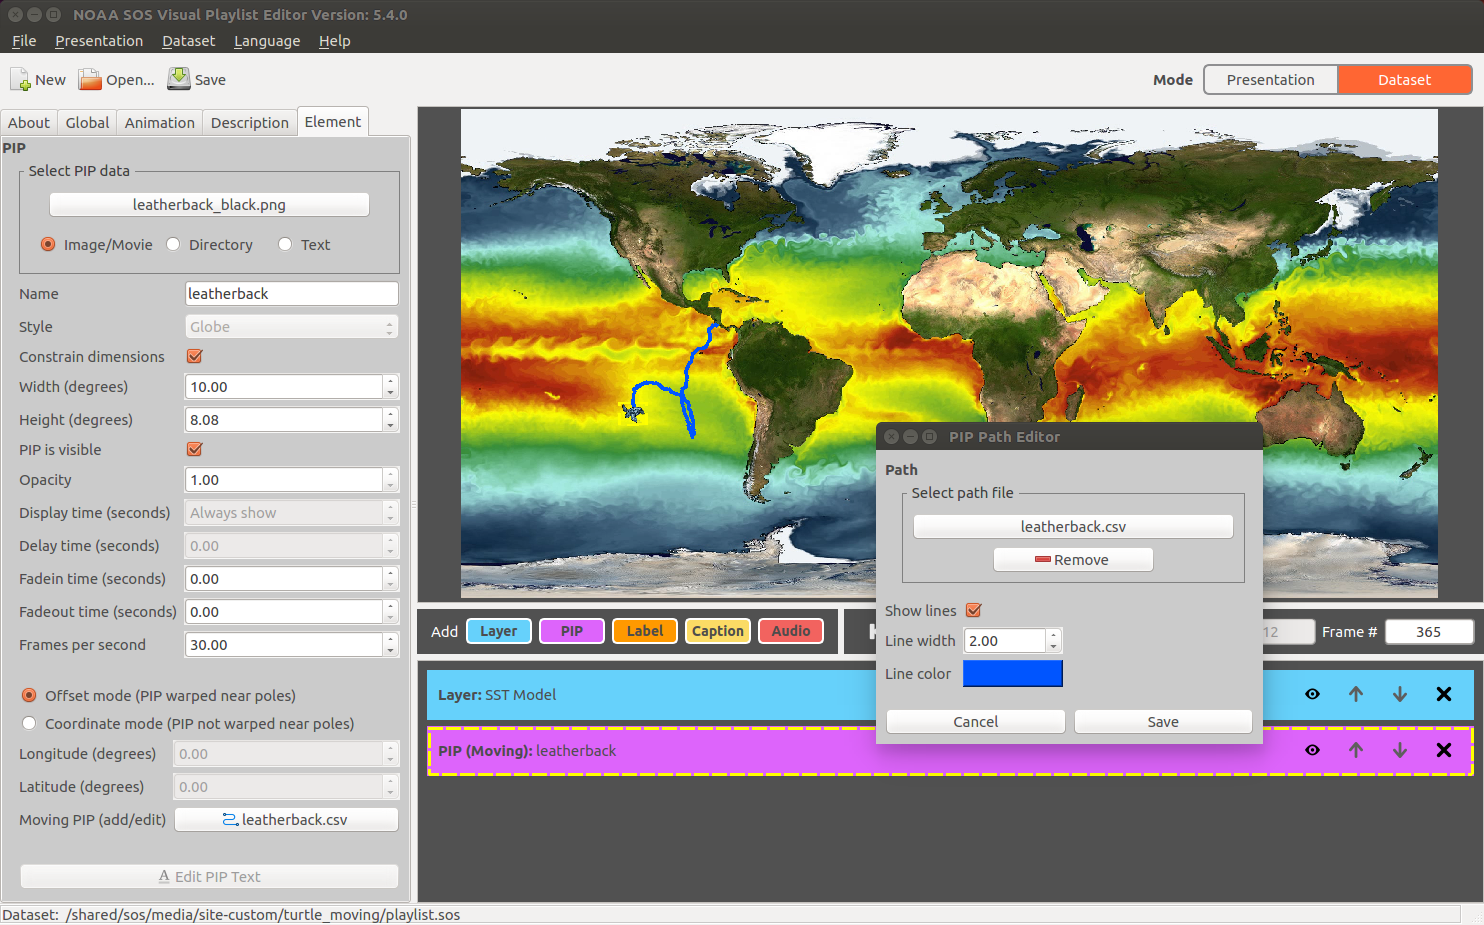
PIP Path Editor dialog
Creating Label Elements
Permalink to Creating Label ElementsBy default, when you add a new Label Element to your dataset, the color of the label text will be white against a transparent background, and the text will be rendered using the Free Sans font. To edit the format of your label, simply click on the Label Element in the Track View to bring up the label’s Element tab, and then click on the Edit Label Format button. This will show the Label Editor, which functions similarly to the Text PIP Editor. A couple of things to note: The first line in the labels text file will be shown in the Label Editor, and you cannot modify this text. The purpose of the text is to get an idea of what the label will look like as you are formatting it. Also, when pressing the Save button in the Label Editor toolbar, the format gets saved automatically to the file labelformat.html without the option to rename the file from the UI.
Creating Caption Elements
Permalink to Creating Caption ElementsBy default, when you add a new Caption Element to your dataset, the color of the caption text will be white against a semi-transparent background, and the text will be rendered using the Free Sans font. To edit the format of your caption, simply click on the Caption Element in the Track View to bring up the caption’s Element tab, and then click on the Edit Caption Format button. This will show the Caption Editor, which functions similarly to the Text PIP Editor. A couple of things to note: The first line in the captions text file will be shown in the Caption Editor, and you cannot modify this text. The purpose of the text is to get an idea of what the caption will look like as you are formatting it. Also, when pressing the Save button in the Caption Editor toolbar, the format gets saved automatically to the file captionformat.html without the option to rename the file from the UI.
Localization / Translation
Permalink to Localization / TranslationThe VPLE’s UI may be localized (i.e. translated) to other languages. The VPLE UI uses a third-party application called Qt Linguist to assist you in translating from English to other languages. Please see the Translations Manuals for more information.
Once translation files are in place on your SOS computer (as described in the Translations Manual), you can change the language of the VPLE UI by clicking the Language menu in the Menu Bar and selecting the language of interest from the drop-down box. Any untranslated text will fall back to English.
If you have translated Site-Custom datasets, you need to update the SOS database on your SOS computer in order for those datasets to appear while searching and browsing in Presentation Mode. To do this, follow the instructions outlined in the Get the Latest SOS Database section.
Frequently Asked Questions
Permalink to Frequently Asked QuestionsWhy can’t I work on a Presentation and Dataset at the same time?
Permalink to Why can’t I work on a Presentation and Dataset at the same time?You can only work on one task at a time and you must save or clear your work (by selecting New from the Tool Bar) before going on to another task.
Sometimes, I can’t I modify the Layer and PIP Elements of a dataset that I am editing as an override from my presentation playlist. Why?
Permalink to Sometimes, I can’t I modify the Layer and PIP Elements of a dataset that I am editing as an override from my presentation playlist. Why?A presentation playlist consists of a list of datasets. Each dataset’s playlist.sos location is specified via the include attribute (one include attribute/value pair per dataset, where the value is the absolute path of the playlist.sos filename). Layer and PIP Elements specified inside a dataset’s playlist.sos file may not be editable because they are defined within a different file (i.e. the dataset playlist.sos file, not the presentation playlist file itself that you are currently working on). Editing these Elements would require editing the dataset’s file, which is not allowed. For example, you cannot modify or delete an existing Layer or PIP Element, but you can add a new Layer or PIP Element. You also cannot delete an Audio or Label Element, but you can modify them (i.e. select a different audio file or label file from the Element tab).
Where is the yellow resize corner for Base Layer Elements?
Permalink to Where is the yellow resize corner for Base Layer Elements?You cannot resize or move a Base Layer. Therefore, you will not see a yellow resize corner on a Base Layer Element in the Preview when you click on it.
Why does it look like my dataset is not animating even though the Time field is increasing?
Permalink to Why does it look like my dataset is not animating even though the Time field is increasing?If you load a dataset and press the Play button, and then you notice that the
Time field is updating but the Frame # is not updating, this is likely because
the Time to Dwell on First Frame (milliseconds) (firstdwell attribute in SOS)
has been set to a non-zero value. This is the same for Time to Dwell on Last
Frame (milliseconds) (lastdwell attribute in SOS). These attributes are shown
in the Animation Tab.
I clicked on an Element in the Track View, but no Element was highlighted in the Preview. Why?
Permalink to I clicked on an Element in the Track View, but no Element was highlighted in the Preview. Why?If you click on an Element in the Track View, the Element gets highlighted in the Preview. If you find that no Element was highlighted in the Preview, the Show/Hide button of that Element in the Track View may be set to Hide. For PIPs, the PIP might have a Delay time or Fadein Time set to values that prevent the PIP from showing up until a specified animation time is reached. Or, PIPs or Layers might have an Opacity value set to 0.0.
Why is my Layer’s Eye button in the Track Lane disabled?
Permalink to Why is my Layer’s Eye button in the Track Lane disabled?One of the attributes for Layers in the Element tab is a Layer is Visible
checkbox (layervisible attribute in SOS). If this is set to off (unchecked),
the Layer will not be visible in the Preview, and the Layer in the Track View
will have an Eye icon with a slash through it, indicating it is in Hide mode.
The Eye button will also be disabled. To show the Layer in the Preview, the
Layer is Visible checkbox must be set to on (checked) in order to enable the
Eye button.
Where is the background attribute located in the VPLE?
Permalink to Where is the background attribute located in the VPLE?The VPLE does not support the deprecated SOS background attribute.
How do I add KML and WMS media types to my dataset?
Permalink to How do I add KML and WMS media types to my dataset?Why do I see a Data File Error in the Preview window when I load a dataset that has KML or WMS data in it? The visual preview for datasets with KML or WMS data types are not supported by the VPLE.
I set the Skip attribute in the Animation tab, but it is not skipping in the Preview when I play the dataset. Why?
Permalink to I set the Skip attribute in the Animation tab, but it is not skipping in the Preview when I play the dataset. Why?The Skip every N Frames While Animating attribute (skip attribute in SOS) can
be set in the Animation Tab and will be honored on SOS,
however, it is ignored during playback of the dataset in the VPLE Preview.
Changing the Start Dataset on Frame attribute (startframe attribute in SOS) to 1 does not seem to do anything. Why?
Permalink to Changing the Start Dataset on Frame attribute (startframe attribute in SOS) to 1 does not seem to do anything. Why?A startframe of 0 and a startframe of 1 both correspond to the first
frame in the dataset. A startframe of 2 corresponds to the 2nd frame in the
dataset, and so on.
How do I enter negative end frame values?
Permalink to How do I enter negative end frame values?Negative values for the End Dataset on Frame attribute in the
Animation Tab (endframe attribute in SOS) cannot be
set using the VPLE. However, you can open the dataset’s playlist.sos file and
edit that attribute manually.
How do I enter negative start frame values?
Permalink to How do I enter negative start frame values?Negative values for the Start Dataset on Frame attribute in the
Animation Tab (startframe attribute in SOS) cannot be
set using the VPLE. However, you can open the dataset’s playlist.sos file and
edit that attribute manually.
How do I enter negative end frame values?
Permalink to How do I enter negative end frame values?Negative values for the End Dataset on Frame attribute in the
Animation Tab (endframe attribute in SOS) cannot be set
using the VPLE. However, you can open the dataset’s playlist.sos file and edit
that attribute manually.
My movie is showing up as black. Why?
Permalink to My movie is showing up as black. Why?Sometimes, when you first load a dataset that has movie data, the movie will not show up unless you press the Play button.
My image directory sometimes plays out of sync. Why?
Permalink to My image directory sometimes plays out of sync. Why?Limitations for a dataset that contains a directory of images that may cause a dataset’s data to get out of sync during playback include:
- Images whose resolution is greater than 4096 in width
- Frames per second (fps) greater than 25 or 30
- A dataset with many image directories (for example, image directories specified by many Layers and PIPs) running at high frame rates
Appendix A: SOS Definitions
Permalink to Appendix A: SOS DefinitionsDataset
Permalink to DatasetA packaged collection of coherent content (multiple layers, timestamps, pips). For example, the Blue Marble dataset located in its own folder, /shared/sos/media/land/blue_marble/blue_marble/.
Dataset Description
Permalink to Dataset DescriptionText that describes a Site-Custom dataset and that is located in the dataset playlist file via the description attribute. Dataset descriptions are accessed from the the iPad SOS Remote app’s Data Info button.
Dataset Playlist
Permalink to Dataset PlaylistSOS datasets are located in the /shared/sos/media/ or /shared/sos/rt/folders on your SOS computer. With the exception of the /shared/sos/media/site-custom/ folder, datasets contained within those two folders are not editable (these are known as NOAA-managed datasets).
Each dataset is contained within its own folder. Within each dataset’s folder is a playlist.sos text file (a variation, such as playlist_audio.sos may also exist) that contains a set of attribute/value pairs that describes the dataset. The attributes in the VPLE’s Tab Views is what gets written to the playlist.sos file. The dataset’s folder also contains the content/imagery for the dataset, such as movie or image files.
For example, the Blue Marble dataset’s playlist.sos file is located on your SOS computer in the following folder, /shared/sos/media/land/blue_marble/blue_marble/ and the Blue Marble dataset’s playlist.sos file contains the following attribute/value pairs:
name = Blue Marble
data = 4096.jpg
fps = 40
tiltx = 23.5
category = land
catalog_url = http://sos.noaa.gov/Datasets/dataset.php?id=82
majorcategory = Land
Live Program
Permalink to Live ProgramLive programs are SOS presentations that have been created by users of SOS, including scientists, educators, museum staff and student interns. They are carefully crafted presentations that use SOS datasets to tell a story and teach audiences about a specific topic such as ocean currents or extreme weather events. Included in each Live Program is an SOS presentation playlist (i.e. a collection of datasets) and a script with notes for presenters and sometimes supplementary educational materials (i.e. clicker questions and classroom lesson plans). Please see the Live Programs page in the Education section for more information.
NOAA-Managed Dataset
Permalink to NOAA-Managed DatasetDatasets managed by NOAA that are automatically downloaded to your SOS computer. NOAA-managed datasets are located either in the /shared/sos/media/ folder (with the exception of /shared/sos/media/site-custom/) and the /shared/sos/rt/ folder. Datasets in these folders should never be edited.
Presentation Playlist
Permalink to Presentation PlaylistA presentation playlist is a collection of datasets grouped together in a list for a presentation. Every presentation playlist ends with the .sos extension (for example, demo.sos). Presentation playlists are typically located in the /home/sos/sosrc/ folder or the /home/sosdemo/sosrc/ on the SOS computer.
Presenter Notes
Permalink to Presenter NotesNotes for presenters that are associated with a presentation playlist or a Live Program. Presenter Notes are located at the end of a presentation playlist file and can be typed into the file directly (not recommended) or can be modified and saved to that file by using the VPLE’s Presenter Notes section in the Summary View in Presentation Mode. Presenter Notes are accessed from the the iPad SOS Remote app’s Presenter Notes button.
Site-Custom Dataset
Permalink to Site-Custom DatasetA Site-Custom dataset is a dataset that has been created by a site that is not part of the NOAA-managed SOS Data Catalog. Custom datasets should be placed in the /shared/sos/media/site-custom/ folder.
Appendix B: Attribute Descriptions
Permalink to Appendix B: Attribute Descriptionsthe right-hand side. The credits listed are: Each of the text or number fields in the Tab View of Dataset Mode corresponds to an attribute/value pair that gets written to a dataset's playlist.sos file when a dataset is saved. To get more information about of each of the attributes, look for the UI attribute description and click on its corresponding attribute link.
About Tab
Permalink to About Tab| User Interface Text | Link to Attribute Description |
|---|---|
| Name (required) | name |
| Major category | majorcategory |
| Sub category | subcategory |
| Keywords | keywords |
| Creator | creator |
| Publisher | publisher |
| URL | catalog_url |
Global Tab
Permalink to Global Tab| User Interface Text | Link to Attribute Description |
|---|---|
| X-axis (degrees) | tiltx |
| Y-axis (degrees) | tilty |
| Z-axis (degrees) | tiltz |
| Z-rotation enabled | zrotationenable |
| Z-angle (degrees) | zrotationangle |
| Z-frames per second | zfps |
| Select script file | script |
| Custom icons | icons |
Animate Tab
Permalink to Animate Tab| User Interface Text | Link to Attribute Description |
|---|---|
| Animate when loaded | animate |
| Frames per second | fps |
| Start dataset on frame | startframe |
| End dataset on frame | endframe |
| Stop dataset on frame | stopframe |
| Skip every N frames while animating | skip |
| Time to dwell on first frame (milliseconds) | firstdwell |
| Time to dwell on last frame (milliseconds) | lastdwell |
| Repeat time (duration) of dataset (seconds) | duration |
| Auto-Run: Total duration of dataset (seconds) | timer |
Description Tab
Permalink to Description Tab| User Interface Text | Link to Attribute Description |
|---|---|
| Add new description | description |
Base Layer Element Tab
Permalink to Base Layer Element Tab| User Interface Text | Link to Attribute Description |
|---|---|
| Select base layer data | data |
Layer Element Tab
Permalink to Layer Element Tab| User Interface Text | Link to Attribute Description |
|---|---|
| Select layer data | layerdata |
| Name | layer |
| Layer is visible | layervisible |
| Opacity | layeralpha |
| Western (left) boundary | layerwest |
| Eastern (right) boundary | layereast |
| Northern (top) boundary | layernorth |
| Southern (bottom) boundary | layersouth |
| Minimum zoom | layerminzoom |
| Maximum zoom | layermaxzoom |
PIP Element Tab
Permalink to PIP Element Tab| User Interface Text | Link to Attribute Description |
|---|---|
| Select PIP data | pip |
| Name | pipname |
| Style | pipstyle |
| Constrain dimensions | N/A |
| Width | pipwidth |
| Height | pipheight |
| PIP is visible | pipvisible |
| Opacity | pipalpha |
| Display time (seconds) | piptimer |
| Delay time (seconds) | pipdelay |
| Fadein time (seconds) | pipfadein |
| Fadeout time (seconds) | pipfadeout |
| Frames per second | pipfps |
| PIP offset (wapred near poles) | pipvertical, piphorizontal |
| PIP offset (not warped near poles) | pipcoords |
Moving PIP (add/edit)
Permalink to Moving PIP (add/edit)| User Interface Text | Link to Attribute Description |
|---|---|
| Select path file | pippath |
| Show lines | pippathformat |
| Line width | pippathformat |
| Line color | pippathformat |
Label Element Tab
Permalink to Label Element Tab| User Interface Text | Link to Attribute Description |
|---|---|
| Select label file | label |
| Height (degrees) | labelheight |
| Label Longitude (degrees) | labelhorizontal |
| Label Latitude (degrees) | labelvertical |
| Format (font, color, etc) | labelformat |
| Labels are visible | labelvisible |
Caption Element Tab
Permalink to Caption Element Tab| User Interface Text | Link to Attribute Description |
|---|---|
| Select caption file | caption |
| Height (degrees) | captionheight |
| Caption Longitude (degrees) | captionhorizontal |
| Caption Latitude (degrees) | captionvertical |
| Format (font, color, etc) | captionformat |
| Captions are visible | captionvisible |
Audio Element Tab
Permalink to Audio Element Tab| User Interface Text | Link to Attribute Description |
|---|---|
| Select audio file | audio |
| Volume level | volume |