Legacy SOS Explorer® 1.4.1 Set Up Guide
Legacy SOSx Set Up Guide
Permalink to Legacy SOSx Set Up GuideThis guide will takeyou step-by-step through the process of setting up your Science On a Sphere® Explorer® (SOSx).
Wiring Diagram
Permalink to Wiring Diagram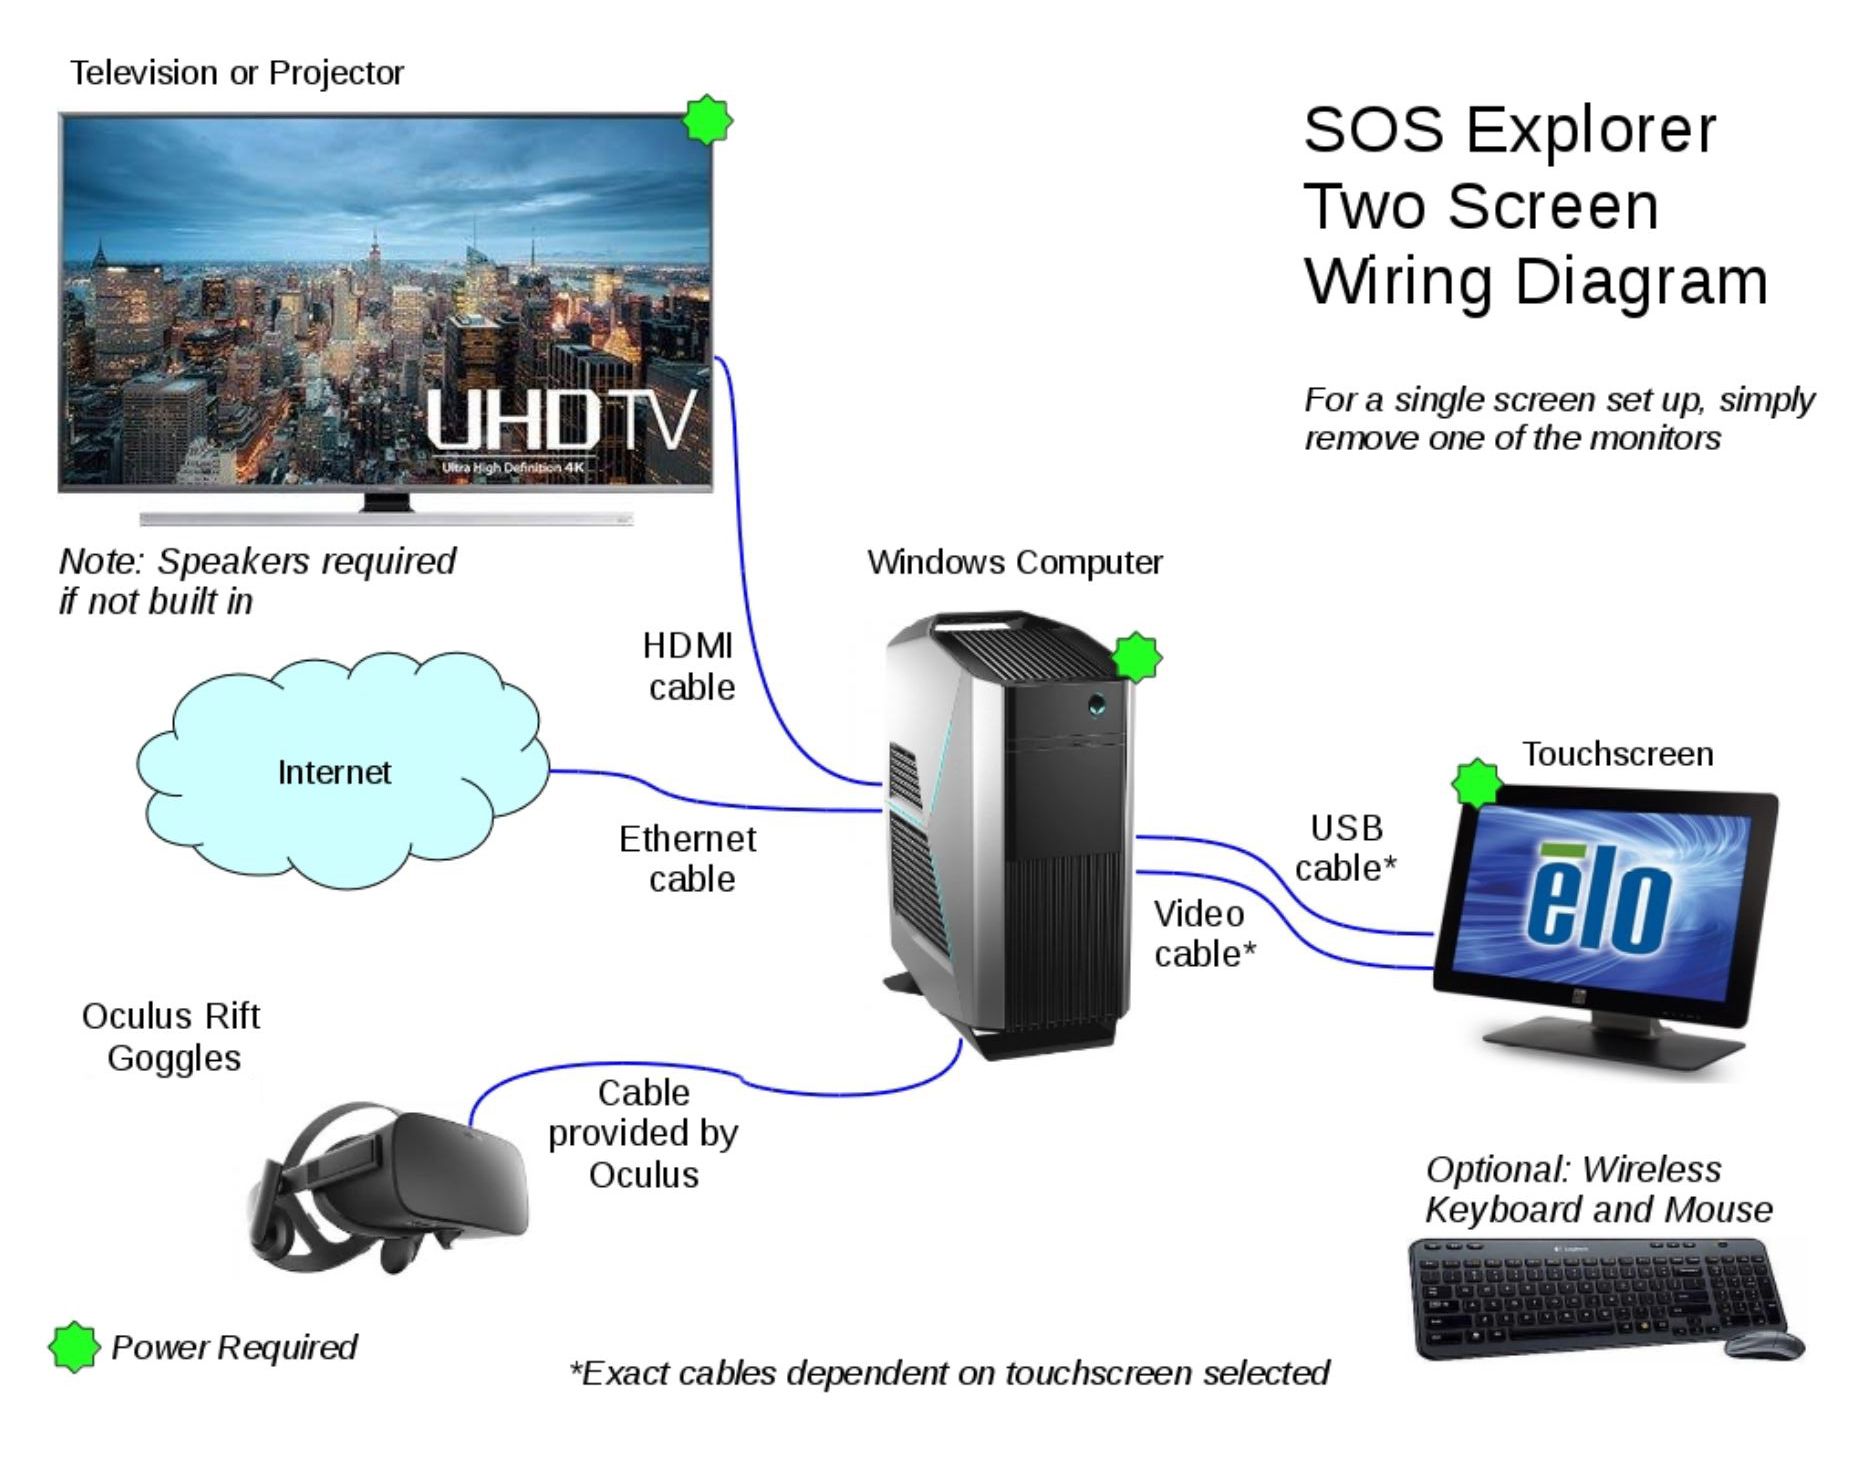
SOS Explorer® two-screen wiring diagram
SOSx runs on a Windows computer and can be configured with up to two screens. In a two-screen configuration, you typically have one large display, such as a TV, connected via HDMI to the computer, and a smaller touchscreen, connected by a video cable and a USB cable to the computer. (The actual cables needed to connect a touchscreen can vary depending on the particular model of touchscreen chosen.) The SOSx computer needs to be connected to the internet via an ethernet cable. And you may connect an Oculus VR headset with the cable provided by Oculus.
You may also optionally connect a wireless keyboard and mouse. This may be useful for maintenance, or for guests to control SOSx if you’re not using a touchscreen.
Screen Resolution Settings and Multiple Monitors
Permalink to Screen Resolution Settings and Multiple MonitorsBefore running SOS Explorer®, the computer should be configured with the proper display configuration. The application expects two monitors to be attached. The main or primary screen should be the touch screen and the secondary screen should be the larger TV. To access the display settings right click on the desktop and choose Display settings.
Configuring the Displays
Permalink to Configuring the Displays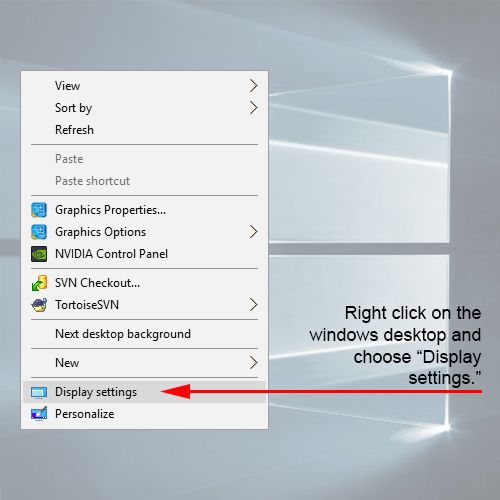
Windows desktop context menu
This will open the settings dialog window where you should try to match the settings outlined below.
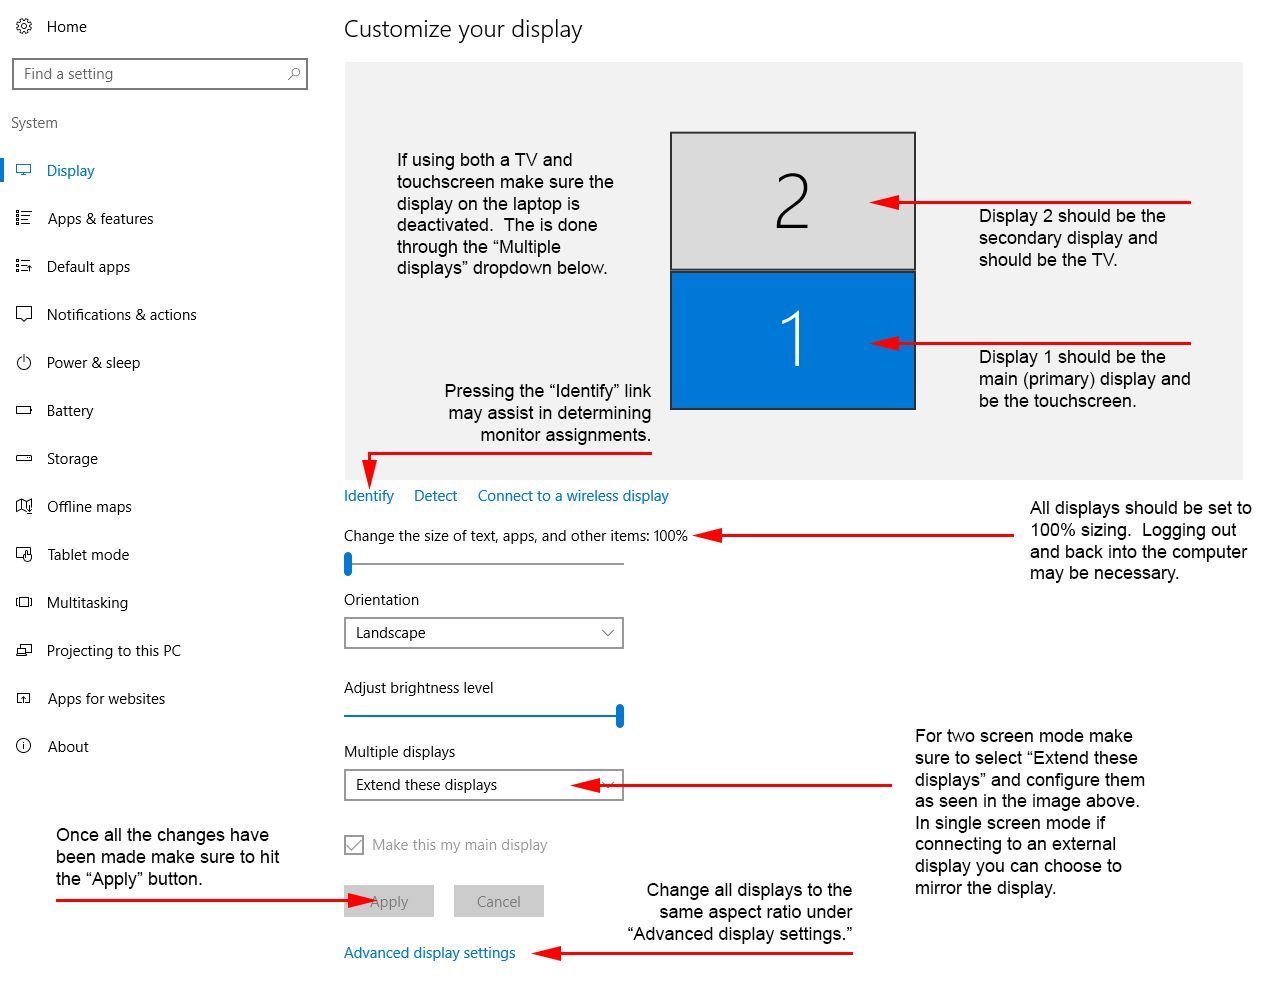
Windows display settings dialog window
In two monitor mode both monitors should be displayed with the main (primary) touchscreen appears below the larger secondary TV. Further all displays should be set to 100% sizing and the extended desktop mode enabled. Multiple displays should be set to Extend these displays. In single monitor mode there will be only one display shown. If using a set of virtual reality glasses they will not appear in this dialog.
Ensure the Aspect Ratios Match
Permalink to Ensure the Aspect Ratios MatchAccess Advanced display settings found at the bottom of the dialog window check to make sure that all the attached displays are running at the same aspect ratio. Typical resolutions include 1920x1080 (1080P) or 3840x2160 (4K or 2160P).
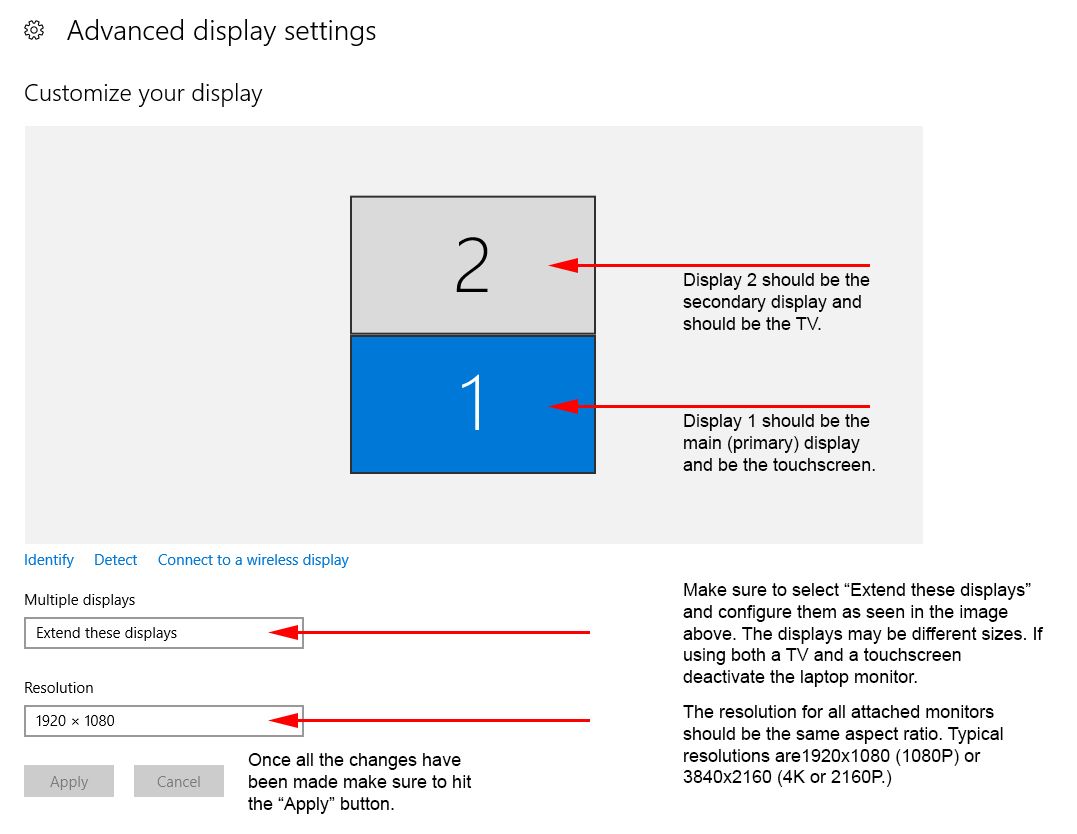
Advanced display settings dialog window
Check the Refresh Rate for the TV
Permalink to Check the Refresh Rate for the TVFinally, it may be necessary to change the refresh rate on the TV. To do this right click on the desktop and select NVIDIA Control Panel.
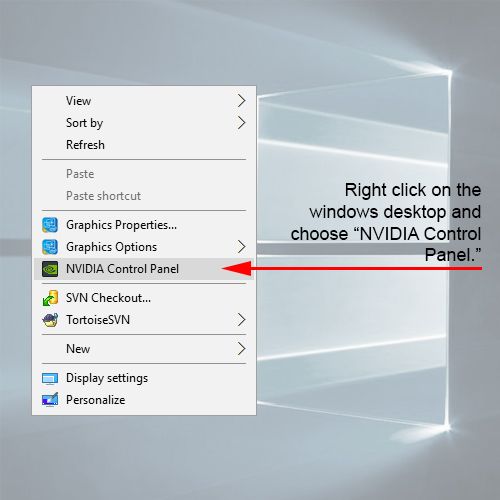
Windows desktop context menu
Select Change resolution from the left panel in the dialog window and then verify that the Refresh rate is set at 60Hz for all the available displays. If you made any changes in this dialog, press Apply.
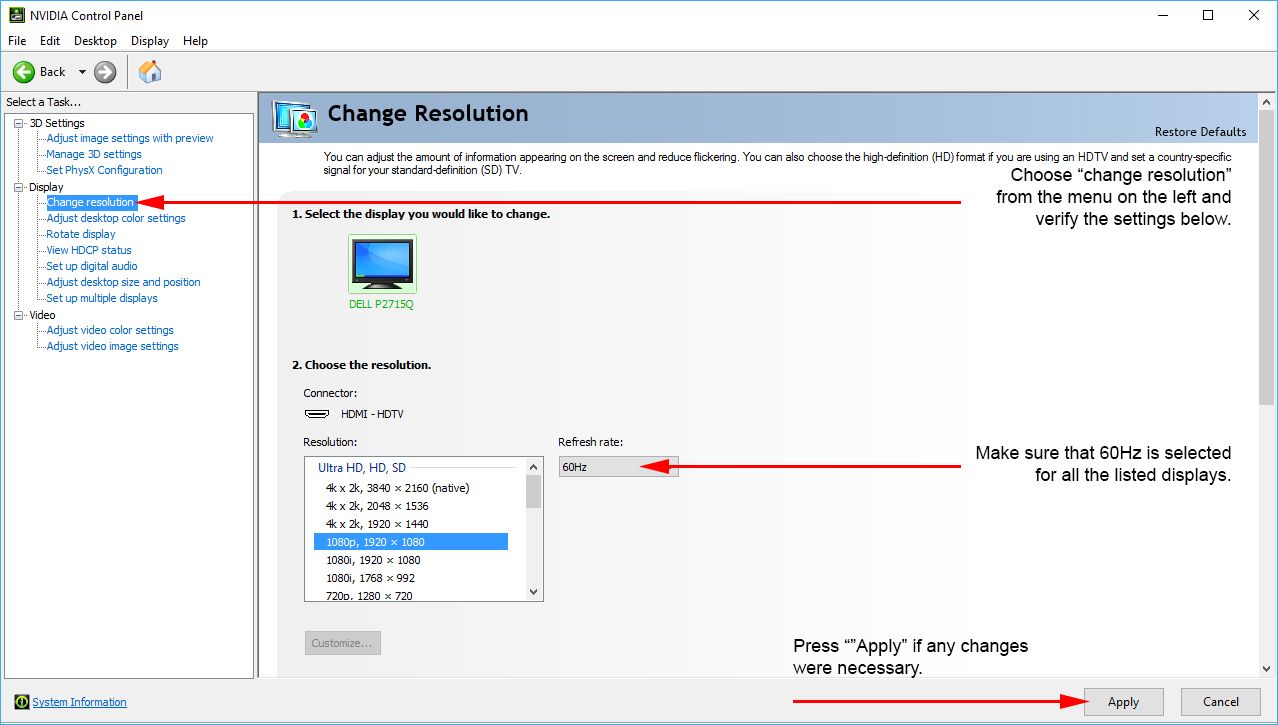
NVIDIA Control Panel dialog window
Set UI Scale Factor
Permalink to Set UI Scale FactorFor Dual Display (2K / 4K Monitors) setups: you will want to run the SOSx Config utility and edit the UI Scale Factor for displays 1 and 2. The recommended settings are 1.65 for dual 2K monitors and 1.65 and 3.0 for 2K / 4K setups.
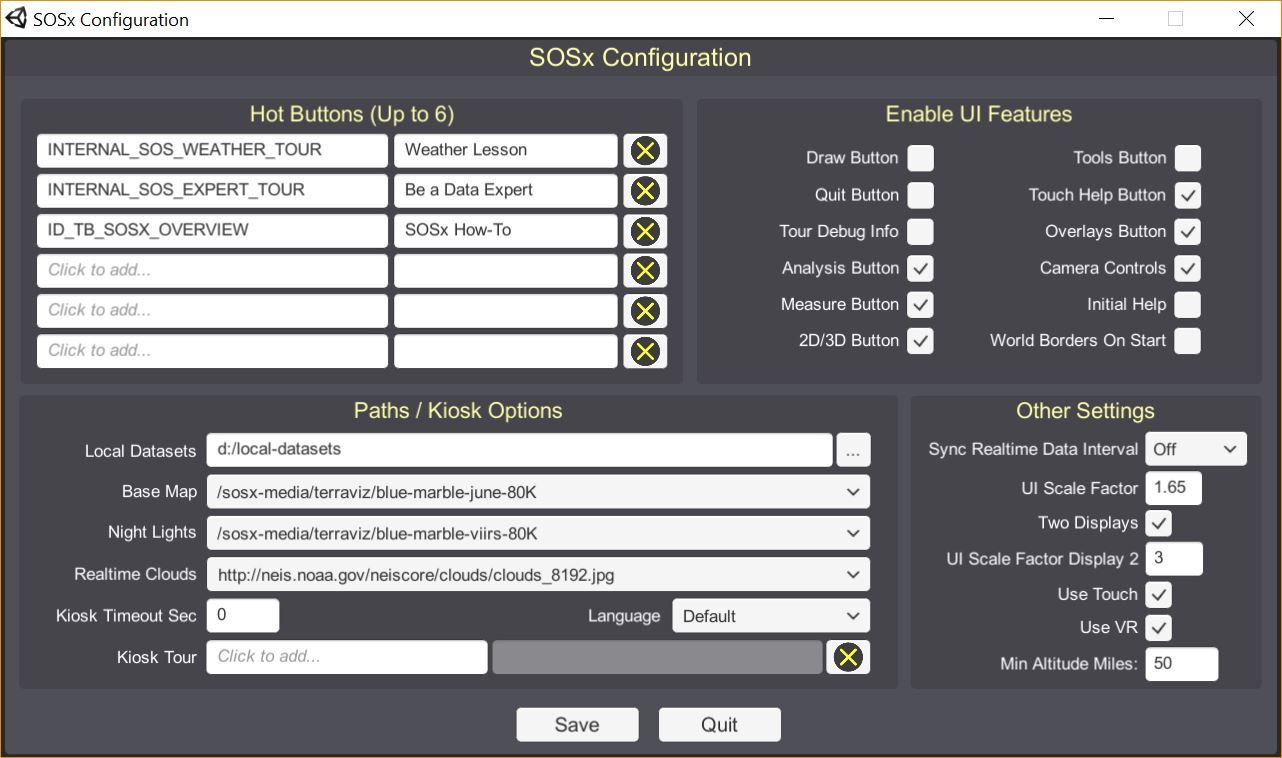
SOSx Config dialog window
Installing SOSx
Permalink to Installing SOSxBefore installing the software, the computer needs to be configured with all the hardware attached and the correct screen configuration. For example, if you’re using a touch screen and a 4k television, make sure the proper resolutions are set for each display. See the Setup Guide for instructions on this. You will also need to be connected to the internet for the final steps of the installation
Launch the Installer
Permalink to Launch the InstallerPlug the hard disk into one of the USB3 ports (they’re blue), if you’re installing multiple copies of SOSx, you can use the same hard disk. If it doesn’t automatically pop up (this behavior depends on configuration settings of your computer), open your file browser and look for the drive named SOSx_Install
Double-click the SOSx-setup.exe file to launch the installation.
Accept the License
Permalink to Accept the LicenseA license agreement will pop up. Read through and click I accept the agreement and then press Next.
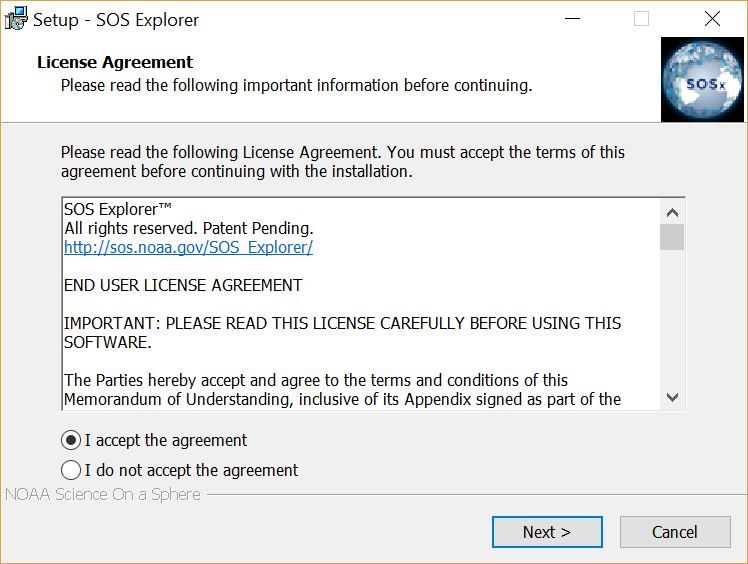
SOSx license agreement
Select Location for the SOSx Installation
Permalink to Select Location for the SOSx InstallationThen you will be asked to select the destination location. Typically, just accept the default location (C:\Program Files\SOS Explorer) by pressing Next.
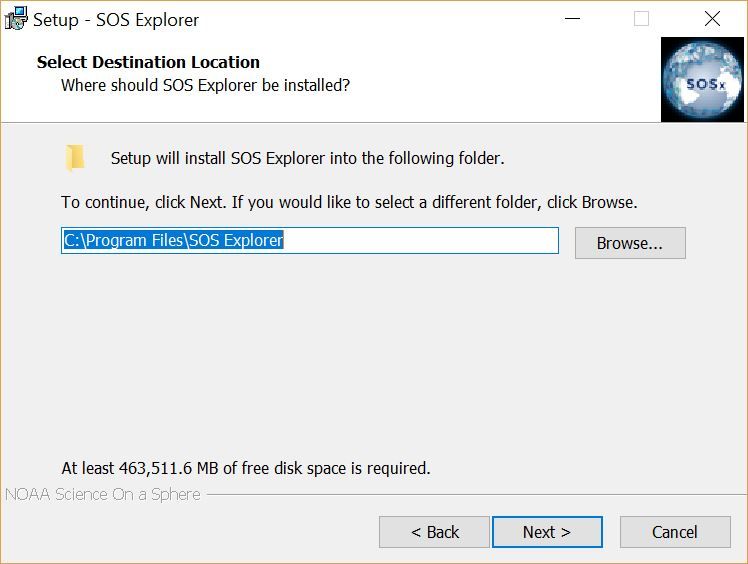
SOSx installation location selection
Choose Dataset Directory
Permalink to Choose Dataset DirectoryNext it will give you a prompt asking where to install the Dataset Directory. If you have just one drive, accept the default C:\local-datasets directory. If you have a secondary drive for storage, switch to that location using the Browse… button. Then press Next.
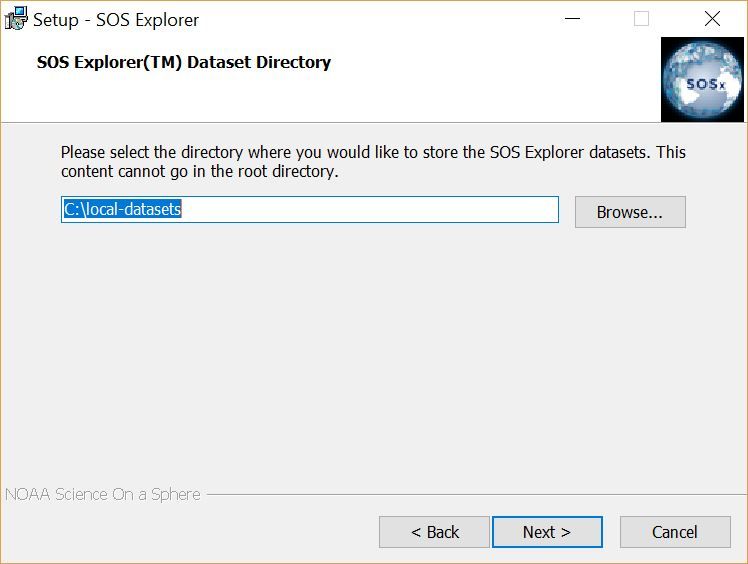
Dataset directory selection
Select Start Menu Folder
Permalink to Select Start Menu FolderIn the Select Start Menu Folder prompt that comes up next, accept the suggested Shortcut by pressing Next.
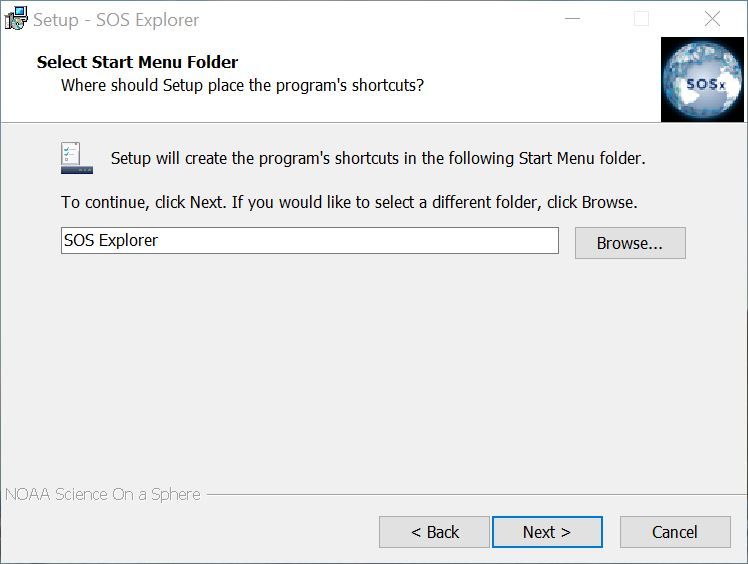
Start Menu folder selection
Select Additional Tasks
Permalink to Select Additional TasksNext you will be asked to Select Additional Tasks. By default Create a desktop icon will be checked. The other options for you to select are:
- Schedule syncing of datasets Tuesday at 9:00AM
- Automatically start on login. This is useful for systems that are set up as a kiosk
- Deactivate Windows swipe gestures (Windows 8.1 or 10). This prevents visitors from easily exiting the application in an exhibit setting
- Deactivate screensaver and power savings. Select this if you don’t want a screensaver coming on when there is no user interaction
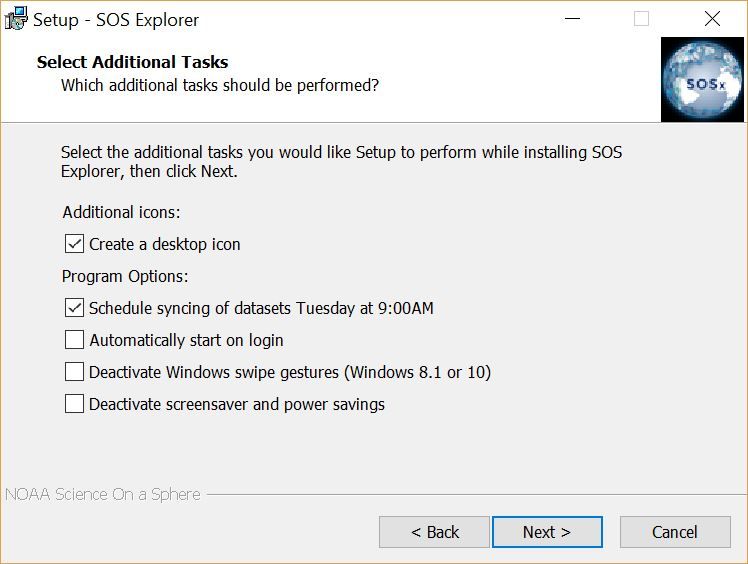
Additional tasks selection
After selecting the above options press Next and a prompt will appear where you can start the installation.
Start the Installation
Permalink to Start the InstallationClick Install to begin the installation. At this point, the install software will download all the SOSx content onto your system. This step will take several hours the first time.
If there are missing software packages, you will be prompted to download these. Agree to all of them in order for the software to run properly. These are video codecs and Windows drivers.
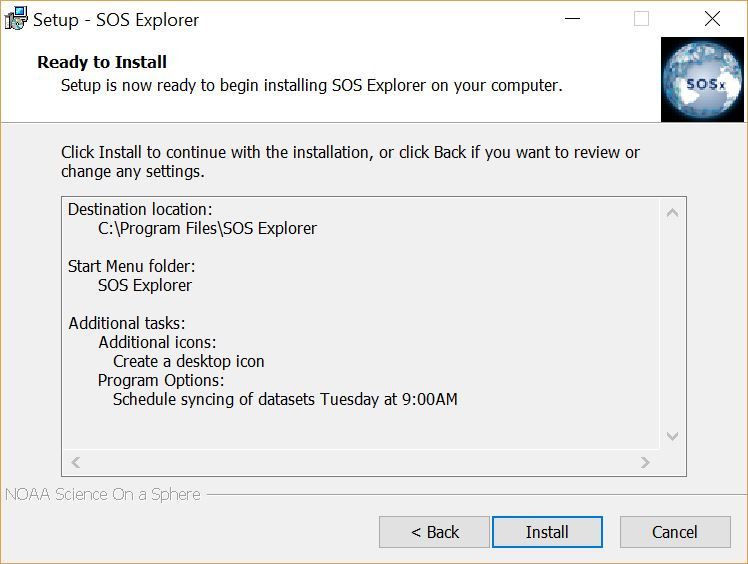
Installation summary
Complete the Installation
Permalink to Complete the InstallationOnce all of the requisite files have been installed on your computer, you’ll see a prompt about completing the setup. You are given the options to view this instruction manual or check for new data. Once you have selected what you want, click Finish.
- If you selected to view the documentation or check for new data, you will see windows for those pop up
- If you selected modify or review configuration the SOSx Configurator will appear
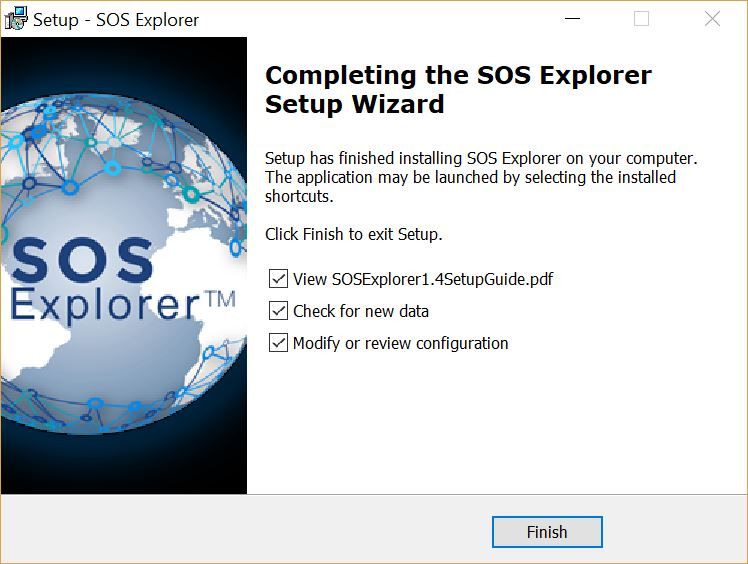
Complete setup
Launch SOSx for the First Time
Permalink to Launch SOSx for the First TimeDouble click on the SOS Explorer® icon on the Desktop (if you kept that default) or in the Start menu folder that was created. This will initiate the registration process.
Registering SOSx
Permalink to Registering SOSxThe first time SOS Explorer® is launched it will need to be registered in order to receive a license. If you have purchased multiple copies, it’s not a problem to use the same information for each.
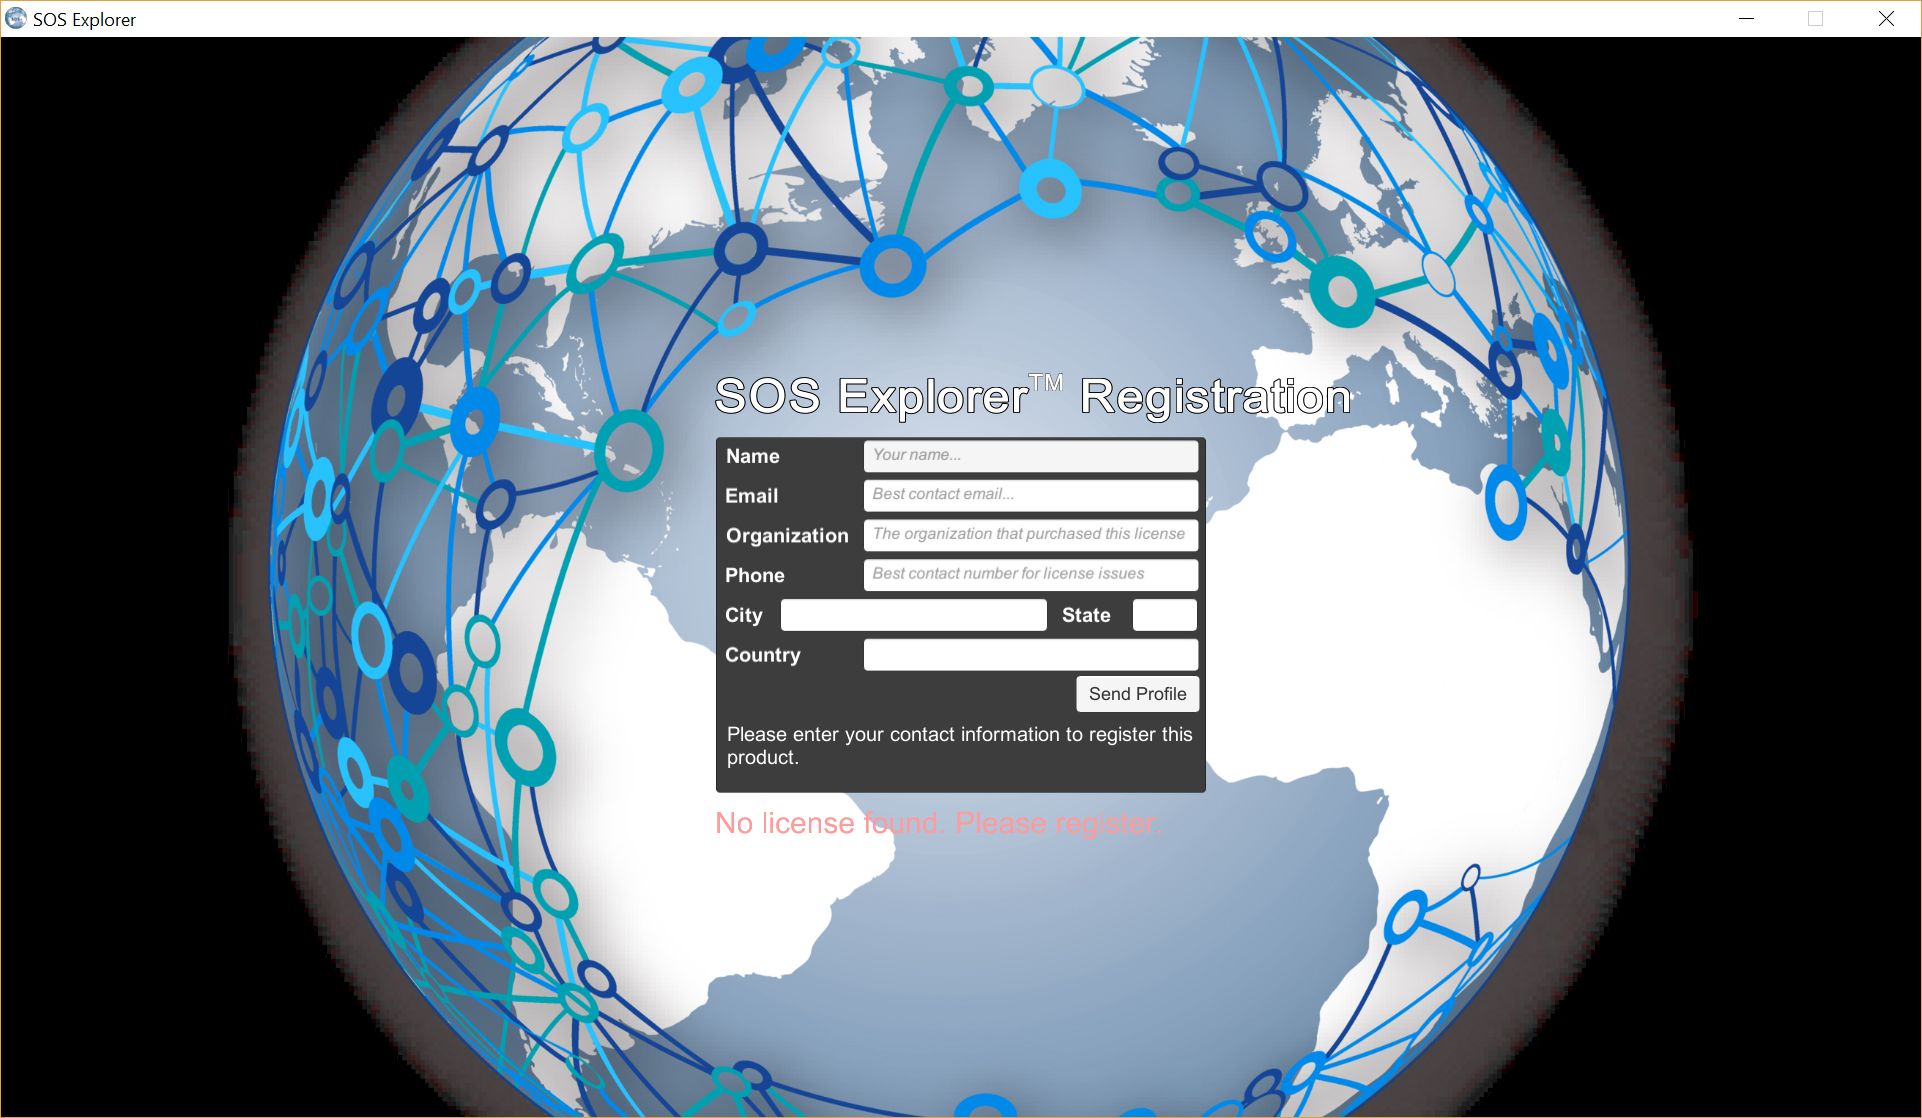
SOSx prompts you to register the software if it can’t find a license when launched.
Registration Fields
Permalink to Registration Fields- Name
- The name of the person who is responsible for administering the installation
- The email address for the person who is responsible for administering the installation
- Organization
- The name of the organization in charge of the SOS Explorer® installation
- Phone
- A contact phone number
- City
- The city where the SOS Explorer® installation is located
- State
- The state where the SOS Explorer® installation is located
- Country
- The country where the SOS Explorer® installation is located
Submitting Registration
Permalink to Submitting RegistrationAfter filling in the information click on Send Profile. You will need to be connected to the Internet for this step.
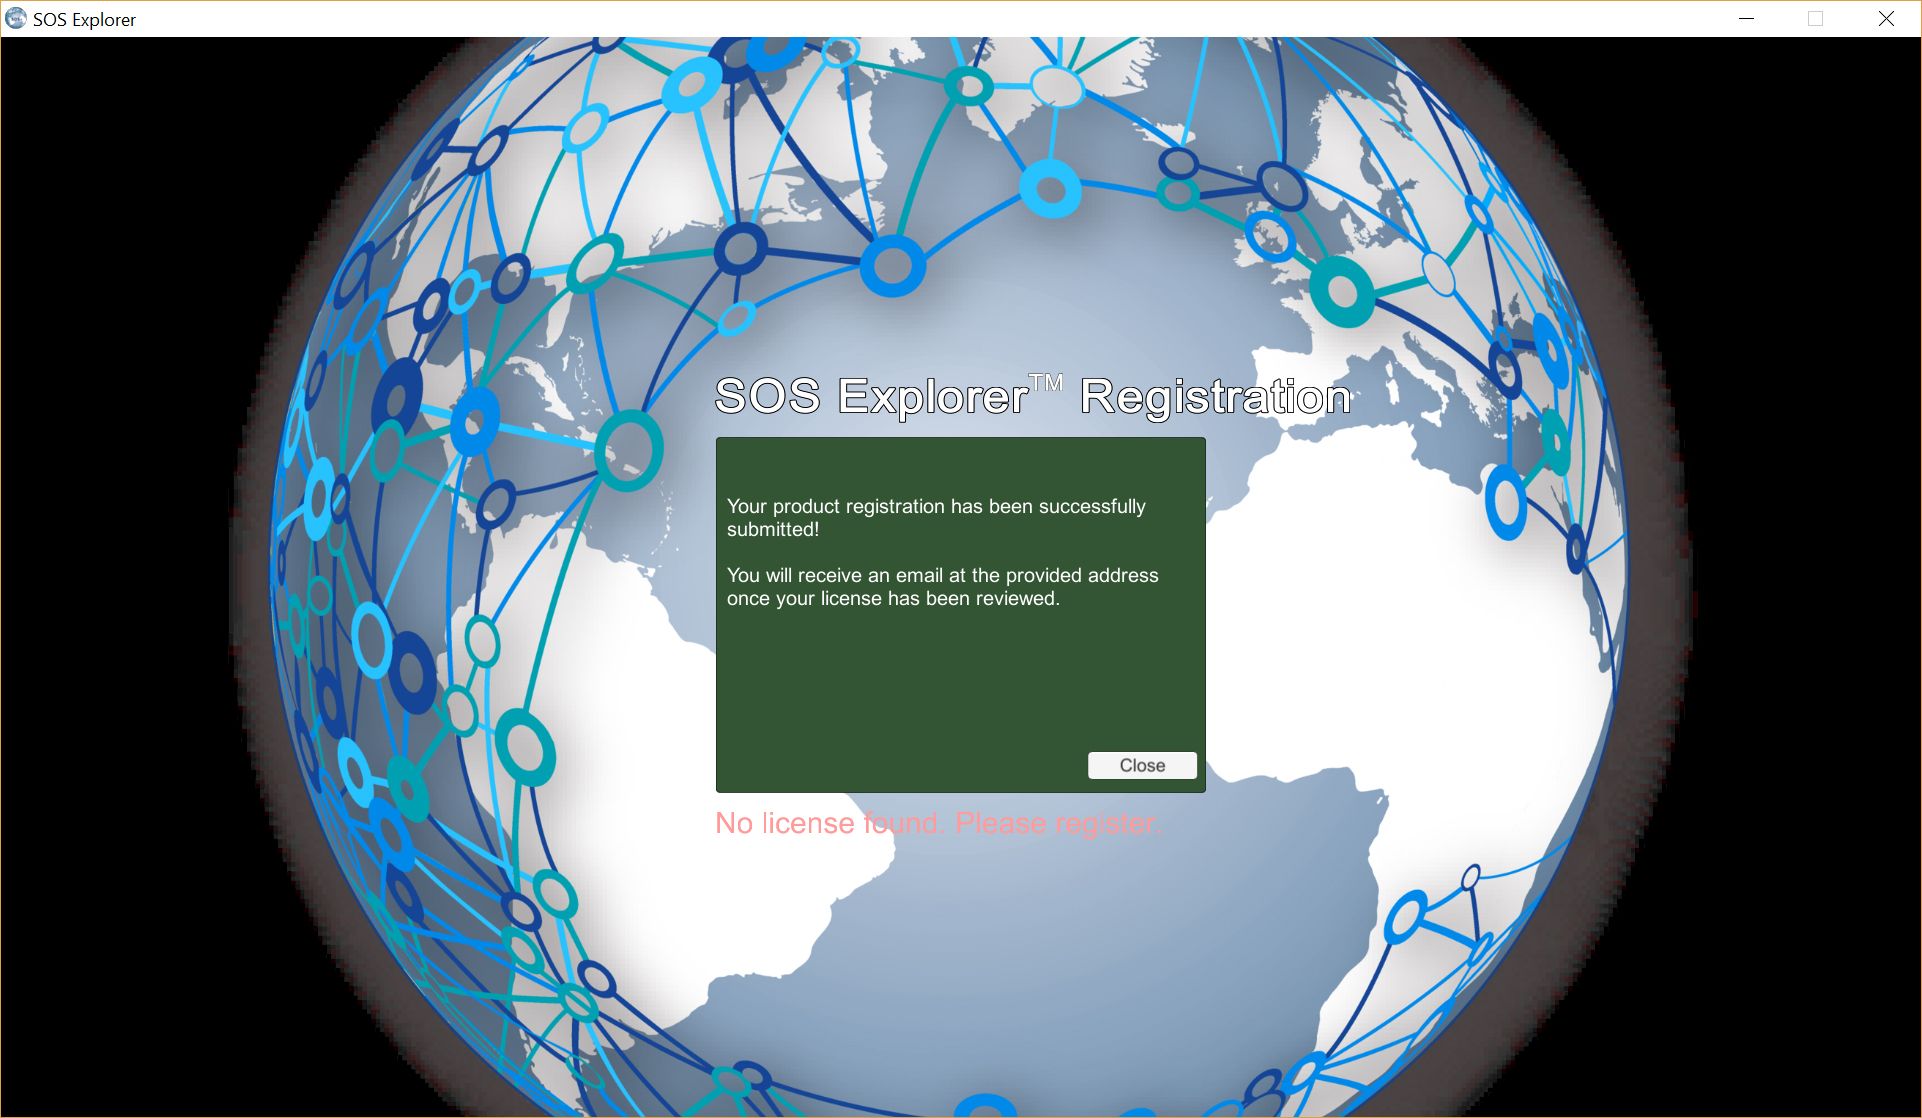
SOSx displays a screen similar to this if your registration information has been submitted successfully.
You will receive an email at the address provided from sos.explorer@noaa.gov saying the license request is being reviewed. Please allow up to 48 hours for activation. You will receive another email when the license request has been approved.
Running SOSx
Permalink to Running SOSxIf you accept all the default names and file locations during the installation process, there will be a SOS Explorer® icon on your Desktop that you can use to launch the application. In the Start menu, there will be a SOS Explorer folder that contains:
- Launcher for SOS Explorer®
- Launcher for the Tour Builder
- Launcher for the SOS Configurator
- Sync Datasets which updates all datasets
- Shortcut to the local datasets folder
- License file
- Setup guide (this document)
- Uninstall application
How to Start SOS Explorer®
Permalink to How to Start SOS Explorer®Click the icon to start SOSx. You will find the icon in the SOS Explorer® folder in the start menu and on the Desktop.

SOS Explorer® desktop icon
How To Exit SOS Explorer®
Permalink to How To Exit SOS Explorer®SOS Explorer® is difficult to quit when it’s set up as an exhibit because it is designed to operate in an unattended exhibit environment where you would not what visitors gaining access to the desktop or operating system. In a classroom setting, the software can be modified through the config file (see Modifying the Configuration) to include an exit button if you prefer. In the exhibit setting, you should leave the keyboard and mouse hidden during normal operation. If you need access to the Desktop or Windows environment you should retrieve the keyboard and mouse and press Alt + F4.
Selecting Datasets
Permalink to Selecting DatasetsThere are over 140 datasets loaded onto your exhibit, including real-time datasets that will automatically update every hour. However, if you would prefer to restrict to a particular theme, for example, if your museum is an aquarium and you want only Water and People datasets to appear in the SOSx Search Window, you can do so. You will still be able to access all the datasets from TourBuilder but they will not show up in the SOSx Search Window.
Restricting Datsets by Category or Narration
Permalink to Restricting Datsets by Category or NarrationOpen local-datasets directory to find a number of small text files including tag_selection_bak.json. Open it.
This is the text you will find:
{
    "inclusive": true,
    "tags": {
        "Movies": {}
    }
}
An example where only narrated movies are included in the search window.
inclusive can either be set to true or false depending on whether you
would like to include or exclude categories (tags), respectively.
{
    "inclusive": false,
    "tags": {
        "Movies": {},
        "Space": {}
    }
}
An example where narrated movies and space datasets are excluded from the search window.
When you’re finished editing the file, save it and rename it to: tag_selection.json and relaunch SOSx.
Available Dataset Categories
Permalink to Available Dataset CategoriesAir, Extras, Land, Movies, People, Real-time, Snow and Ice, Space, Tour, Water.
Datasets may be in multiple categories.
Modifying the Configuration
Permalink to Modifying the ConfigurationSOS Explorer® has many options for customizing your exhibit, from the number of displays, to the timing of data syncs, to whether or not you want to show an exit button (for use in classrooms, for example). In order to change the configuration of your exhibit, we have created a “Configurator” program, which edits a file called config.json for SOS Explorer®.
SOSx Congigurator
Permalink to SOSx CongiguratorWhen you first launch SOSx, the Configurator will automatically open. Any other time, open the SOSx Configurator program (Configurator.exe), located in the same folder as SOSx, to change the primary settings for SOSx.
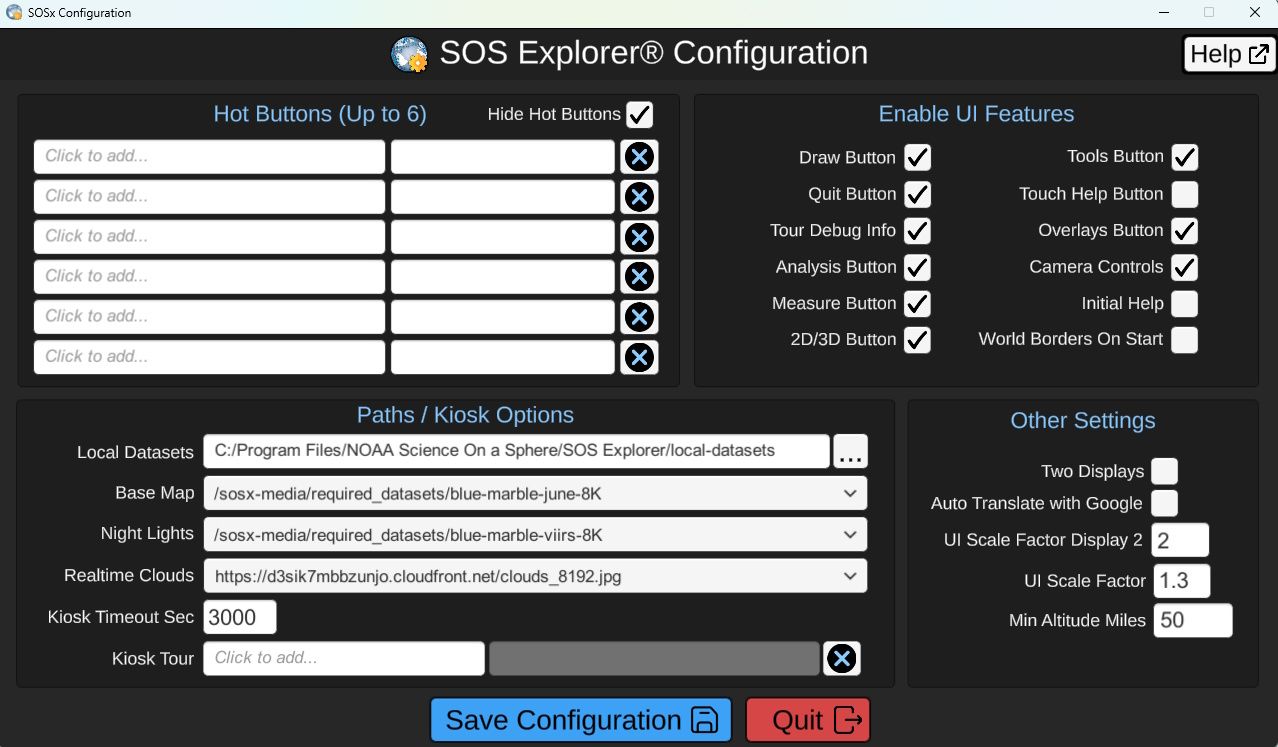
SOSx Configurator window
With Configurator, you can choose which “Hot Buttons” appear on the lower left corner of SOSx, choose basemap / clouds options, link a kiosk tour (a tour that automatically plays after no one has touched the screen for a specified time: Kiosk Timeout Sec), various UI Features (for example, 2D/3D Button on the lower right of the screen can be hidden), and various display options (for example, enabling a second display monitor or an optional VR Oculus Rift).
If you choose all the default options during the installation, you will find the configuration file at: C:\Program Files\SOS Explorer\SOSx_Data\config\config.json
Available Settings
Permalink to Available SettingsEnable UI Features
Permalink to Enable UI Features2D/3D Button
Permalink to 2D/3D ButtonAllows users to switch between 2D map and 3D globe mode.
Analysis Button
Permalink to Analysis ButtonAllows users to probe and analyze datasets, and display graphs.
Camera Controls
Permalink to Camera ControlsDisplays camera controls which allow the user to tilt and rotate the camera (pitch and roll).
Draw Button
Permalink to Draw ButtonAllows users to open a window to draw lines and place icons on the globe.
Measure Button
Permalink to Measure ButtonAllows users to measure distances on the globe.
Overlay Button
Permalink to Overlay ButtonAllows users to display overlays on the globe such as country borders, cities, and grid lines.
Quit Button
Permalink to Quit ButtonAllows users to exit the application by pressing a quit button on the lower-right. Not recommended for exhibits.
Tools Button
Permalink to Tools ButtonShows a menu with a variety of resources. Normally hidden.
World Borders on Start
Permalink to World Borders on StartWhen checked, displays country borders when the application is started, when unchecked shows the globe without borders. Default is unchecked.
Paths / Kiosk Options
Permalink to Paths / Kiosk OptionsBase Map
Permalink to Base MapThe directory where the chosen Earth basemap is installed. This is typically either an 8K or 80K version of NASA’s Blue Marble.
Kiosk Timeout Seconds
Permalink to Kiosk Timeout SecondsThe number of seconds before the automatic kiosk tour will run when there is no activity. Default is 420.
Kiosk Tour
Permalink to Kiosk TourThe dataset ID of the tour to run when there is no activity.
Language
Permalink to LanguageThe language that should be used for display. Typically this should remain the default unless you want to override the system settings.
Local Datasets
Permalink to Local DatasetsThe location where the datasets are installed.
Night Time Lights
Permalink to Night Time LightsThe directory where the chosen Earth night time lights dataset is installed. This is typically either an 8K or 80K version of NASA’s Black Marble.
Real-Time Clouds
Permalink to Real-Time CloudsThe URL where the most recent version of clouds are located. This is typically either a 4K or 8K black and white equidistant projected cloud image.
Other Settings
Permalink to Other SettingsMin Altitude Miles
Permalink to Min Altitude MilesHow close to allow the view point to get to the Earth.
Sync Realtime Data Interval
Permalink to Sync Realtime Data IntervalThe amount of time to wait between checks for new realtime data on the SOS FTP.
Two Displays
Permalink to Two DisplaysThe number of displays to show SOS Explorer® on. Checking the box means there are two displays, otherwise there is one.
UI Scale Factor
Permalink to UI Scale FactorA percentage to scale the UI elements on the main display. A value of 1 is the original size, but touch-screen users may prefer larger values such as 1.75. Default is 1.75.
UI Scale Factor Display 2
Permalink to UI Scale Factor Display 2A percentage to scale the UI elements on the secondary display. A value of 1 is the original size. Default is 1.75.
Use Touch
Permalink to Use TouchCheck the box in most circumstances unless told otherwise.
Use VR
Permalink to Use VREnable support for virtual reality using the Oculus Rift and Leap Motion. See Virtual Reality Support for additional details.
config.json
Permalink to config.jsonenableFullFTPSyncOnStart
Permalink to enableFullFTPSyncOnStarttrue to launch a full data synchronization process every time SOSx is started.
This may impact system performance. The default is false.
enableRealtimeFTPSyncOnIdle
Permalink to enableRealtimeFTPSyncOnIdletrue to synchronize the latest real-time datasets when there is no activity.
The default is true. When set to false, the real-time datasets do not sync.
hideCountries
Permalink to hideCountriesA string array of country names that should not appear in the corresponding overlay.
refreshLocalDatasetsSec
Permalink to refreshLocalDatasetsSecThe number of seconds to wait between real-time datasets syncing when the
machine is idle. The default is 1800.
Dataset Downloads
Permalink to Dataset DownloadsNew datasets are continually being added to SOSx and real-time datasets are being updated regularly. Defaults have been set for automatic data downloads, but you have the ability to change them to meet your site’s needs. All dataset downloads require the computer to have an internet connection.
If you want to manually update the datasets, you can do this by selecting Sync Datasets in the SOS Explorer folder found in the Windows Start menu under All Programs.
Real-time Datasets
Permalink to Real-time DatasetsMost real-time datasets show new imagery either hourly or daily so that you can
display current events. They are synced every time the software is idle. The
time it takes for the software to be considered idle is defined by
kioskTimeoutSec in the config file, which by default is set to 7 minutes. Once
idle, the real-time datasets are synced by default every 30 minutes, as defined
by the refreshLocalDatasetsSec option in the config file. Other real-time
datasets (such as real-time earthquakes) attempt to download the latest data
each time the dataset is loaded and require an Internet connection.
Non real-time Datasets
Permalink to Non real-time DatasetsIf the Schedule syncing of datasets Tuesday at 9:00AM checkbox was left checked during the setup process all other datasets are updated every Tuesday at 9:00am through the Windows task scheduler. When the data download is happening, it’s possible that you will see a decline in performance for the SOSx software. If you plan on leaving the computer on all the time, you can set this download to occur in the middle of the night to avoid potential performance issues.
If your computer happens to be off at 9:00am on Tuesday, you can use the manual sync described above to get any new datasets that you are missing.
The scheduled task can be modified by starting the Task Scheduler found in the Start menu.
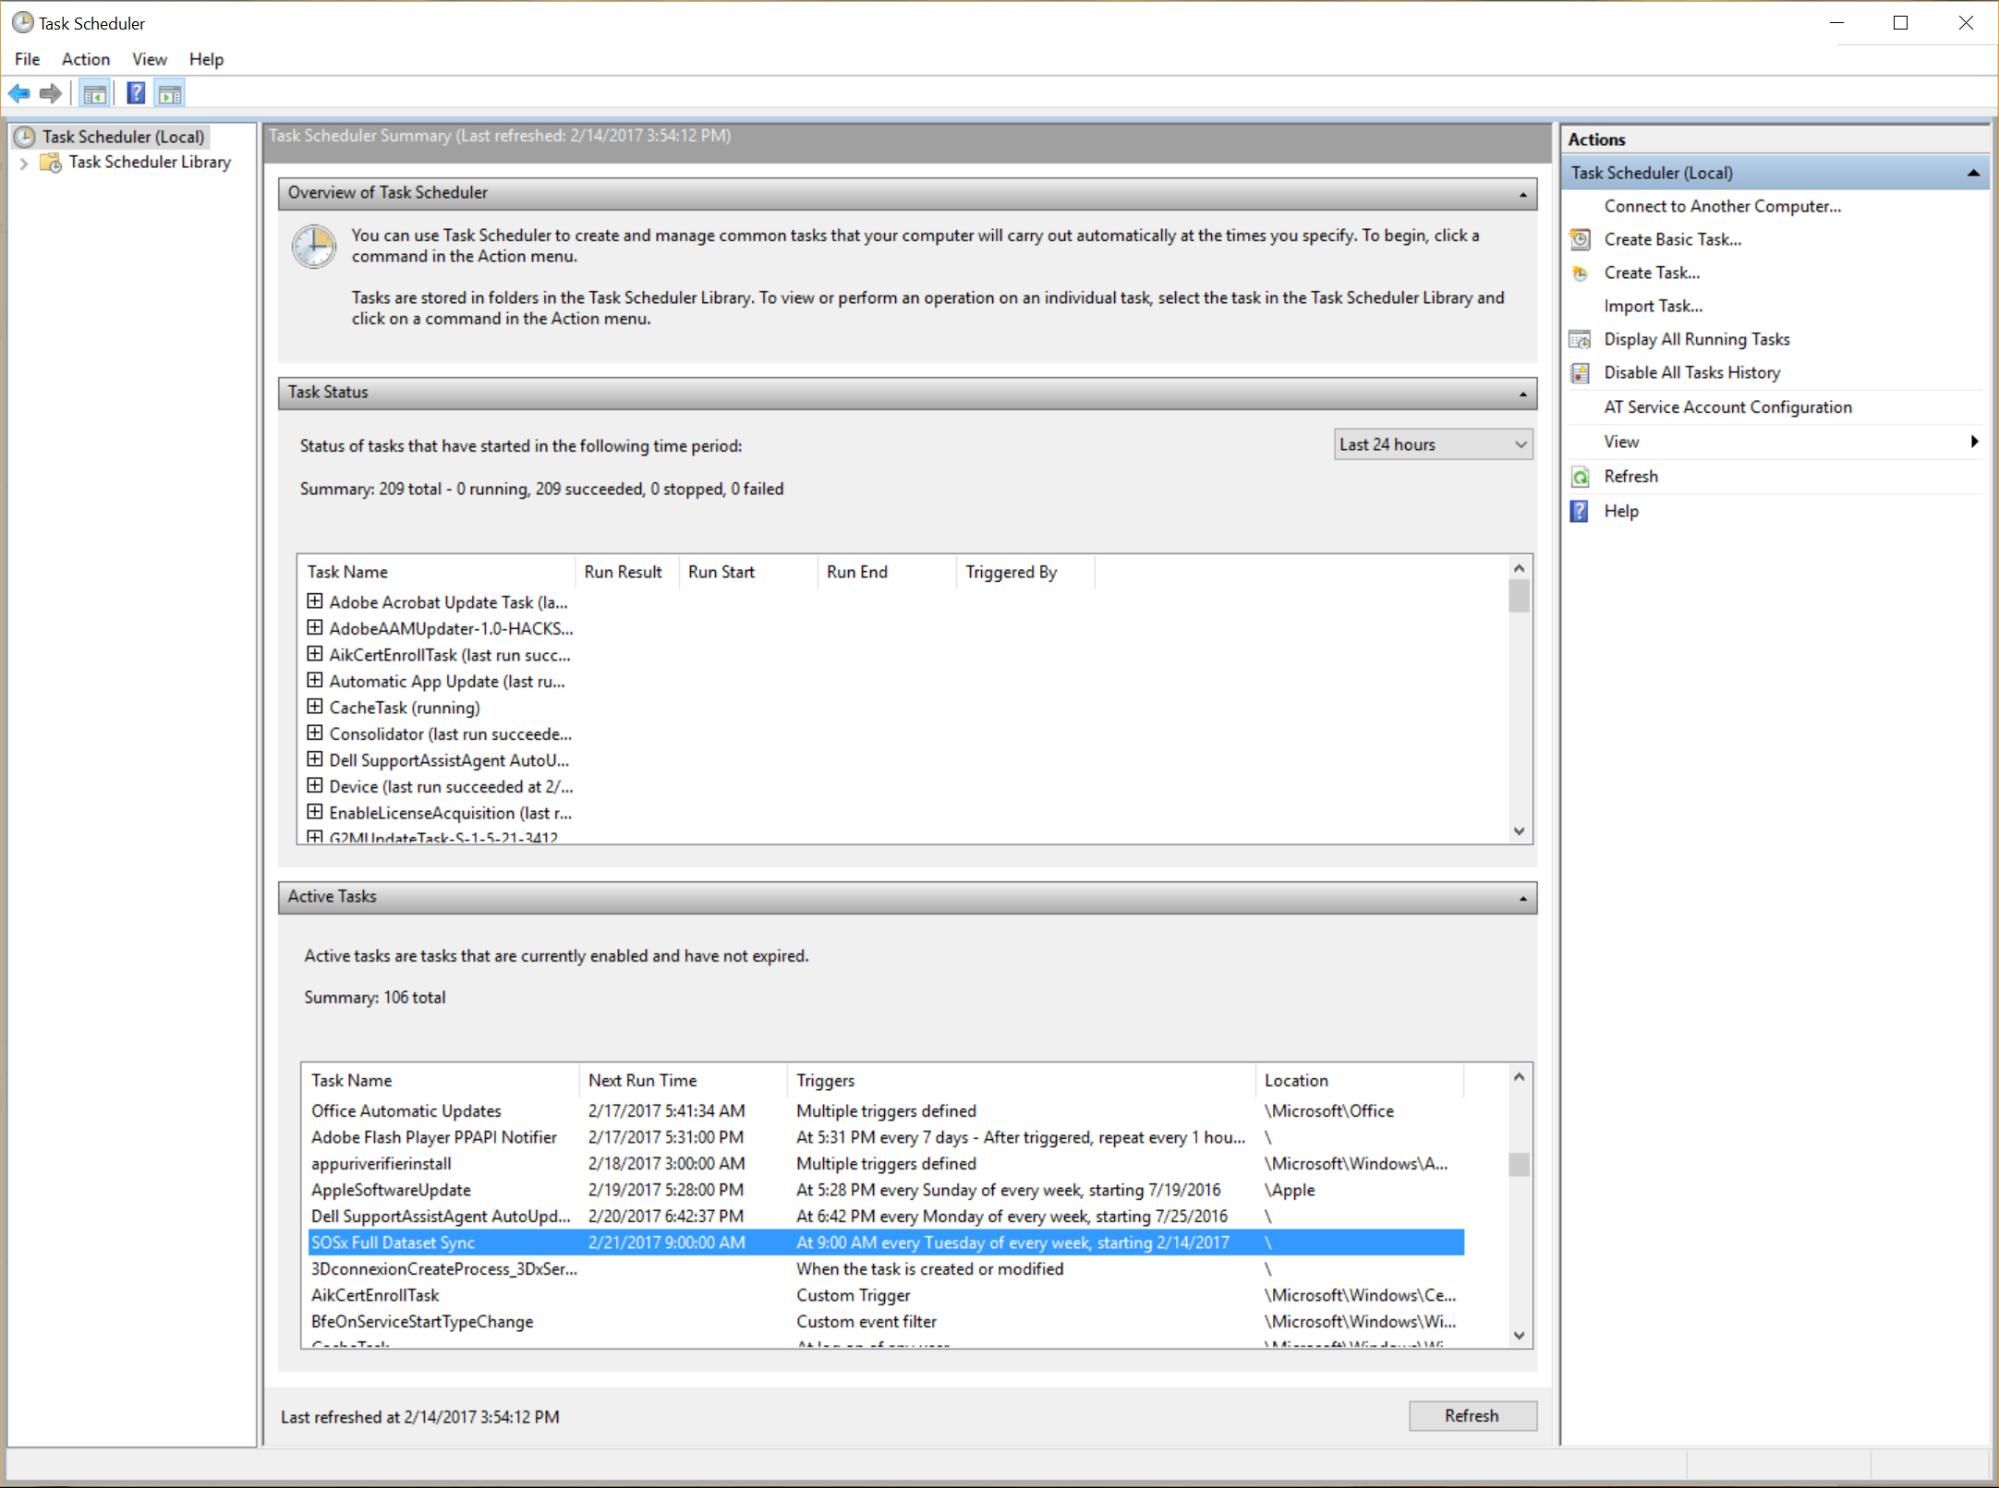
Windows Task Scheduler
Double-clicking on the SOSx Full Dataset Sync task pulls up the properties.
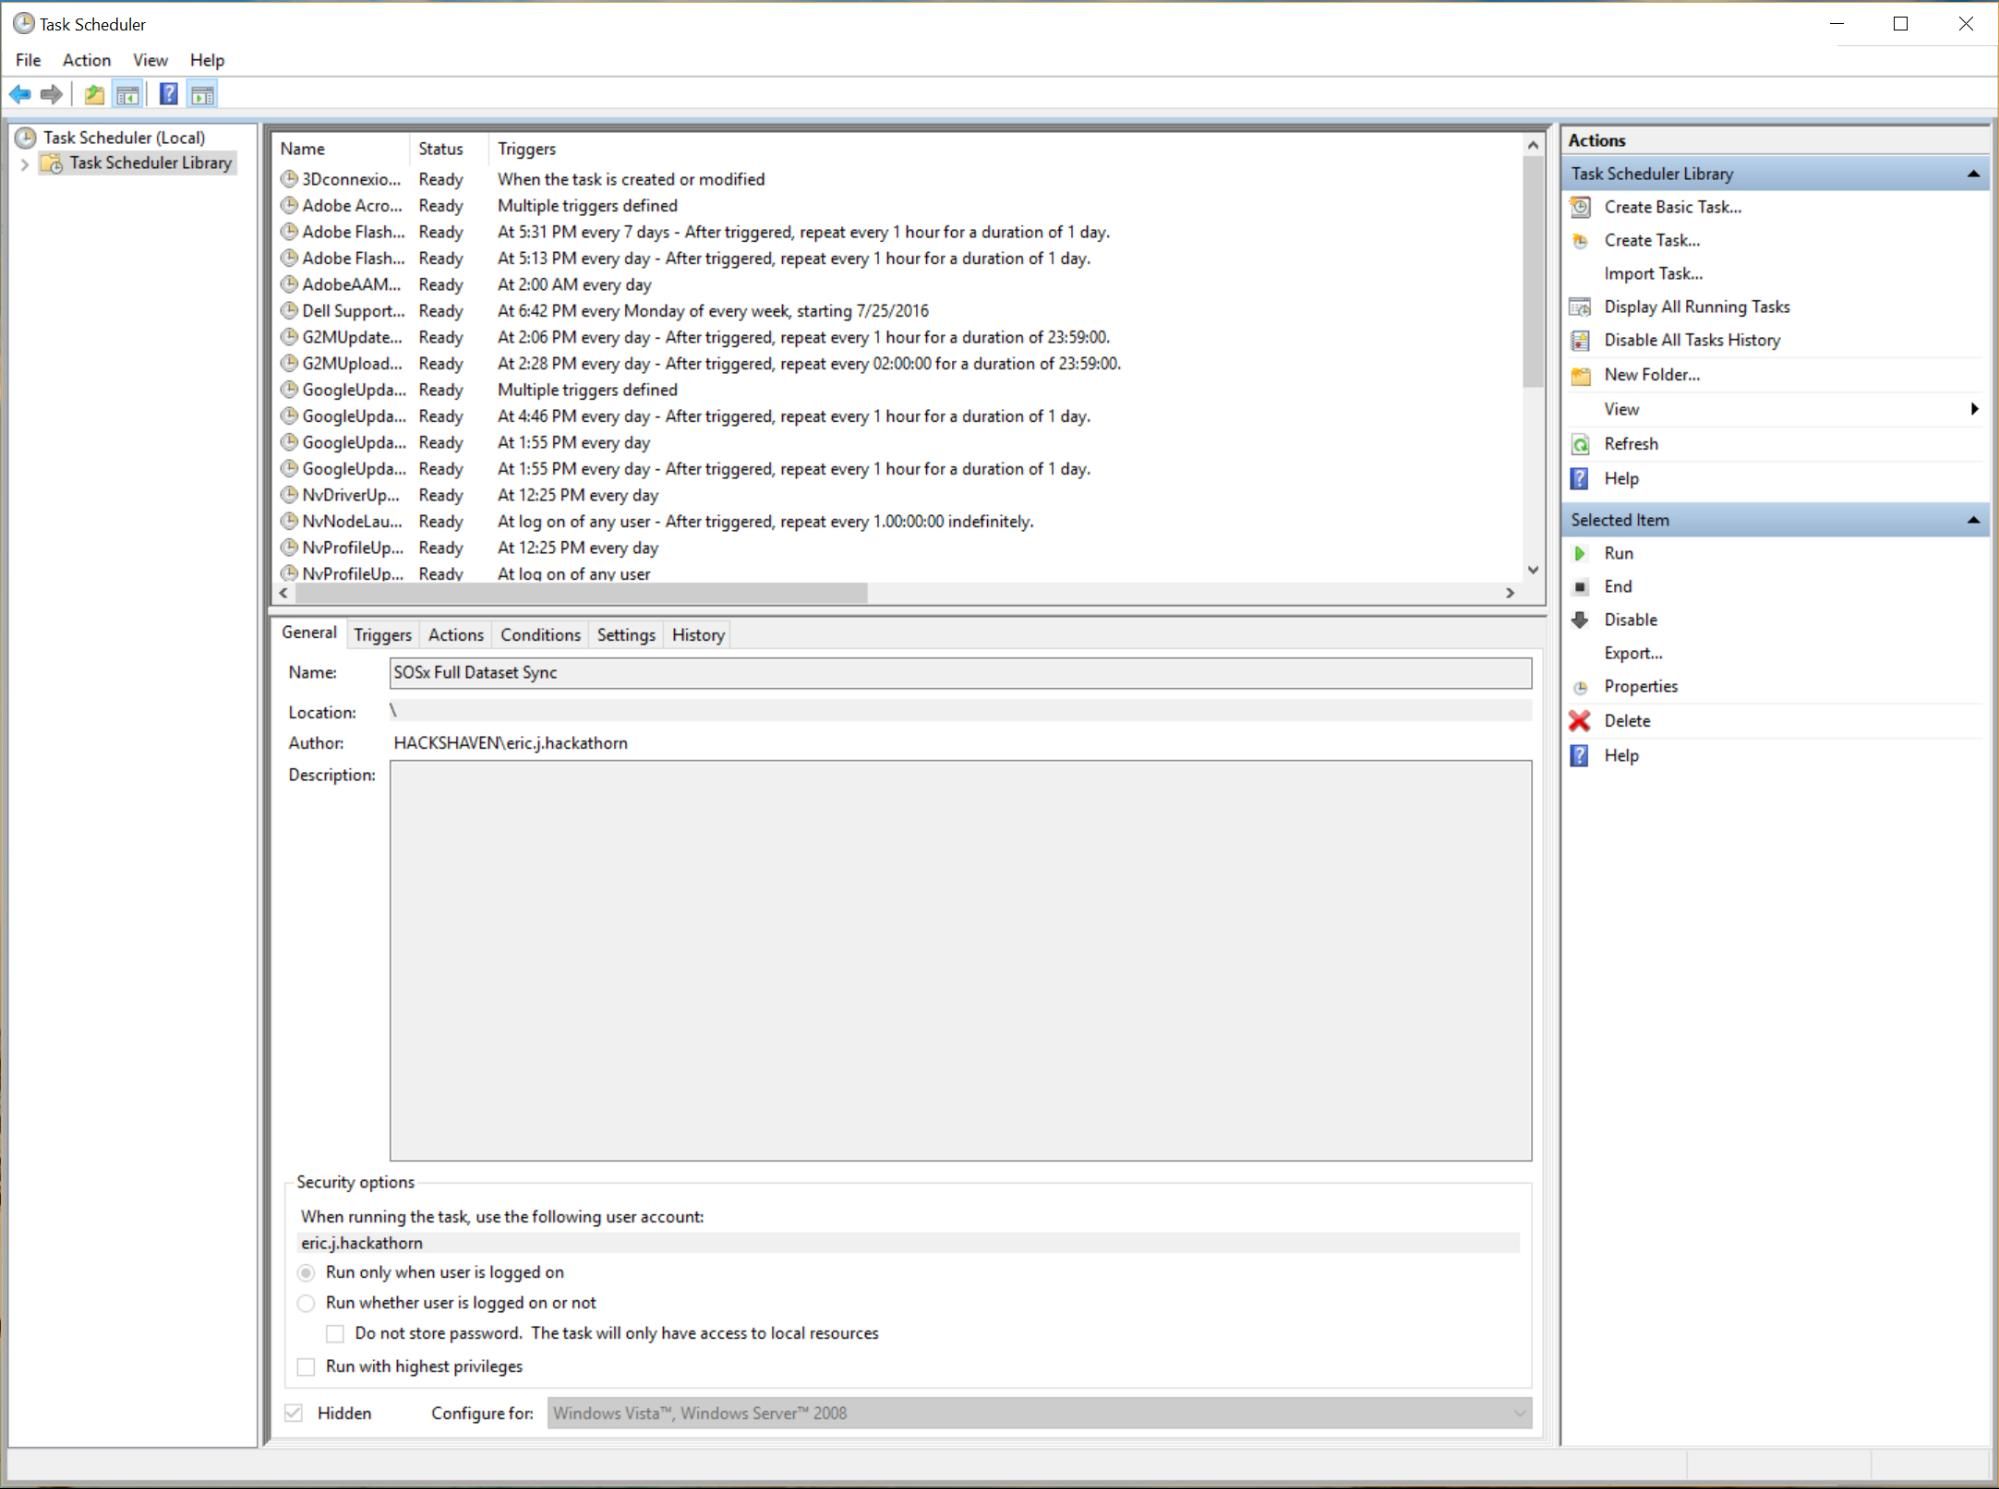
SOSx Full Dataset Sync task
Click on Properties in the Actions bar on the right to edit the task.
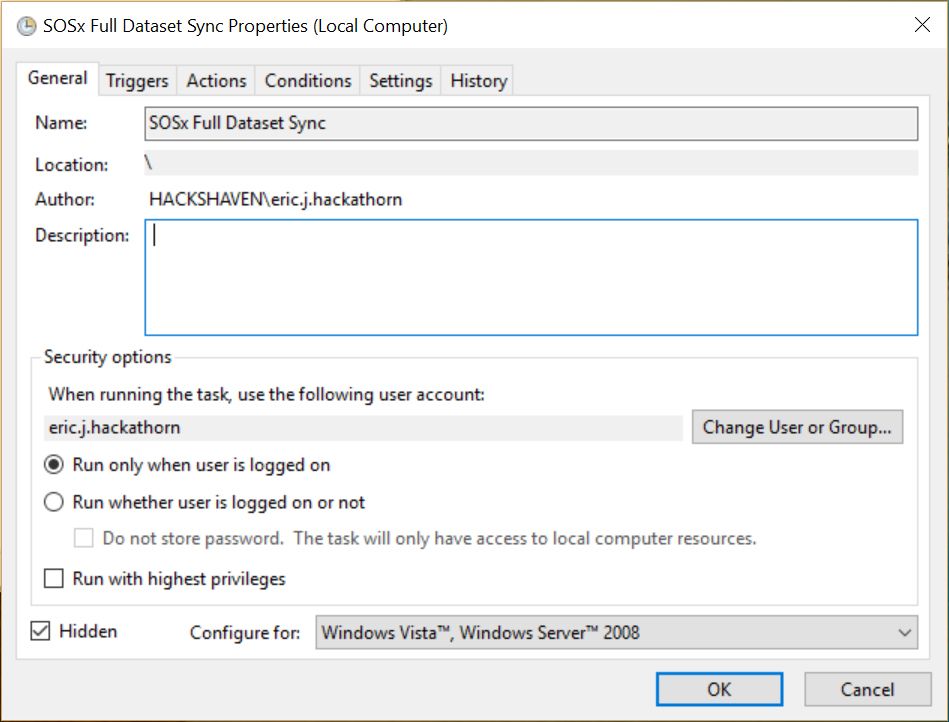
Properties for the SOSx Full Dataset Sync task
The Triggers tab will let you change the time and frequency of the scheduled full dataset sync.
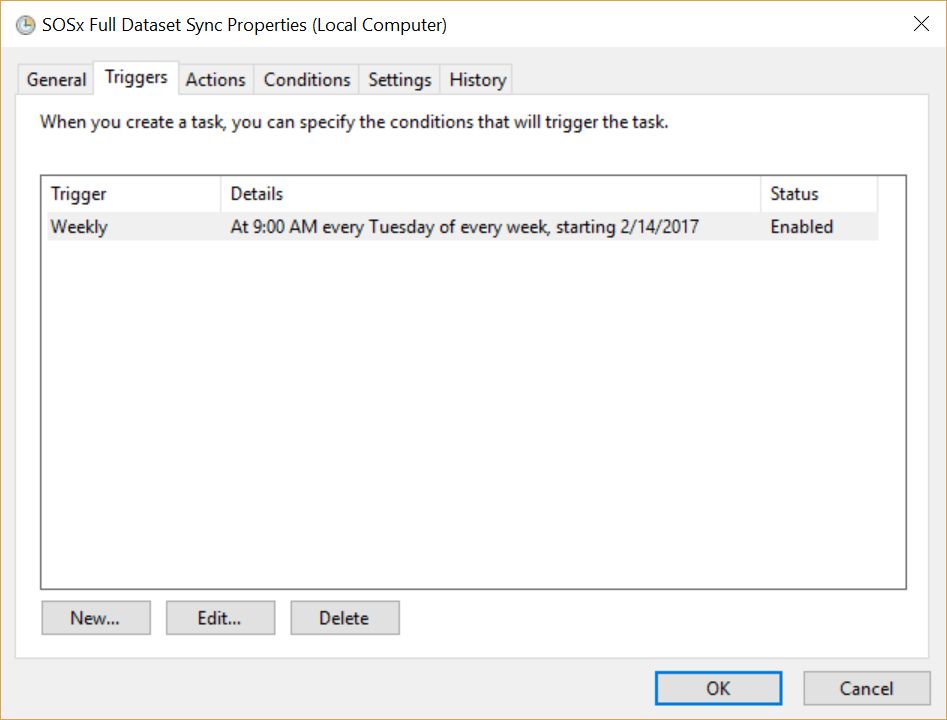
Triggers for the SOSx Full Dataset Sync task
Virtual Reality Support
Permalink to Virtual Reality SupportStarting in version 1.4 SOS Explorer® (SOSx) offers full support for virtual reality (VR). This feature requires the following additional hardware:
Follow the setup instructions included in both products and ensure the hardware is operational. Next run the Configurator program, check the Use VR box to enable VR, and click the Save button to save configuration options. At this time HTC Vive is not supported.
When you run SOSx with VR enabled on a system where Rift has been installed, you have the option of putting on the Rift headset to experience SOSx. With the Rift on, you will see the Earth in the distance and you will also see a virtual version of your hand. If you extend your index finger, you can touch buttons to activate them. When first starting SOSx, you will see two buttons in the main panel floating in front of the Earth: a Search button and a Navigate button.
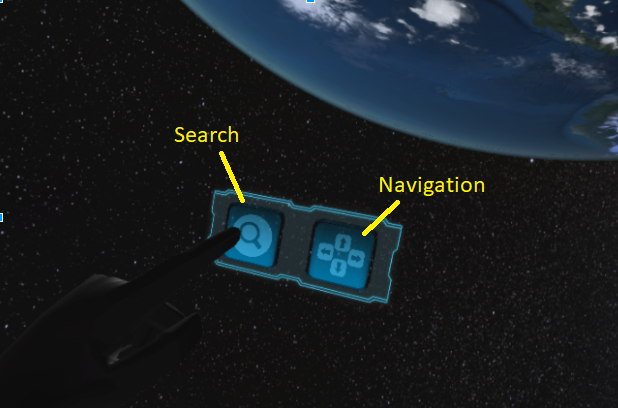
SOSx controls in virtual reality
Search
Permalink to SearchIf you press the Search button, the Search Window appears with categories of datasets for you to choose among.
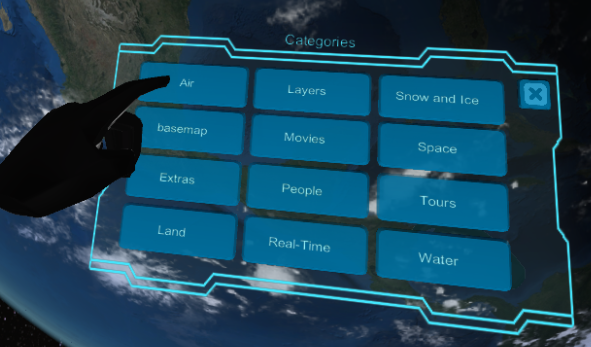
Dataset categories for searching
If you touch the Air button, for example, you’ll see datasets in that category.
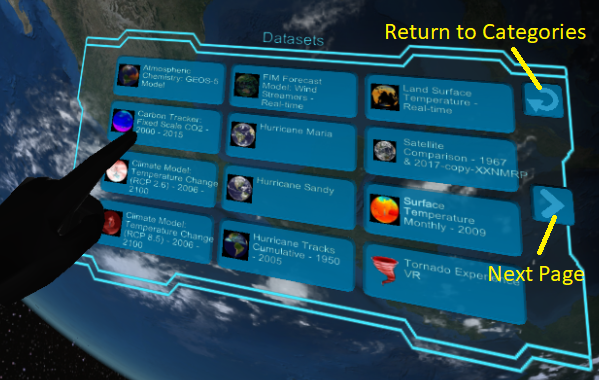
Air datasets
Dataset Controls
Permalink to Dataset ControlsYou can touch a dataset button to open that dataset. Note that you will see the dataset in your Rift and any user at the touch screen will also see the dataset load. If you load a dataset that can be animated (e.g., a dataset with multiple images, one for each time) then you’ll see a legend on the left, and below the main panel you’ll see the Animation window. Press the buttons to pause, rewind, advance frames, etc.
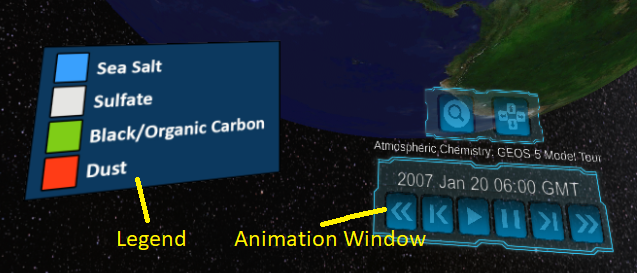
Panels visible when an animatable dataset is selected
Navigation
Permalink to NavigationIf you press the Navigation button with your finger, the Navigation window appears. Use this window to rotate the globe and zoom in/out.
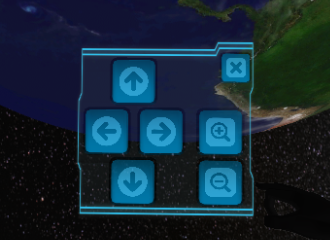
Virtual reality navigation controls
360 Degree Content
Permalink to 360 Degree ContentIf you load a tour with 360 degree content (bubbles) like the Florida Keys National Marine Sanctuary Tour, you’ll see a VR window that enables you to choose which 360 degree “bubble” to fly into.
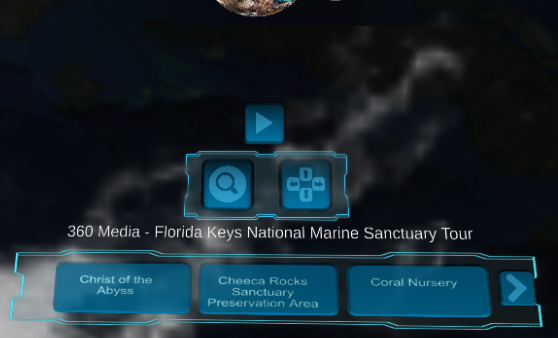
“Bubble” selector for a 360 degree tour
If you press the Christ of the Abyss button with your finger, for example, you will fly into that 360 degree bubble and can look around. Once inside the bubble, you can exit back out by touching the Exit 360 Bubble button.
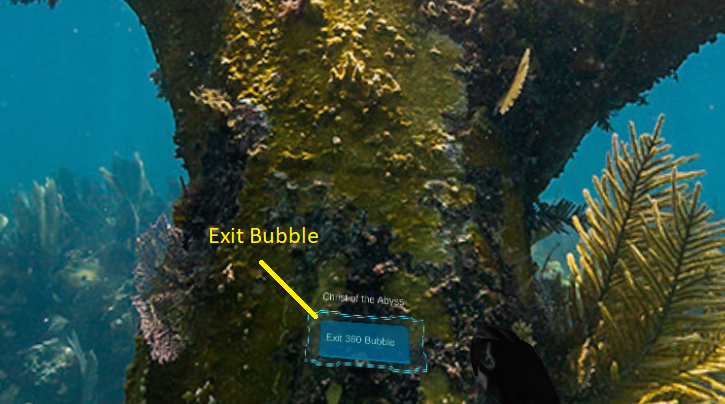
Exit 360 bubble button
Updating SOSx
Permalink to Updating SOSxOn occasion the SOS team will release updates to SOS Explorer®. If you are connected to the Internet SOS Explorer® will check to see if there are updates available and automatically patch the application. You can observe the progress in the SOS Explorer Auto Patcher.
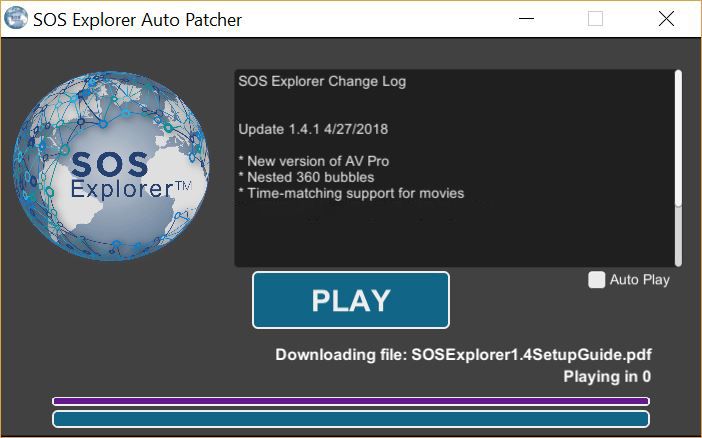
SOS Explorer Auto Patcher window