Dataset Mode Tutorial
View an Existing Dataset
Permalink to View an Existing DatasetIn the Menu Bar, click DatasetOpen (or you can click the Open Shortcut if in Dataset Mode). Browse to a dataset folder of interest. Select the dataset’s playlist.sos file and click Open. The path to the dataset you just opened is displayed in the Status Bar on the bottom left corner of the UI. The dataset imagery will open in the Preview, and the Tabs and Track View will get populated with the dataset’s attributes. Use the Playback View controls to animate through the dataset.
Modify a Dataset
Permalink to Modify a DatasetFor global modifications to a dataset such as frames per second, dwell time, etc., select the Animation Tab, modify the desired attributes, and re-run the animation. When attributes are modified in the other global tabs (About, Global, and Description), the Preview and Track View in the VPLE are not affected, even when you re-run the animation, as they are not applicable in the flat-screen preview. However, when the dataset is saved, changes made to attributes in these tabs will show up appropriately in SOS and on the iPad SOS Remote app.
To modify an Element, click on an Element in the Preview or Track View. For Layers and PIPs, a yellow corner appears in the bottom right corner of the Element in the Preview to indicate that the Element can be rescaled by clicking and dragging on the corner (note that the Element’s aspect ratio is maintained when using the mouse to resize). You can also use the mouse to reposition an Element in the Preview. Base Layers cannot be resized and cannot be repositioned. Labels and Captions can only be resized in their height dimension — their width is automatically computed.
When you select an Element, the Element tab is brought to the forefront and shows all the attributes that can be modified for that Element. Changing attributes such as the data file, size, position, opacity, etc. will update it in the Preview either immediately or during playback.
Add New Elements to a Dataset
Permalink to Add New Elements to a DatasetIn the Add View, click the desired Element type to add it to your dataset. For Layers, a message prompt will first ask you if the media you want to add is a File (ex. a single image or a movie) or a Directory (eg. a directory of image frames). For PIPs, a message prompt will first ask you if the media you want to add is a File, Directory, or Text (see the Creating Text PIP Elements section for more info). For all Elements, a file browser will pop up where you can navigate to your data of interest.
Filters have been added to the file browser depending on the type of data you are trying to open. So, for example, when adding Audio, you will only see audio files (.mp4, .mp3, etc.) in the file browser; for Labels, you will only see .txt files; and for Captions, you will only see .srt files. Once you select Open, a new Element will be added to the Track View and the Preview, and the Element tab will open up with the new Element’s default attributes populated.
Create a New Dataset
Permalink to Create a New DatasetIn the Menu Bar, click DatasetNew (or you can click the New Shortcut if in Dataset Mode). Add Elements to your dataset as described in the Add New Elements to a Dataset section. Edit the About, Global, Animation, and Description tabs as necessary to describe your dataset.
When creating a new dataset, at a minimum, a Name must be specified in the About Tab and at least one Layer must exist.
Save a Dataset
Permalink to Save a DatasetClick the DatasetSave button in the Menu Bar (or you can click the Save Shortcut if in Dataset Mode). If you have modified a NOAA-managed dataset, a message prompt will pop-up explaining that this is a NOAA-managed dataset and it cannot be modified, but it can be copied to another folder. Follow the prompts to proceed. If you click the Save button and you have modified an existing dataset that is not NOAA-managed, the dataset will save all your changes to your dataset’s playlist.sos file that you originally opened.
If you click DatasetSave As, select a folder in which to save your dataset. By default, the file browser opens up into the /shared/sos/media/site-custom/ folder, which is the folder where all custom datasets should be saved. Custom datasets should only be saved here so that the SOS database can be updated with your site’s custom datasets.
If you want to save a new dataset to a folder that does not exist, click DatasetSave As, and then, in the file browser that pops up, click the Create New Folder button in the top-right hand side. Enter a folder name, press Enter, and then press Save.
Creating Text PIP Elements
Permalink to Creating Text PIP ElementsA Text PIP is a special kind of PIP that displays text only. A Text PIP has all the same attribute specifications as a normal PIP, such as height, opacity, and fadein time.
Rather than using an image editing program to create text and save it as an image file for a PIP, you can enter text directly into the PIP Text Editor and save the Text PIP to your SOS dataset. A Text PIP gets written to an html file. You should only use the Text PIP Editor to create and edit Text PIP files, and you should not create or edit it by hand.

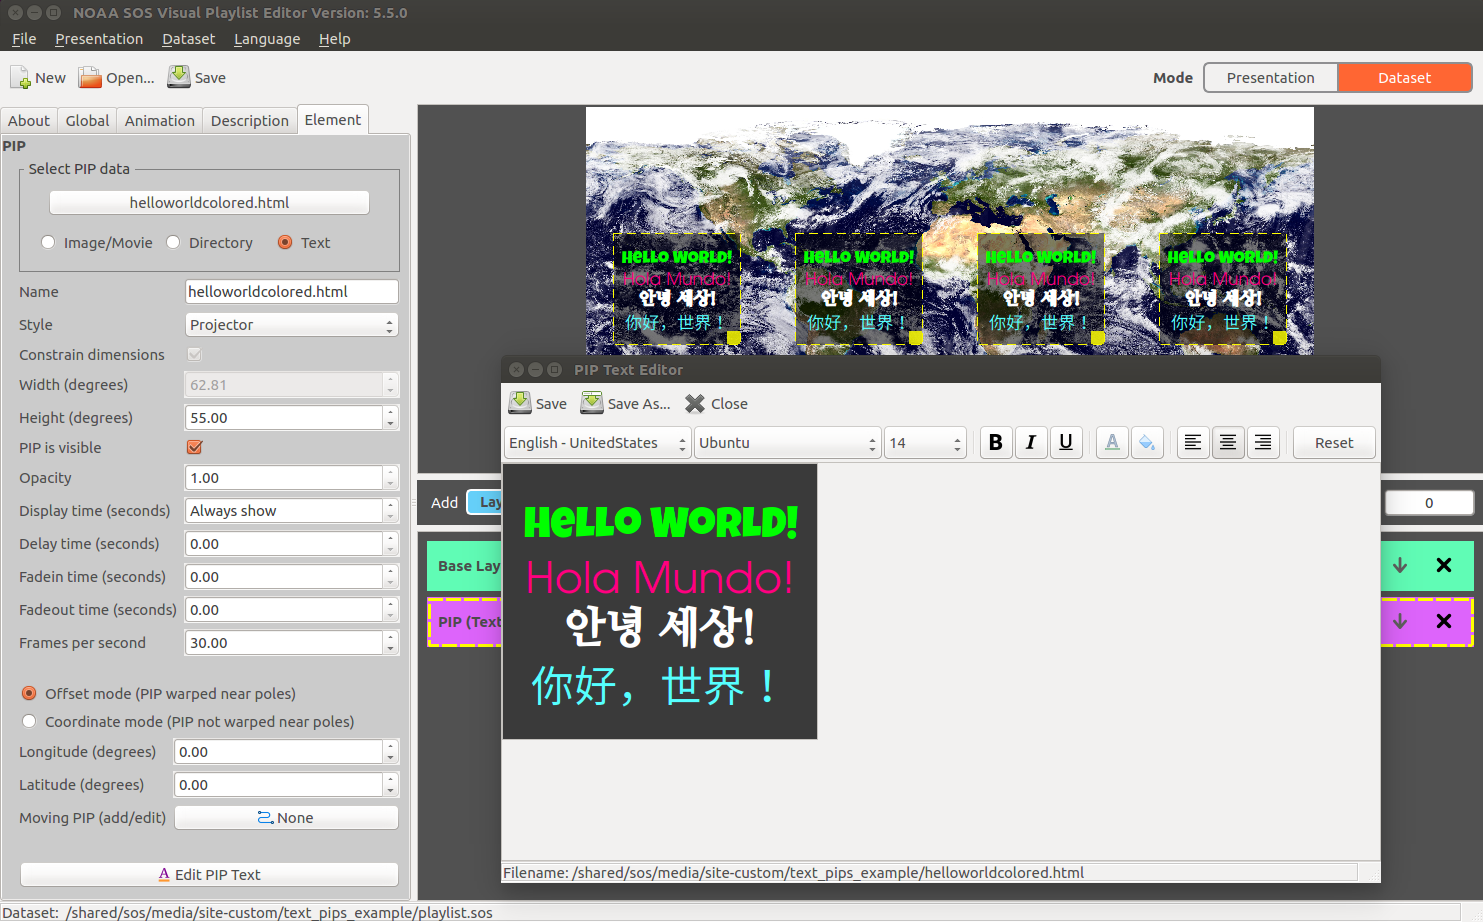
Pip Text Editor dialog window

An example Text PIP
SOS Configuration for Optimal Text PIP Resolution
Permalink to SOS Configuration for Optimal Text PIP ResolutionBy default, Text PIPs are optimized for SOS displays with 4 projectors where each projector has a resolution of 1920x1200. If your SOS display has a different configuration (i.e. fewer projectors or a different resolution), please configure all fields in the Projectors section of the SOS Configuration Manager to obtain the ideal text resolution for your SOS display.
Add a Text PIP
Permalink to Add a Text PIPTo add a Text PIP to your dataset, click the PIP button in the Add View, and select the Text option when prompted. At the next message prompt, select the File option if you are adding an existing Text PIP, or select the Create option if you are creating a new one.
When a Text PIP is added, a new track lane called PIP (Text) is added to the Track View, a placeholder image that says PIP Text (if creating a new one) or the actual text (if adding an existing one) is added to the Preview, and the PIP Text Editor pops up. You cannot set the width of a Text PIP as it is automatically computed at the time of rendering onto SOS, but you can set the height as you would any other PIP.
Edit a Text PIP
Permalink to Edit a Text PIPTo edit a Text PIP, click the Text PIP in the Track View or in the Preview to bring up the Element tab. Click on the Edit PIP Text button on the bottom of the tab to bring up the PIP Text Editor.
First, select the language you are going to write your text in from the Language drop down menu. (By default, each time the Text PIP Editor first pops up automatically, it will auto-select the language currently set in the Language menu of the VPLE’s Menu Bar.) Selecting a language filters the Font drop down menu to show only those fonts on your system that will support characters in that language.
The Font Size is used to indicate how big characters in the text are relative to each other, and do not represent the actual size of the text that will be shown on SOS. The final dimensions of a Text PIP, regardless if it is a single line or contains multiple lines, and regardless of the font sizes in the text, will have a height (in degrees latitude) equal to what you have specified in the Height (degrees) field of the PIP Element tab. In other words, the VPLE/SOS will proportionally scale all of your text to fit the height of the Text PIP, and it will dynamically compute the width of the Text PIP. As an example, if you are trying to create single line Text PIPs to label all the continents on the sphere, and you want the size of the text to look consistent across all the Text PIPs, do not change the Font Size for any of the Text PIPs (just leave at the default), and make the Height (degrees) of each of the Text PIPs the same.
You can set other attributes on the text like bold, italics, underline, alignment, text color, and background color. By default, the alpha channel (transparency) for the background color is set to 0 (fully transparent). The Reset button will reset the Text PIP Editor to all its default values.
If you want to write text in multiple languages in a single Text PIP, you must first select a Language, then select a supported Font, and then type or paste the characters into the Text PIP Editor. Alternatively, you can directly type or paste text of different languages into the Text Editor first. After that, for each set of text from a given language, you must select the language from the Language drop down menu, highlight the text that corresponds to that language, and then select the available font from the Font drop down menu so the text will change to that font.
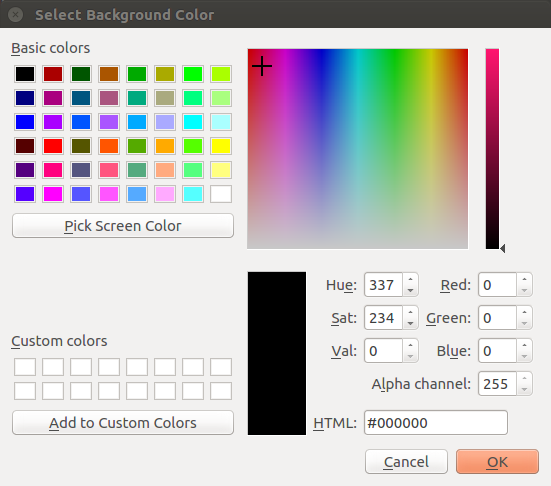
To change the color in a Color Dialog that pops up for the Text and Background Color buttons, you can:
- Select a predefined color from the Basic colors section
- Type in a Red/Green/Blue/Alpha value (range for each channel is 0-255)
- Type in an HTML value
- Use the gradient box on the right-hand side to select a color. Note that this gradient box works in conjunction with the vertical slider to the right of the box

In this example, notice how the cursor in the gradient box is placed in a red area, but the Red/Green/Blue channels are showing values of 0, and the currently selected color is showing black. This is because the vertical slider is set all the way to the bottom, at black. Adjust this slider to change the color.
Save a Text PIP
Permalink to Save a Text PIPClick the Save button to save the Text PIP. If an html file does not yet exist for this Text PIP, you will be prompted to enter a name for your file. Once you save, the full path of your Text PIP is indicated in the Status Bar at the the bottom of the Text PIP Editor. If you close the editor without saving the the text to a file, the Track Lane for the Text PIP will show the title unsaved_empty_text_file.html, which means no file exists for this Text PIP.
Add Custom Fonts to the PIP Text Editor
Permalink to Add Custom Fonts to the PIP Text EditorIf you want to use a font that is not shown in the Text PIP Editor, you can add a font file to the following folder on your SOS computer: /usr/local/share/fonts/. Only FreeType font formats are supported, such as .ttf, .ttc, .otf ( complete list of supported font format). Once you add a font, restart the main SOS GUI application.
Creating Moving PIPs
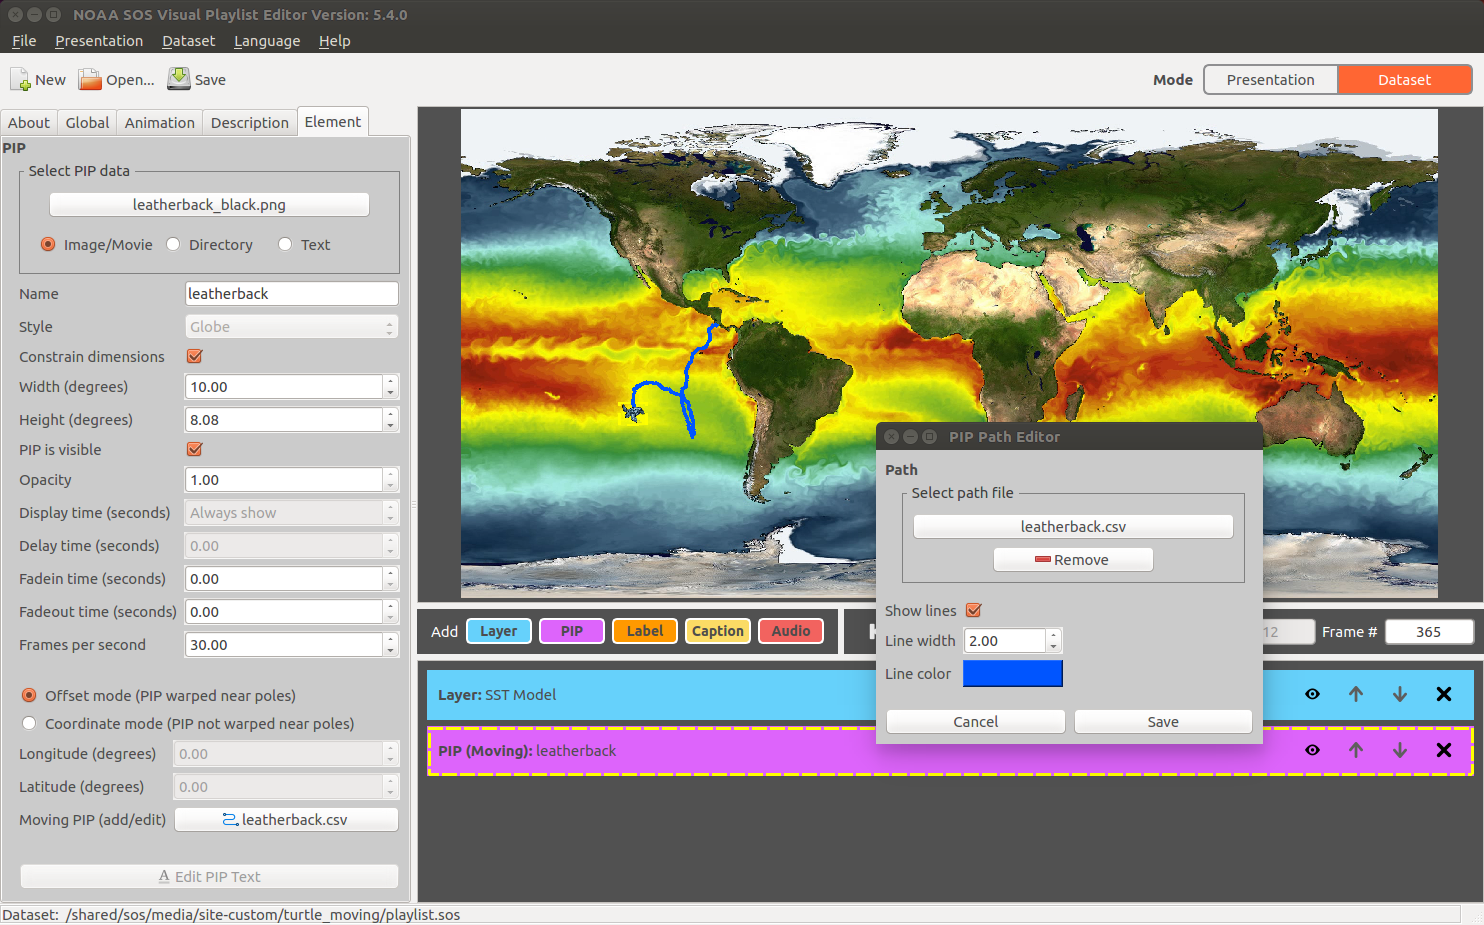
Permalink to Creating Moving PIPsEach type of PIP can be given a simple path file that contains coordinate locations that indicate how to automatically move the PIP on the sphere as the dataset is animating. The path file is a simple comma separated value file (.csv file format) that contains a list of increasing frame numbers, each with a latitude and longitude value. As the dataset is animating, the PIP will be moved to the location specified in the file that corresponds to the current frame being displayed on SOS. Option to render a line path that follows the moving PIP is provided and is turned ON by default. Use the Moving PIP (add/edit) button to open the PIP Path Editor to add/change/remove the path file as well as specify attributes for path line drawing.
For a full example on how to create a Moving PIP, including detailed documentation for creating the csv path file, please see Creating a Moving PIP.

PIP Path Editor dialog
Creating Label Elements
Permalink to Creating Label ElementsBy default, when you add a new Label Element to your dataset, the color of the label text will be white against a transparent background, and the text will be rendered using the Free Sans font. To edit the format of your label, simply click on the Label Element in the Track View to bring up the label’s Element tab, and then click on the Edit Label Format button. This will show the Label Editor, which functions similarly to the Text PIP Editor. A couple of things to note: The first line in the labels text file will be shown in the Label Editor, and you cannot modify this text. The purpose of the text is to get an idea of what the label will look like as you are formatting it. Also, when pressing the Save button in the Label Editor toolbar, the format gets saved automatically to the file labelformat.html without the option to rename the file from the UI.
Creating Caption Elements
Permalink to Creating Caption ElementsBy default, when you add a new Caption Element to your dataset, the color of the caption text will be white against a semi-transparent background, and the text will be rendered using the Free Sans font. To edit the format of your caption, simply click on the Caption Element in the Track View to bring up the caption’s Element tab, and then click on the Edit Caption Format button. This will show the Caption Editor, which functions similarly to the Text PIP Editor. A couple of things to note: The first line in the captions text file will be shown in the Caption Editor, and you cannot modify this text. The purpose of the text is to get an idea of what the caption will look like as you are formatting it. Also, when pressing the Save button in the Caption Editor toolbar, the format gets saved automatically to the file captionformat.html without the option to rename the file from the UI.