SOS Explorer® Exhibiting Options Guide
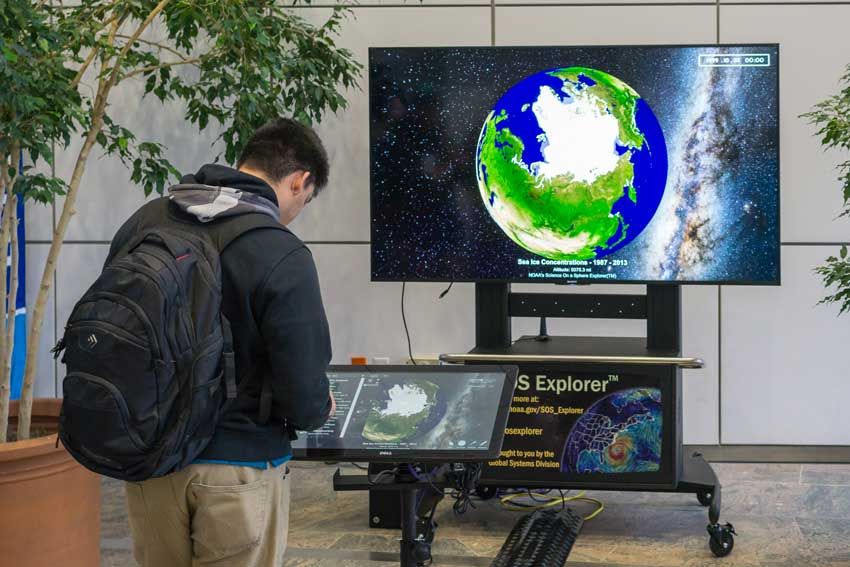
SOS Explorer® on a dual screen setup.
Introduction
Permalink to IntroductionSOS Explorer® (SOSx) has historically been used as a tool for public interactive exhibits, in museums for example, similar to Science on a Sphere but easier to acquire and takes up less space. With the release of SOSx 1.5.0 we have completely revamped the install process by using a new cloud-based delivery method. This means that you can fully install SOS Explorer® on your Windows computer with an internet connection without the need of any additional hardware or software. If you are looking to acquire a fully supported public exhibit, we recommend contacting sos.explorer@noaa.gov for distributor details, as the free version, accessed by downloading from our website has limited support.
If you haven’t already downloaded SOSx, you can do so here:
Since the new version of SOSx only includes a software install, this guide serves as a step-by-step process of the hardware installation and machine configuration you might need for the best public interactive exhibit experience. As part of our effort to increase accessibility for the software, we have removed several features that we previously included in pre-1.5.0 SOSx installs, which include the automatic setup of Exhibiting Features. These Features optimize the machine for exhibiting purposes. This guide will help you set these features up again manually.
Hardware Setup
Permalink to Hardware SetupAt the bare minimum, SOSx needs these System Requirements to run on a Windows-based computer. However, to set up an interactive exhibit, it is likely that you will need a setup that’s tweaked to your needs. For example, you might want to use a desktop computer with a large display and a touchscreen kiosk to facilitate the interaction with visitors.
In a two-screen configuration, you typically have one large display, such as a TV, connected via HDMI to the computer, and a smaller touchscreen, connected by a video cable and a USB cable to the computer. (The actual cables needed to connect a touchscreen can vary depending on the particular model of touchscreen chosen.) The SOSx computer needs to be connected to the internet via an ethernet cable. If your display lacks speakers, it is recommended that you buy them separately so that visitors can listen to audio.
You may also optionally connect a keyboard and mouse. This may be useful for maintenance, or for guests to control SOSx if you’re not using a touchscreen.
Wiring Diagram
Permalink to Wiring Diagram
SOS Explorer® two-screen wiring diagram.
Screen Resolution Settings and Multiple Monitors
Permalink to Screen Resolution Settings and Multiple MonitorsBefore running SOS Explorer®, the computer should be configured with the proper display configuration. The application expects two monitors to be attached. The main or primary screen should be the touch screen and the secondary screen should be the larger TV. To access the display settings right click on the desktop and choose Display settings.
Display Configuration
Permalink to Display Configuration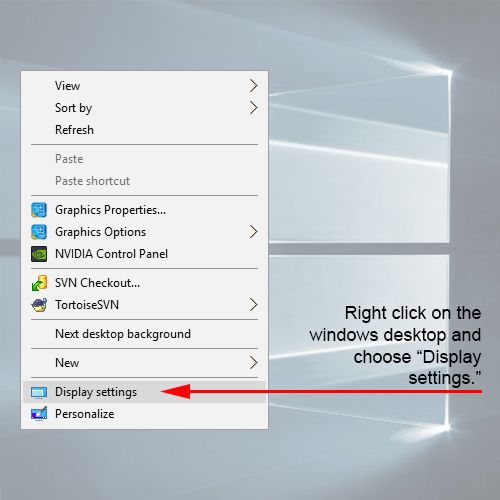
Windows desktop context menu
This will open the settings dialog window where you should try to match the settings outlined below.
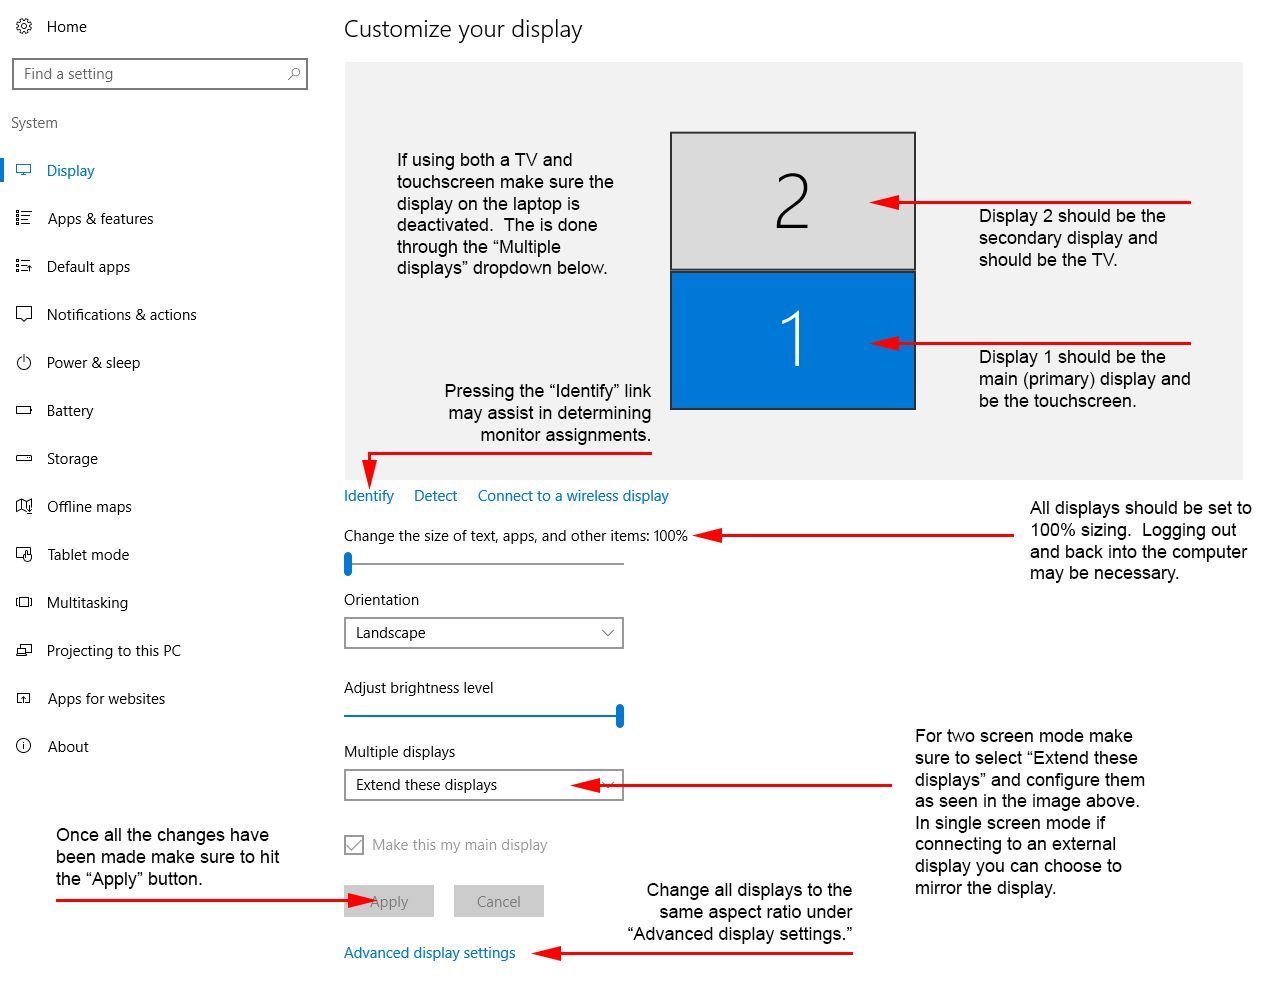
Windows display settings dialog window
In two monitor mode both monitors should be displayed with the main (primary) touchscreen appears below the larger secondary TV. Further all displays should be set to 100% sizing and the extended desktop mode enabled. Multiple displays should be set to Extend these displays. In single monitor mode there will be only one display shown. If using a set of virtual reality glasses they will not appear in this dialog.
Aspect Ratio Matching
Permalink to Aspect Ratio MatchingAccess Advanced display settings found at the bottom of the dialog window check to make sure that all the attached displays are running at the same aspect ratio. Typical resolutions include 1920x1080 (1080P) or 3840x2160 (4K or 2160P).
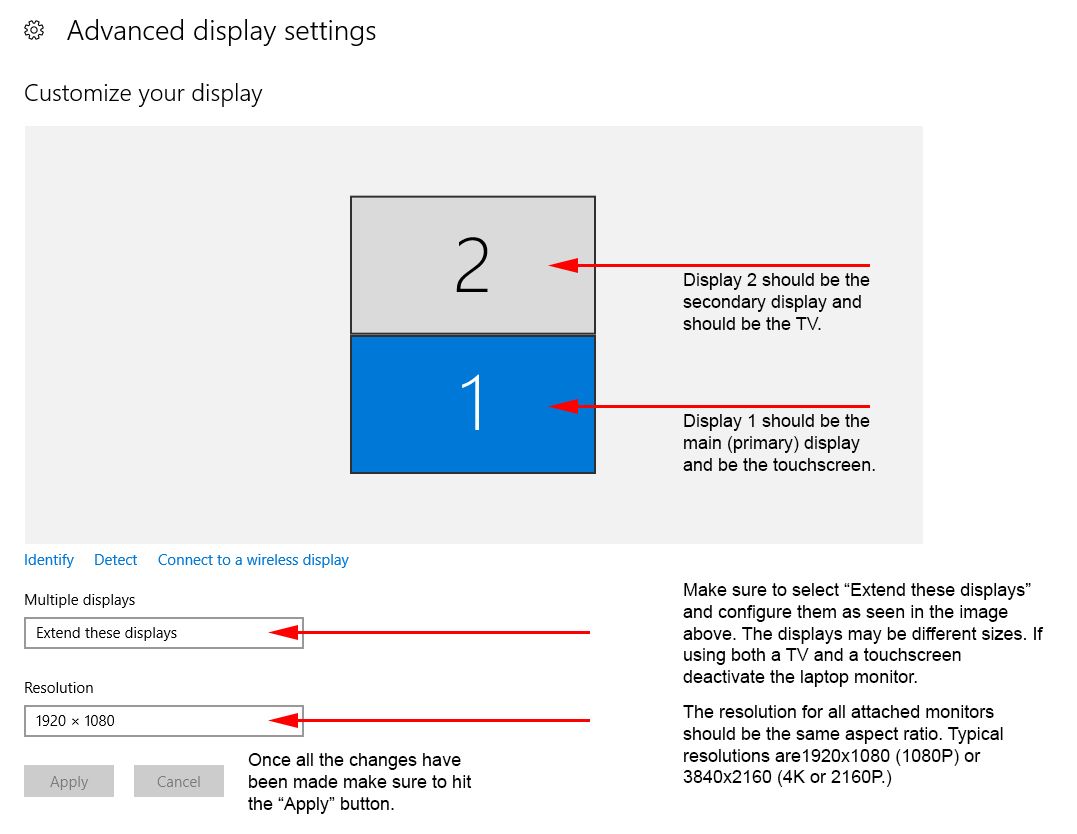
Advanced display settings dialog window
UI Scale Factor
Permalink to UI Scale FactorFor Dual Display (2K / 4K Monitors) setups: you will want to run the SOSx Config utility and edit the UI Scale Factor for displays 1 and 2. The recommended settings are 1.65 for dual 2K monitors and 1.65 and 3.0 for 2K / 4K setups.
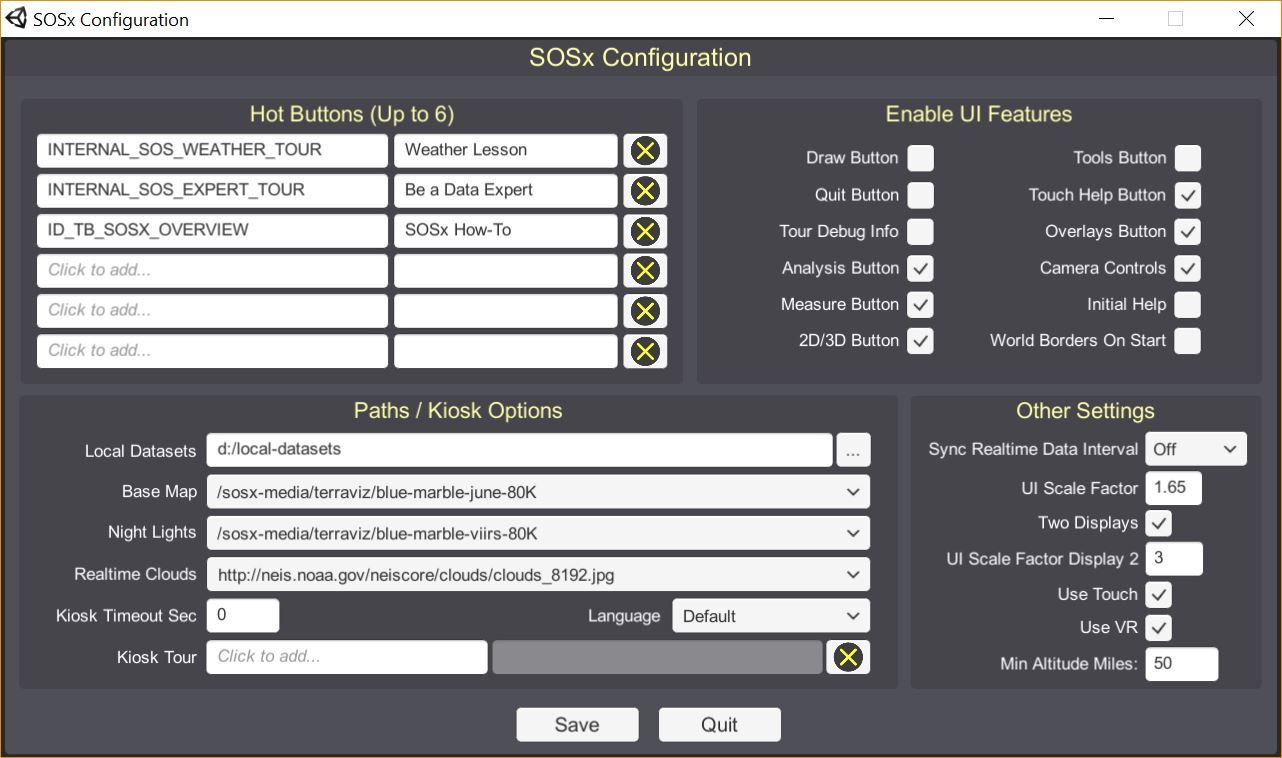
SOSx Config dialog window
Machine Options
Permalink to Machine OptionsDisabling the Edge Swipe Gesture
Permalink to Disabling the Edge Swipe GestureIf your Windows computer has a touch screen, users can swipe on different edges for different behaviors described below.
- Swipe in from the right side of your screen to open the action center.
- Swipe in from the left to view all your open apps in task view.
- Swipe in from the top to view a full screened app’s title bar while tablet mode is on.
- Swipe in from the bottom to view the taskbar in full-screened apps while tablet mode is on or when the taskbar is auto-hidden.
- Open the Registry Editor: Press the Windows key + R, type regedit, and press Enter. You might need to provide administrator permission to open the registry editor.
- In the Registry Editor window, navigate to the following key:
HKEY_LOCAL_MACHINE\SOFTWARE\Policies\Microsoft\Windows\EdgeUI- If the EdgeUI key doesn’t exist, you’ll need to create it. Right-click on the Windows folder, select New, and then Key. Name the new key EdgeUI.
- Create a new DWORD value:
- Right-click on the EdgeUI key in the left pane.
- Select New -> DWORD (32-bit) Value.
- Name the new value AllowEdgeSwipe
- Set the value data:
- Double-click on the AllowEdgeSwipe value in the right pane.
- In the Value data field, enter 0 (zero) to disable edge swipes.
- Click Ok to save the changes.
You have successfully disabled the Edge Swipe Gesture. To re-enable it, follow part 4 but instead of inputting 0 as the Value data, input 1, and select Ok.
Enabling the High Performance Power Plan
Permalink to Enabling the High Performance Power PlanEnabling the High Performance power plan will make sure your computer is always running at its best performance while exhibiting, ensuring a smooth and responsive application.
- Open the Settings App. You can search for it in the Windows search bar or
open it using Windows + i.
- Alternatively, if you are using Windows 8 or earlier, open the Control Panel.
- Go to System.
- Click on Power.
- Under Power Mode you will see a dropdown with the available plans.
- Make sure you have the Best Performance plan selected.
To revert back to another power plan, you can follow the steps until step 4, and select another power plan on the list.
Disabling the Screen Saver
Permalink to Disabling the Screen SaverDisabling the Screen Saver will make sure your monitor activates a Screen Saver animation during exhibiting.
- Open the Settings app. You can search for it using the Windows search bar or press the Windows key + i.
- Click on Personalization.
- On the right side, scroll down and click on Lock Screen.
- Under Related settings at the bottom, click on Screen saver settings.
- In the Screen saver dropdown menu, select (None). This option disables the Screen Saver completely.
- Click Apply and then Ok to save the changes.
To re-enable your screen saver, simply follow the above steps, and under the Screen saver drop down choose a specific screen saver.
Restart Your Computer
Permalink to Restart Your ComputerFinally, to make sure all your changes are applied correctly, make sure to restart your computer before opening up SOS Explorer® for exhibiting.
Credits
Permalink to CreditsThe following are icons used in the creation of this guide. Specifically, they were used to create the Wiring Diagram shown above.
- Globe Icon made by Nsu Rabo Elijah from www.flaticon.com
- Power Strip Icon made by Vectors Tank from www.flaticon.com
- Keyboard Icon made by xnimrodx from www.flaticon.com
- Cloud Icon made by ranksol graphics from www.flaticon.com
- Computer Screen Icon made by hqrloveq from www.flaticon.com
- Computer Icon made by AbtoCreative from www.flaticon.com
- TV Icon made by Freepik from www.flaticon.com